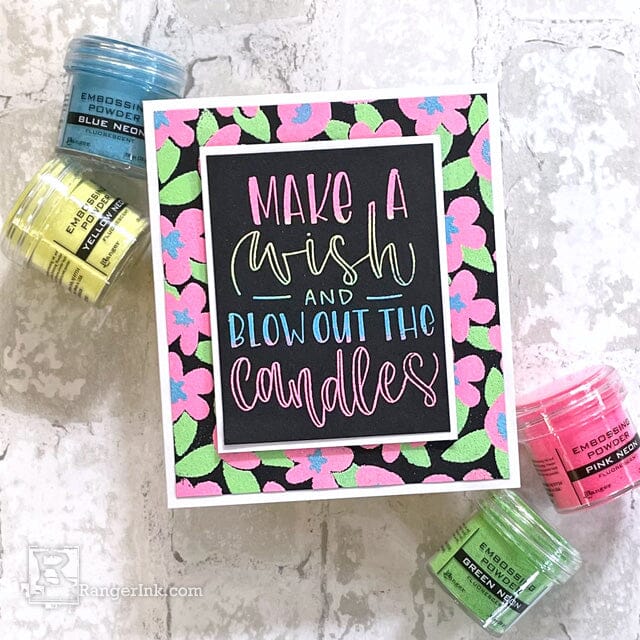
Elevate Your Birthday Cards with Neon Embossing Powder! Lauren Bergold is here to show you how to create a fun, bright birthday card using the Ranger Neon Embossing Powder Set. Get ready to add a pop of color to your celebrations!

Neon Embossing Powder Birthday Card by Lauren Bergold
- Materials
- Instructions
Letter It™ Clear Stamp Set - Let's Party
Neon Embossing Powder Bundle
Emboss It™ Dabber Clear
Emboss It™ Ink Pad Clear
Ranger Heat It™ Craft Tool
Wendy Vecchi MAKE ART Stay-tion
Tim Holtz Distress® Black Heavystock
Simon Hurley create. Stark White Cardstock
Dina Wakley MEdia Kraft Paper Pack
Letter It™ White Foam Roll Tape
Ranger Artist Brushes
Letter It™ Fineliner Black Pens
Instructions
Nothing brightens up a birthday better than a card full of bold, beautiful blossoms, and neon colors take them to the next level!

Step 1: Gather Materials: Ranger Neon Fluorescent Embossing Powders in Pink, Yellow, Green and Blue; Simon Hurley create. Pretty Petals three-part Layering Stencil Set; Letter It Clear Stamp Set: Let's Party; Emboss It Clear Dabber and Ink Pad; Ranger Heat It Craft Tool; black and white cardstock.

Step 2: Place the flower Stencil from Simon Hurley's Pretty Petals Layering Stencil Set on a piece of Tim Holtz Distress Black Heavystock and secure to Wendy Vecchi's MAKE ART Stay-tion with the magnets. Use the Emboss It Embossing Dabber to apply clear embossing ink carefully through the stencil. Use an up and down motion to dab the ink on, taking care not to slide sideways, as the ink may go under the stencil. Carefully remove the stencil by lifting it directly upwards, so that you don't smear the ink. Sprinkle with Ranger Pink Neon Embossing Powder, tap off the excess, and return it to the jar. With a small dry brush, remove any stray flecks of powder. Use the Ranger Heat It Craft Tool to melt the powder, then allow the embossing to cool completely before moving on to the next step.

Step 3: Place the leaf stencil from the Pretty Petals set on top of your pink embossed flowers, taking care to line it up as precisely as possible. (Note that the set's name, "Pretty Petals" is embossed in the lower right corner of each stencil, to help you orient it correctly!) Use the Emboss It Dabber to apply clear embossing ink through all the leaves on the stencil. Lift the stencil off carefully and sprinkle with Green Neon Embossing Powder, tap off the excess, clean up with the small brush if needed, and use the Heat It Tool to melt the powder. Set aside and allow to cool completely.

Step 4: Place the flower center stencil on top of the embossed piece. Use the Dabber to apply Clear Embossing Ink and lift the stencil off carefully. Sprinkle with Blue Neon Embossing Powder, tap off the excess, use the brush to clear any stray bits of powder, and melt the powder with the Heat It Tool.


Step 5: Stamp, "Make a Wish and Blow Out the Candles" from Letter It's Let's Party Clear Stamp Set using an Emboss It Clear Ink Pad. Sprinkle the Neon Embossing Powders one by one to the horizontal lines of text that make up the word art design, starting with Pink Neon, then adding Yellow Neon, then Green Neon, then Blue Neon and finally Pink Neon again at the bottom. Gently tap the excess powder off onto a sheet of paper, use a small brush to remove any stray flecks of powder and melt with the Heat It Craft Tool. (NOTE: When using multiple shades together, DO NOT try to return the powders to their original jars! Instead, set them aside and use them to emboss other stamped, stenciled or doodled images. Note that the more separated you keep the colors, the more of a rainbow effect you'll get; while mixing them together will create a more consistent --but variegated-- colorway.)

Step 6: Trim the embossed flower background to 4.75 x 5.5" and affix to a 5 x 5.75" card made from Simon Hurley create. Stark White Cardstock. Trim the word art piece to 3.25 x 4"and mat on a scrap of white cardstock. Add the word art to the center of the flower panel using small pieces of Letter It White Foam Roll Tape.

Step 7: Experiment using the same combination of powders on kraft and white cardstock. Notice how different the Neons look when the background color is changed. For extra variety, use a Letter It Fineliner to add outlines or doodles to the design. Stamp interior sentiments, sign the cards, and send them to your favorite birthday buddies.
Your Cart
- Choosing a selection results in a full page refresh.


 My name is Lauren Bergold, and I live in central New Jersey with my husband of 30+ years and A LOT of art supplies! My favorite medium is paper, and I especially love making cards. I teach papercrafting classes, as well as collecting and compiling vintage and found papers. You can find me on my blog,
