by Kassa Hayselden
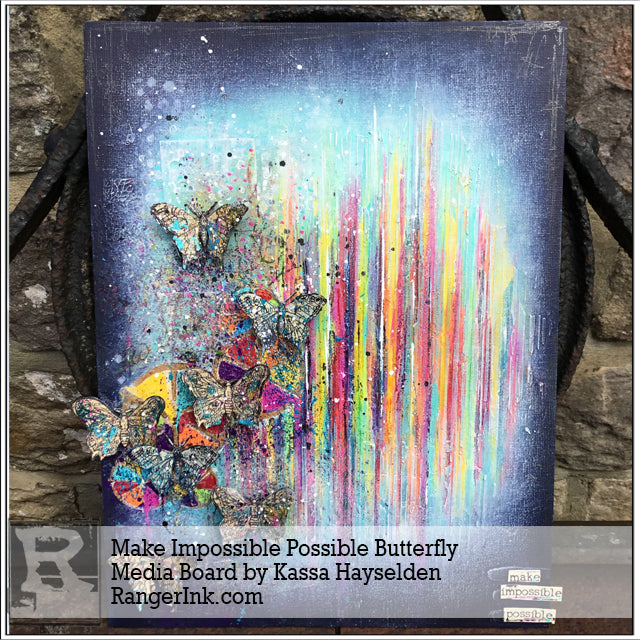
Make Impossible Possible Butterfly Media Board by Kassa Hayselden
- Materials
- Instructions
- Ranger Heat it™ Craft Tool
- Embossing Powders: Frosted Crystal
- Ranger Texture Paste
- Fude Ball Pen: Black
- Ranger Craft Tags: #8 Black
- Ranger Shiny Foil Transfer Sheets: Frozen & Vintage
- Tim Holtz Distress® Splatter Brush
- Tim Holtz® Distress Crayons: Spiced Marmalade, Mustard Seed, Picked Raspberry, Mermaid Lagoon, Twisted Citron, Festive Berries, Picket Fence
- Dylusions Stencils: Small Bubbles
- Dina Wakley Media 1 oz. Mica Sprays: Lapis
- Dina Wakley Media Stamps: Scribbly Small Birdies, Collaged Hearts, Textures
- Dina Wakley Media Stencils & Masks: Tracks & Wheels
- Dina Wakley Media Brushes
- Dina Wakley Media Acrylic Paints
- Dina Wakely Media Board
- Tim Holtz by Stampers Anonymous Layering Stencil - Stripes
- Bullet tipped Posca Pens (for Splatters) white/black; old yellowing book pages, ephemera
Instructions

Awe hi there Kassa here and sooooo over the moon to be back over here at Ranger sharing with you all again. This piece of art I share with you today can be created as a fast exercise to practice color combos missing out various steps (like the texture paste etc) or as I have done here, you can take your time and slowly build up layers, repeating which ever steps you want to and not necessarily in the order I have written down here, there are no hard and fast rules…heeheehee…
 Step 1: Take the Media Board and give it a quick light coat of White Gesso.
 Step 2: Once the Gesso is dry add a little ephemera with the Gel Medium then spread a thin layer of Texture Paste through the three stencils: ‘Tracks’ in the bottom right-hand corner; ‘Stripes’ in the midsection, vertical elongated random stripes and ‘Wheels’ in the left-hand side midsection.
 Step 3: Take a selection of Dina Wakley Paints (in my case just about all of ’em) have a little splodge of each ready to dip into, my palette is always a piece of Ranger Watercolor Paper because as I keep using the paper palette it layers up into a beautiful kaleidoscope of color I eventually use as a background – never wasting paint. So I start with painted vertical stripes in Lemon and Tangerine.
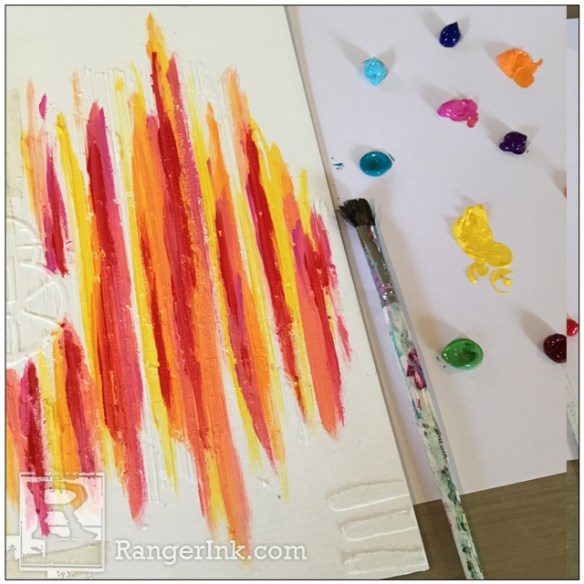 Step 4: Quickly while the paints are still wet add in just a small amount of the next color stripes either next to or over the wet paints, I keep to the same color hues so the Blushing, Magenta and Ruby. Remember, leave white space for the cooler tones. (Tip) Be very light with your hands/paint strokes and I like to pick up just a little paint on my brush at a time and 2 to 3 stripes with this – you’ll find this will give beautiful wispy, faded stripes too. Now dry this all with a Heat Tool.
 Step 5: I start to fill in the white space with the lighter Turquoise, Lime and Sky now.
 Step 6: And quickly whilst the paint is still wet I add in next to or over the wet paints a small amount of the darker paints: Ocean,Evergreen, Lapis, Fuchsia – dry with Heat Tool.
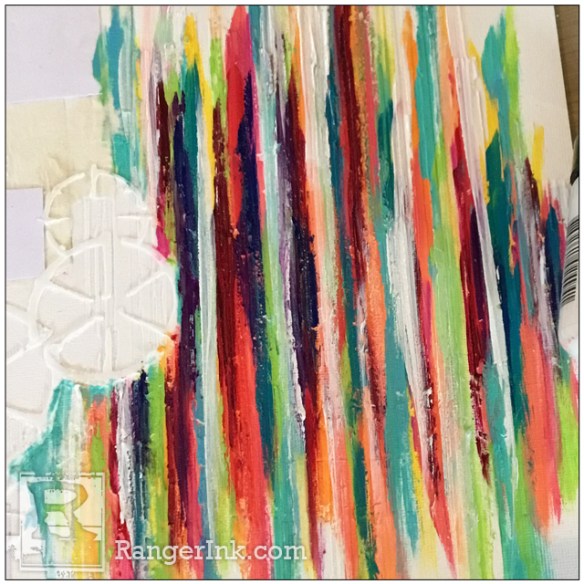 Step 7: Check everything is dry before adding in random stripes of White Gesso, I usually cover the darker areas and each Gesso stripe has two or three coats.
Step 8: I start the whole process over adding new color layers over the previous stripes and Gesso – remembering to use more lighter, brighter shades especially Lemon. Darker tones I use little of, they are great for contrast ‘pops’ and red/Ruby being such a strong color I use as a contrast ‘pop’ color as it can take over the page but it is a must! And Gesso is your friend – it’s like your eraser!
 Step 9: Paint Turquoise in all the remaining surrounding white space (except the texture paste wheels) Then dry brush over your stripes with the Turquoise paint (dry brushing is using your paint brush with relatively little paint on the brush – I paint on a scrap of paper to get my brush to dry brush ‘perfection’ – a scratchy, paint wash appearance) Dina Wakley’s brushes are the best for dry brushing as they are bouncy and firm!
 Step 10: I take my biggest Dina Wakley brush and start to paint from the edges inwards of my board with ‘Night’ or Black Gesso. I use very little paint, opting to pick up paint little and often because as you need to do the dry brush technique again to get the soft scratchy fade.
 Step 11: Add color above the wheels finishing off with a layer of ‘Turquoise’.
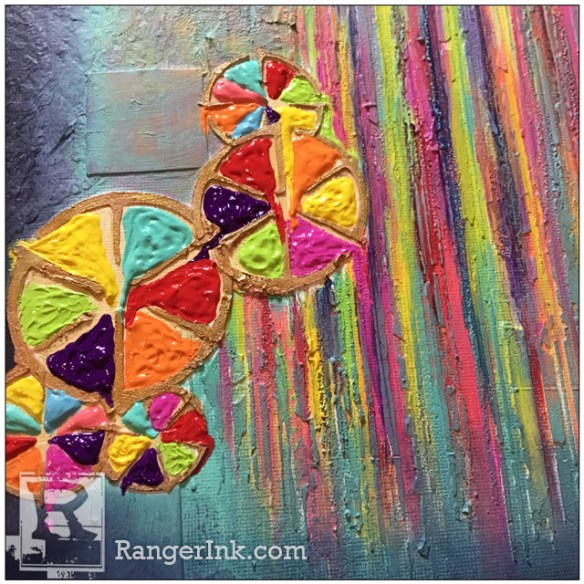 Step 12: Paint the ‘raised texture’ of the wheels in ‘Penny & Gilt’ then paint/dab in thick amounts of various colours inside the wheels – I leave this to dry naturally…
 Step 13: I stamp the two butterflies and words out on old yellowing book pages, approx 14 butterflies and adhere with matte gel medium to a black tag, trim out once the dry. Take the Distress Splatter Brush and add those tiny splats of color to the butterfly wings. Adhere the words and a mix of the butterflies to the board, seven in all.
 Step 14: Add a few ‘bubbles’ of White Gesso through the Dylusions ‘Bubble’ stencil – dry brush the Gesso through the stencil.
 Step 15: Add just a few more ‘Distress splatters’ around the butterflies; doodle & scribble with the Fude Ball Pen around the edges of the board; spritz the Lapis Mica Spray one or two times over the butterflies; scribble just a little Distress Crayon color to the centre stripes and splatter lightly with the Posca pens.
 Step 16: Take the other seven butterflies and dab them randomly with the Collage Glue Stick place the Shiny Transfer Foil (shiny side up) on the glue and firmly press down, wait a few minutes then carefully peel back to reveal the sparkle.
 Step 17: On the board in and around the butterflies randomly stamp with the Scribbly words from the Dina Wakley Textures set, also stamp on the right-hand wing edge of the ‘shiny foiled’ butterflies and quickly before the ink dries sprinkle with the Frosted Crystal embossing powder – when you heat set this powder with your Heat Tool the surface of the embossing powder does what it says – crystallises forming a frosted rough surface, a perfect surface for Distress Crayons to sit on.
 Step 18: I scribble Distress Crayon to the raised rough crystal embossed Scribbly words on the board and butterfly wings holding the crayons vertical to the board so that the flat tip of the crayon catches the rough embossed edges as you lightly pull it over them, I don’t bother to blend but simply add more different colors – so cool! Made for each other!
 Step 19: Adhere some of the foiled butterflies over corresponding butterflies. Now dry brush Gesso on the board to blend the ‘Night/Black Gesso’ edges into the centre color stripes. I slowly build up the dusty layers and ‘dust’ over the centre stripes lightly too. A wet wipe is handy to ‘dab’ away any over Gesso’d areas. Just let the area dry before dry brushing again.
 Step 20: Finally I add a little more color and detail to pull everything together, highlight the stripes with the bright colors from the Distress Crayons, no need to blend them. Add light dots and dabs of the Crayons in and around the butterflies, also add dots of the Turquoise & Magenta paint there too with the reverse of a paint brush. A few Fude Ball scribbles and splatters with your black and white bullet tipped pens and tah dah finished!


