


Liquid Pearls are dimensional pearlescent paints, ideal for many different techniques, including stenciling and watercoloring. But did you know that dry Liquid Pearls will act as a resist for diluted colors? Lauren Bergold shows us how as she creates this shimmery winter bluebird card, step by step.
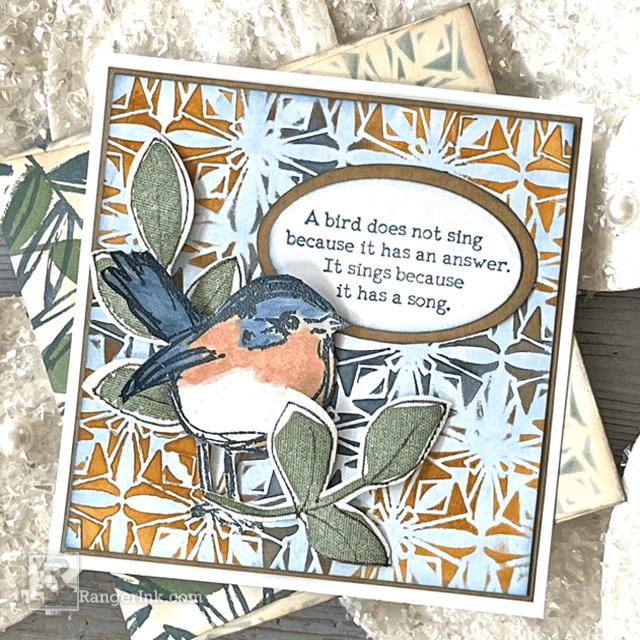
Liquid Pearls Winter Bluebird Card by Lauren Bergold
- Materials
- Instructions
Instructions
I'm always looking for new ways to use my Liquid Pearls, and this technique—similar to using a heat-embossed design as a resist for watercolor—is currently my favorite.

Step 1: Gather Materials: Liquid Pearls in Slate, Copper Pearl, Deep Water, Pewter and Rouge; Simon Hurley create Stained Glass Stencil; Dina Wakley MEdia Scribbly Birds & Sticks with Leaves Stamp Sets; Clear Emboss It Ink Pad; Ranger Steel Embossing Powder; Distress White Heavystock, Stark White and Kraft Cardstock; Stickyback Canvas Tape.

Step 2: Center the Simon Hurley create Stained Glass Stencil over a 5.25" square panel of Distress White Heavystock. Use a Mini Ink Blending Tool and Domed Foams to apply Slate Liquid Pearls to the center of the panel, and Copper Pearl to the four corners, allowing the colors to blend where they overlap. Remove the stencil and set the panel aside to dry completely. Clean the stencil immediately using Isopropyl Alcohol.

Step 3: When the stenciled panel from Step 2 is completely dry, dilute a small amount of Deep Water Liquid Pearls with water and use a paint brush to apply it over the entire design. The textural areas will resist the color, while the bare paper will absorb it. Use a tissue or cloth to gently blot off the excess liquid. Set the panel aside and allow to dry.

Step 4: Stamp the right-facing bird from Dina Wakley's Scribbly Birds Stamp Set in Clear Embossing Ink and sprinkle with Steel Embossing Powder. Return excess powder to jar and remove any stray flecks with a small brush. Melt the powder with the Heat It Craft Tool and allow the embossing to cool before proceeding.

Step 5: On a small palette or your craft sheet, use a small amount of clear water to dilute Liquid Pearls in Deep Water; Rouge mixed with Copper Pearl; and Pewter. Paint the stamped image like a bluebird, as pictured. Set aside and allow to dry before cutting out neatly with scissors.

Step 6: On a piece of Dina Wakley Stickyback Canvas Tape, stamp the two small solid leaf clusters from the Sticks with Leaves Stamp Set in Olive Archival. Loosely outline the leaves with a .09 black Letter It Fineliner Pen before cutting out with scissors.

Step 7: Stamp the "song" sentiment from the Scribbly Birds set on a scrap of white cardstock in Cobalt Archival Ink. Use a small oval die or template to cut into shape. Ink the edges lightly with Cobalt, if desired; and mat on a slightly larger oval of kraft cardstock.

Step 8: Assembly: Trim the Stained Glass panel to 5" square, lightly ink the edges in Cobalt and adhere to a thin mat of kraft cardstock. Add the bluebird to the lower lefthand side of the panel, surrounded by the two leaf clusters. Position the oval sentiment towards the upper righthand corner. Add the completed design panel to a 5.5" square card.

Step 9: Use coordinating colors of Archival Ink to decorate a matching envelope. Sign the card and mail to a friend or relation... Just Because!
 My name is Lauren Bergold, and I live in central New Jersey with my husband of 30+ years and A LOT of art supplies! My favorite medium is paper, and I especially love making cards. I teach papercrafting classes, as well as collecting and compiling vintage and found papers. You can find me on my blog, All the Good Blog Names Were Taken, and on Instagram as @llaurenb where I love to connect with other artists and makers!
Related Posts

Simon Hurley create. Solar Spray Card by Cassie Trask
Shine bright with this shimmering floral card by Cassie Trask! In this tutorial, she uses the latest Simon Hurley create. Heartfelt...
Read More
Your Cart
- Choosing a selection results in a full page refresh.
