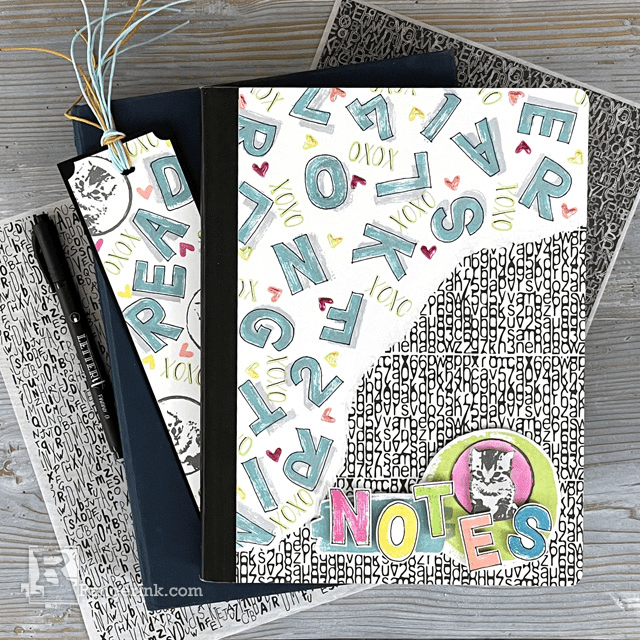
Get ready to transform the ordinary into extraordinary! Join Lauren Bergold as she takes a simple composition book and turns it into a fun, one-of-a-kind custom notebook using Ranger Archival Inks, Liquid Pearls, Stickles, and more.

Customized Notebook Cover by Lauren Bergold
- Materials
- Instructions
Liquid Pearls™: Raspberry, Coral, Lemon Chiffon
Stickles™ Glitter Glue: Hibiscus, Yellow, Seafoam, Orange Slice, Waterfall
Tim Holtz Stampers Anonymous Cling Mount Stamp Sign Painter
Dina Wakley MEdia Stamp Pocket Circles
Dina Wakley MEdia Jumbled Letters Collage Paper
Simon Hurley create. Stamp Paint Swatches
Simon Hurley create. Stark White Cardstock
Letter It™ Clear Stamp Set - Loves
Wendy Vecchi MAKE ART Stay-tion Bundle
Wendy Vecchi MAKE ART Perfect Card Adhesive
Ranger Angled Brushes
Ranger Mini Ink Blending Tool
Ranger Mini Ink Domed Replacement Foams
Instructions
Keeping track of goals, chores, shopping lists, expenses and more is definitely much more fun if you have a special notebook; and it's a quick and easy make using your existing Ranger Ink goodies!

Step 1: Gather Materials: A plain notebook or composition book from the big box store; Ranger Archival Inks in Beach Cruiser, Shadow Grey, Graphite, Sea Grass, Sun Dazed, Vibrant Fuchsia and Coastal Coral; Liquid Pearls in Raspberry, Coral and Lemon Chiffon; Stickles in Hibiscus, Yellow, Seafoam, Orange Slice and Waterfall; Tim Holtz Sign Painter Alphabet Stamp Set; Dina Wakley MEdia Pocket Circles Stamp Set and Jumbled Letters Collage Paper; Simon Hurley create Paint Swatches Stamp Set; Letter It Loves Sentiment Stamp Set.

Step 2: Trim a piece of Simon Hurley create Stark White Cardstock to the size of your notebook (the sample is 6.75 x 9.75"). In pencil, draw a wavy line from just below the top right-hand corner to just above the bottom left-hand corner of the panel. Working within the wavy section you've created, randomly stamp letters from Tim Holtz's Sign Painter Alphabet in Beach Cruiser Archival Ink; the intended effect is to look as if the letters are tumbling from the top of the book downwards, so be sure to change the position and orientation each time you stamp.

Step 3: Using Shadow Grey Archival, stamp each letter a second time, just slightly to the left and above each letter, so that every letter has a shadow. Optional: If desired, loosely outline each letter with a black .01 Letter It Fineliner.

Step 4: Using the XOXO stamp from Letter It's Loves sentiment set and Sea Grass Archival, stamp the XOXO randomly between the letters; changing the position and direction of the stamp each time. Optional: If desired, add a black accent inside the open lines of the XOXO stamp.

Step 5: Using the small solid heart from the Loves set, randomly add hearts to the blank spots between the letters and the XO's, using Sun Dazed, Coastal Coral and Vibrant Fuchsia Archival Inks.

Step 6: Add coordinating shades of Liquid Pearls to each of the hearts using Lemon Chiffon, Coral and Raspberry. Set the panel aside on a flat surface and allow to dry completely; preferably overnight.

Step 7: Stamp the letters N, O, T, E and S in the following Archival shades: Vibrant Fuchsia, Sun Dazed, Vivid Chartreuse, Coastal Coral and Paradise Teal.

Step 8: If desired, use a black .01 Letter It Fineliner to loosely outline around the letters. Use a Ranger Angled Brush to sparingly apply Stickles Glitter Glue in a neutral shade to all of the letters, or in coordinating colors as follows: Hibiscus, Yellow, Seafoam, Orange Slice and Waterfall. When the Stickles have dried, cut out around each letter with scissors, leaving a small border of white round each. Mount the letters on slivers of foam tape and set aside.

Step 9: Stamp the cat from Dina Wakley MEdia‘s Pocket Circles Stamp Set twice in Graphite Archival on a scrap of white cardstock.

Step 10: Color one of the cat circles using a Ranger Mini Ink Blending Tool and Vibrant Fuchsia Archival and cut the entire circle out neatly with scissors. To the other circle, apply Shadow Grey to just the kitty, then cut out the cat and add it atop the pink circle with a small piece of foam adhesive.

Step 11: Stamp the large circle from the Simon Hurley create Paint Swatches Stamp Set in Sea Grass Archival at the righthand side of a small piece of white cardstock. Then position the smallest rectangular paint swatch stamp so it overlaps the left-hand side of the circle, as pictured, and stamp in Beach Cruiser Archival. Cut out the compound shape neatly with scissors, leaving a small border of white around the outside edge.

Step 12: Assembly: Add a piece of Dina Wakley Jumbled Letters Collage Paper to a piece of Stark White Cardstock trimmed to fit the notebook (in this case 6.75 x 9.75"). Tear the stamped alphabet panel along the penciled line you drew around the design, so that the panel narrows and moves to the left as it goes down. Affix the torn cardstock panel to the Collage Paper panel and neatly trim the edges if needed; adhere to the cover of the composition book with Perfect Card Adhesive. Add the paint swatches to the lower righthand corner of the book and decorate the paint swatches with the small cat icon and the NOTES letters, as pictured.

Step 13: While you have the supplies out, consider making a coordinating bookmark or two, to keep your place as you make notes in your new custom notebook and/or to share with friends!


 My name is Lauren Bergold, and I live in central New Jersey with my husband of 30+ years and A LOT of art supplies! My favorite medium is paper, and I especially love making cards. I teach papercrafting classes, as well as collecting and compiling vintage and found papers. You can find me on my blog,
