Carisa Zglobicki shares how she creates this mixed media art journal page using Dina Wakley Media Products. Follow along, as Carisa encourages you to flip through, cut out, and collage pieces of the Dina Wakley Media Collage Collective into your work!

You Have Soul and Heart Journal Page by Carisa Zglobicki
- Materials
- Instructions
-
Dina Wakley MEdia Journal
Dina Wakley MEdia Collage Collective
Dina Wakley MEdia Gesso: White
Dina Wakley MEdia Heavy Body Acrylic Paint: Heather, Mineral, Blushing, Turquoise, Lemon
Dina Wakley MEdia Scribble Stick Set 3: Mineral, Heather, Carnation
Ranger Archival Ink: Jet Black
Dina Wakley MEdia Stamps: Organic Scribbles, Scribbled Text Elements
Dina Wakley MEdia Gel Medium
Dina Wakley MEdia Short Handled Brushes (4pk)
Dina Wakley MEdia Collage Words 2
Ranger Brayer: Small
Ranger Heat it Craft Tool
Tim Holtz by Tonic Studios Kushgrip Snips
Instructions

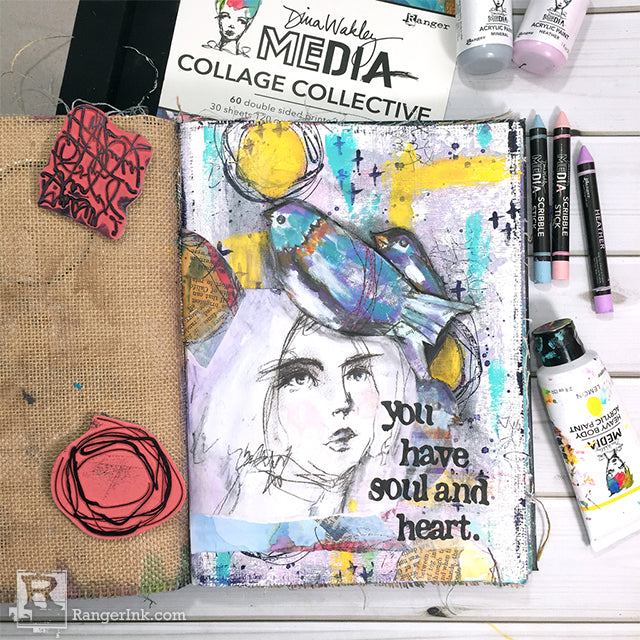
Step 1: First things, first. Let go of wanting to hoard the Collage Collective book! This was a hard one personally, but Dina Wakely created this book for us to use and grab inspiration from so do it! Flip through the book, get inspired by the colors, the shapes and even the figures and then just rip one out that speaks to you and set aside as we get started building our page. For the page today, the black and white face just called out to be used.

Step 2: Working on any of the substrates in the Dina Wakley MEdia journal, begin to create a background using Dina Wakley MEdia acrylic paints. It's up to you whether you want to use Gesso or not, but when working on the cotton pages it's usually a good idea otherwise the paint will soak in and not move as well. The new colors Heather and Mineral are so soft and creamy they were the perfect starting point. Using a brayer, place dots of each color and then roll the paint on your page. This elimInates the thought of where the paint should go and breaks up the blank page.

Step 3: Next, it's time to add some texture using stamps and mark making with more paint. Some favorites are Organic Scribbles and Scribbled Text elements. Using the text stamp, randomly add to the page, stamping multipLe times from one inking to get different values of the ink. Stamp the scribble circle three times across the page to add visual interest and place color inside each one with paint. Originally Blushing was used but then looking at the Collage paper again and seeing Lemon Yellow, I went over it with that to create cohesive color throughout the page.

Step 4: Now the fun part! Start cutting out the collage papers and adhering to the page using Gel Medium. Add Gel Medium to the page as well as the back of the collage paper for a really good smooth application. The Gel Medium stays open for some time so you can rearrange as needed. Allow to dry or use a Heat Tool to dry once happy with where everything is.

Step 5: The final step is adding a bit of color to the face using Scribble Sticks to blend it into the background rather than it looking like it was an afterthought. Using the same colors as the paint creates a soft, seamless blend. Also shade around some of the elements like the birds to bring added dimension to the entire piece. Last, pick out a quote from the Collage Words tissues to add a title to the page and adhere with Gel Medium.


Here are some close ups of the completed art journal page. One of the best parts of the Collage Collective book is being inspired by different paint combinations than what you might normally be drawn to. Using Lemon Yellow is not something that is seen a lot in my art journal, but I loved it in this piece and that is just because there was a little splatter of it on the face collage that I initially picked out for this page.
This process was filmed to show step-by-step how to use the Collage Collective Book to create a fun and simple art journal page.
Thank you to Ranger again for inviting me back to the blog to share this tutorial with you using my favorite Ranger Ink products.


