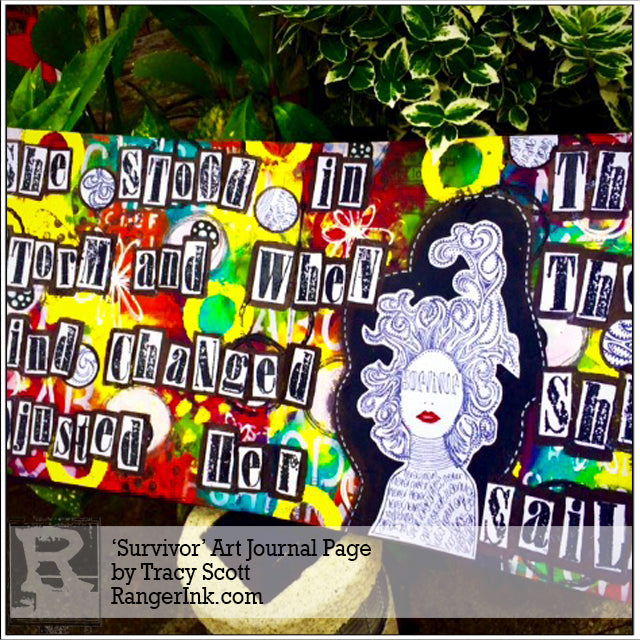
Hey there this is Tracy Scott here all the way from London in the UK with a project for you in my black Dylusions journal. How can you not fall in love with all of the Dylusions paints, stamps and stencils, the colours are so vibrant and the stamps and stencils so versatile. Grab a cuppa tea, sit down and let me take you through how I created this fabulous art journal page in my black Dylusions journal using my favourite Dylusions supplies…

‘Survivor’ Art Journal Page by Tracy Scott
- Materials
- Instructions
- Dylusions Square Creative Journals : Black
- Archival Ink™ #0 Pads : Jet Black
- Fude Ball Pen : Black
- Dylusions Paint : Black Marble, White Linen, Lemon Zest, Dirty Martini, Cherry Pie, Vibrant Turquoise, Tangerine Dream
- Dylusions Stencils : Large Letter Jumble
- Dylusions Cling Mount Stamps : Doodle Blooms, Survivor, Ugh People
- Dylusions Paint Pens : White Linen
- Dina Wakley Media Heavy Body Acrylic Paints : White, Blushing, Turquoise, Lime, Gilt, Medieval, Rosy
- Dina Wakley Media Gel Medium
- Ranger Emboss it™ Clear Ink
- Embossing Powders : Black
- Tim Holtz by Stampers Anonymous: Worn Alphabet Stamp Set
- Circle Paper Punch
- Scissors
Instructions

Step 1: Gather up your favourite Dylusions paint colours and your black Dylusions square journal.
Using your fingers start to spread the paint colours on the page. Do not worry if the paint is thicker in some areas. Use the same finger painting process for all your colours until the page is covered with yummy color.
Dry with your Ranger Heat Tool and don’t worry if some of the thicker paint bubbles (this just adds some texture to your page)

Step 2: Grab your favourite Dylusions stencil (I’ve gone for large alphabet) White Dylusions paint and the Ranger blending sponge and handle. Stencil the pattern randomly all over the page to break up some of the color.

Step 3: Next I grabbed one of my Dylusions quotes stamps sets and a Ranger Black Archival Ink Pad. I randomly chose one of the quote stamps and stamped in various places across the page. Do not try to get a perfect stamped image of the quote you just want parts of the quote to show in the background.

Step 4: I chose to use the lemon zest paint for the next step as I wanted to create some random paint marks on the background (I found a piece of old foam tube that was perfect but you could use bottle lids and found items around your home for this)
Make random painted stamp marks all over your page.

Step 5: Using the same technique and black Dylusions paint I repeated the process with a cardboard tube adding random marks over the page. I just love Dyan’s doodle bloom flowers and for my next step chose my favourite and a Ranger black archival ink pad. I stamped the flower randomly across my background.

Step 6: Going back to the yellow paint I added some painted dots to my background using my fingers. Switching to the White Dylusions paint I then fingerpainted a large white circles onto my page. I then continued finger painting the large white circles randomly over the entire page.

Step 7: Next, I grabbed my Ranger Fudeball pen and began to outline my white circles with scribbles. I painted black smaller circles were added to the inside of the white circles. I repeated that until all of the white circles were finished.

Step 8: I love the small Dina Wakley Media Line paint bottles. The applicator tip is perfect for drawing or scribbling. I chose white. I scribbled some messy flowers into my background using the White Dina Wakley paint. I repeated the previous step but this time chose to scribble circles onto my background.

Step 9: Look how beautiful our background is now that we have all these lovely details together!!!

Step 10: For the next step I took the fabulous Dylusions survivor stamp and stamped it twice onto white card using Ranger black archival ink. I used a circle punch and punched out various parts of one of the ‘survivor’ images I placed my 2nd ‘survivor’ image on my page(do not glue down at this point) and drew a border around it which I filled in with black Dylusions paint then adhering my stamped image down on top, I added some red pen to her lips using the red Fudeball. I also adhered the punched circles at this point randomly to the page. Using my white Dylusions paint pen I edged my black shadow area with a stitched design around the outside.

Step 11: For my quote I use Tim’s worn text alphabet and stamped and embossed using Rangers embossing ink pad and Ranger black embossing powder. The quote reads ‘She stood in the storm and when the wind changed she adjusted her sails’. Each letter of the quote was cut out individually and adhered to my page before outlining with black pen. I also outlined my punched circles with black pen to make them pop.


