by Denise Lush
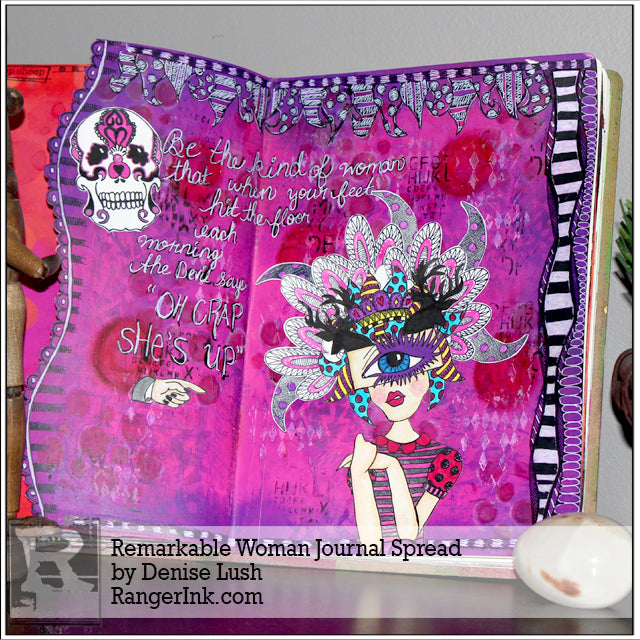
Remarkable Woman Journal Spread by Denise Lush
- Materials
- Instructions
- Ranger Non-Stick Craft Sheet™
- Dylusions Ink Sprays: Crushed Grape
- Dylusions Paint: Crushed Grape, Bubblegum Pink, Cherry Pie, Black Marble, White Linen, Lemon Zest, Postbox Red, After Midnight, Calypso Teal
- Dylusions Stencils: Floral Medley, Circles, Arrows
- Dylusions Cling Mount Stamps: Further Around the Edge , Basic Backgrounds, Inbetweenies, Pin Up Queen, Doodle Parts, The Eyes Have It, These Boots are Made…,Dependable Dotty
- Tim Holtz® Distress Crayons Set #2: Festive Berries
- Ranger Mini Blending Tool
- Dylusions Paint Pens
- Archival Ink™ #0 Pad Jet Black
- Ranger Multi-Medium Matte
- Ranger Heat it™ Craft Tool
- Dylusions Large Creative Journal
- Tim Holtz idea-ology Tissue Wrap
- Ruler
- Pencil
- Wax paper
- Tim Holtz by Tonic Studios: Cush Grip Snips
- Paint Brush
- Baby Wipes
Instructions

 Step 1:
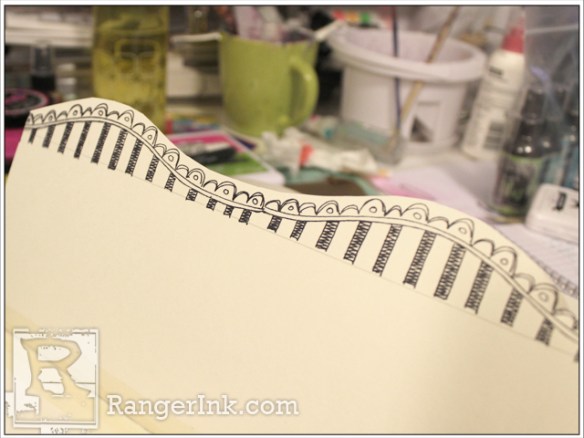
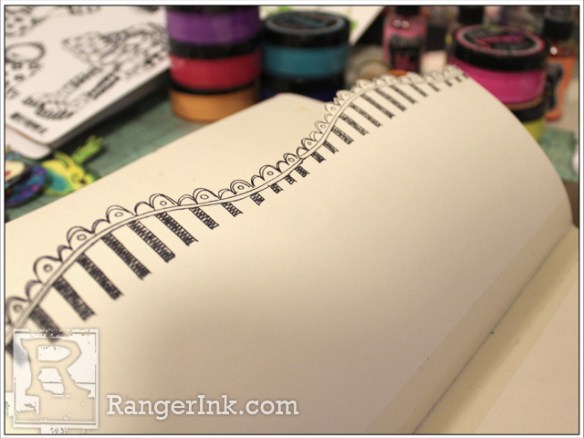
Hi everybody! For this layout I wanted my page to be a little different. I wanted to add some interest to the edge of my page, a decorative edge. I took my ruler and lightly drew a line where I wanted my page shortened.
 Step 2:
I chose a stamp from Dyan’s Dylusion stamp set “Further Around the Edge”. I am stamping this along the penciled line I drew.
 Step 3:
Now here’s the part that’s just a tiny bit hard. Cutting along the scalloped border. This requires a little patience, at least for me it did. I found it easier to just cut above the stamped image first.
 Step 4:
It would be a lot easier to cut if it wasn’t in a book. But cutting along the edge has made it more manageable. It is difficult but in the end so worth the hassle. I love that edge.
 Step 5:
I love layers in art journaling. One great and easy way to add layers to your art journaling is by using Tim Holtz’ tissue wrap. To do this I just use Ranger Multi Medium in a Matte finish, applied with a brush.
 Step 6:
I always protect the pages underneath by placing deli or wax paper under the pages I am currently working on. Then I am ready to bring on the color. I covered the entire background in Dylusions paint colors Bubblegum Pink and Crushed Grape using the Ranger Ink Blending Tool with the Foam applicator.
 Step 7:
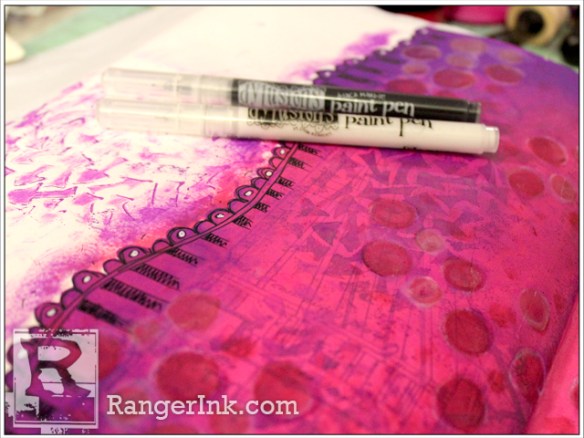
With the Ranger Ink Blending Tool and Foam applicator I added more layers with paint, spray and stencils. I used Bubblegum Pink paint with the Floral Medley stencil; Cherry Pie paint with the Circles stencil and Crushed Grape Dylusions Ink Spray with the Arrows stencil.
 Step 8:
The nice edge that was created in the beginning has become faded from the layers of paint and ink sprays. So I decided to retrace the lines with the Dylusions Paint Pens.
 Step 9:
I am taking another stamp from “Further Around the Edge” to go along the top and bottom of the two- page spread. When I reach the spine I take the stamp off the block to make it easier to get it stamped in the crease of the pages.
 Step 10:
I chose a different stamp from “Inbetweenies” to go along the right side of the spread. I stamped this one twice, turning it around for the second line so it had a slightly different look.
 Step 11:
Took yet another border stamp from Further Around the Edge and stamped it along the top, underneath the first stamped border. Then I took my black and white Dylusions Paint Pens to fill in some areas and doodle along the borders.
 Step 12:
I was dying to try the Tim Holtz Distress Crayons so I grabbed Festive Berries from Set #2 and rubbed it onto the outer edge of the circles I stenciled with the Cherry Pie paint, and made some larger circles as well. OH MY! I think these babies are going to be lots of fun. They look so beautiful with the Dylusions paints!!!
 Step 13:
I stamped the upper part of the body from “These Boots Are Made” on the piece of paper that was cut away when creating our edged border. I will paint this stamped image with Crushed Grape, Postbox Red and Bubblegum Pink Dylusions Paints. I also stamped the head from ‘The Eyes Have It’ and used the following paint colors for this image: Crushed Grape, After Midnight, Calypso Teal, Postbox Red, Lemon Zest and Bubblegum Pink.
 Step 14:
I took a sheet of paper that I had torn out of my Dylusions journal and painted it with White Linen Dylusions Paint. I dried it with my Ranger Heat It Craft Tool and applied a 2nd layer of White Linen paint.
 Step 15:
Next I stamped some images from Doodle Parts in Jet Black Ranger Archival Ink; some waves/swirls from Doodle Delight and a skull from Pin Up Queen. I felt my page needed more black and white imagery within the focus/image of the spread.
 Step 16:
I wanted a little black and white in my background as well. I spread some White Linen Dylusions paint on my Craft Sheet so I could use it to stamp images from the ‘Basic Backgrounds’ stamp set. Once finished I used a baby wipe to clean the paint off my stamp right away.
 Step 17:
I did the same thing with some Black Marble Dylusions paint on my Craft Sheet using the letter jumbles stamp from the Basic Backgrounds stamp set.
 Step 18:
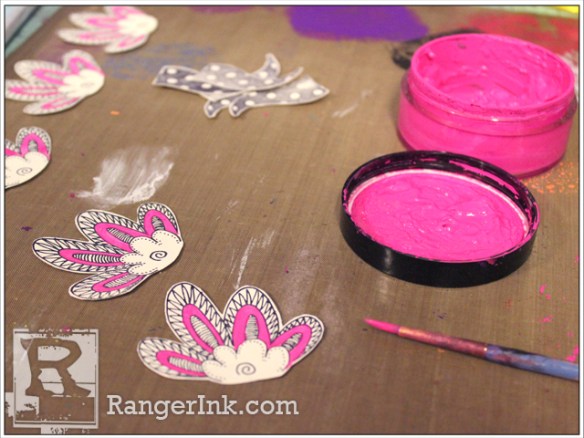
Once I laid the images out on my spread, (although I had wanted the head dressing to be mainly black and white) I felt it needed just a little pop of color. So I added some Bubbblegum Pink to the flourishes and Crushed Grape to the waves.
 Step 19:
To attach the cut out stamped images to the head of the woman I put a bit of Matte Multi Medium just on the base of each piece. That way it’s free and raised up off the page creating dimension.
 Step 20:
I picked a quote and wrote it out with a small paint brush and Black Marble Dylusions paint. I then used the white Dylusions Paint pen and traced over it. It reads ‘Be the kind of woman that when your feet hit the floor each morning the Devil says “Oh Crap She’s Up”’
 Step 21:
Added a little Bubblegum Pink to the skull as well and adhered it to the page with Matte Multi Medium.
 Step 22:
I decided it needed a little something else so I stamped a hand from Dependable Dotty.
 Step 23:
And there you have it, the layout is complete! I hope you enjoyed this tutorial and give it a try yourself!!!


