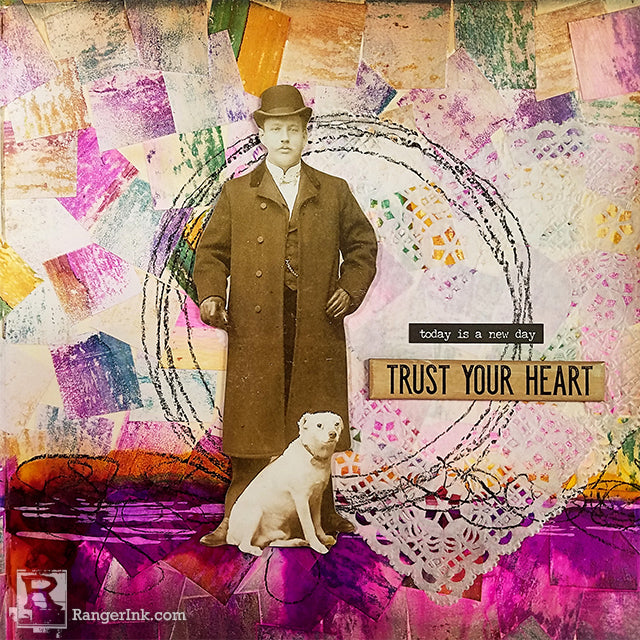
Hello, Creative Friends! I am back today with another tutorial. I wanted to try something different and unique for today’s project, so I came up with this mosaic art journal background using the Ranger Gel Plate and Alcohol Inks. I hope you’re inspired!

Mosaic Art Journal Background by Amber Kroening
- Materials
- Instructions
- Gel Plates
- Gel Plate Printing Brayers: Small
- Tim Holtz® Alcohol Inks: Wild Plum, Butterscotch, Stream
- Tim Holtz Distress® Stains: Vintage Photo
- Dylusions Paint: White Linen
- Dylusions Large Creative Journal
- Tim Holtz Distress® Collage Mediums
- Tim Holtz Distress® Oxide® Ink Pads: Black Soot
- Ranger Adhesive Foam Rolls
- Heart Doily
- Black Stabilo All Pencil
- Tim Holtz idea-ology: Paper Dolls, Chipboard Quotes, Chit Chat Stickers
- Paint Brush
Instructions

Step 1: Drip Alcohol Inks onto the Gel Plate and spread out with a paint brush. Let dry for a minute or two.

Step 2: Brayer white paint onto Gel Plate over the Alcohol Inks.

Step 3: Lay your paper over the wet paint and pull your first print.

Step 4: Apply more white paint to the plate and pull another print. Repeat for a 3rd print. I didn’t add any more ink for the 2nd and 3rd prints.

Step 5: Cut your prints up into 1” squares.

Step 6: Using Distress Collage Medium, adhere the squares to your journal, slightly overlapping each one.

Step 7: Continue collaging your squares until the page is full.

Step 8: I wanted to create a ground so that my focal point has something to stand on rather than floating in mid-air. Using the same Alcohol Inks, I created a line across the bottom 3rd of the page and immediately sprayed with water to get it to flow. I did one color at a time. The inks dry fast so you have to be quick. It helps if your page is upright for this step.

Step 9: Using the edge of an old gift card, I created lines with white paint, across the page.

Step 10: Next I collaged a heart doily onto my page. Don’t worry about wrinkles, they add character and texture.

Step 11: Using a black pencil, I made a circle, and some scribbles along the “ground.”

Step 12: I wanted to add a little more dimension to the page, so I applied Distress Stain in Vintage Photo along the edges of my pages. I used my finger to blend it out.

Step 13: Next I applied Distress Oxide Ink in Black soot to the very edge and smudged with my finger. I used foam adhesive to adhere the paper doll.

Step 14: To finish, I colored the chipboard quote with the Distress Stain and added it to my page along with a Chit Chat sticker.


