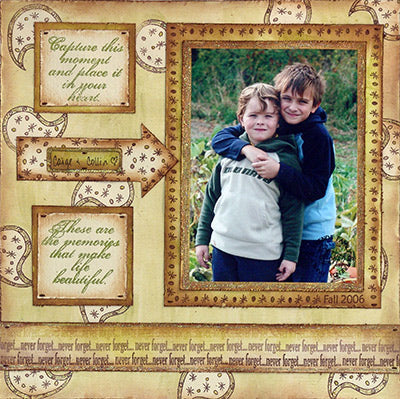
Create this sparkly scrapbook page with Adirondack® products, Distress Inks™ and Stickles™ Glitter Glue!

Capture the Moment By Andra Wheeler
- Materials
- Instructions
- Adirondack® Dimensional Pearls - Lettuce
- Adirondack® Dye Ink Pads - Lettuce, Espresso, Hazelnut
- Adirondack® Powder - Lettuce
- Distress Ink™ Embossing Stamp Pad
- Distress Ink™ Dye Stamp Pad - Vintage Photo
- Stickles™ - Gold
- Inkssentials™ Cut n’ Dry™ Foam
- Inkssentials™ Non-Stick Craft Sheet
- Tim Holtz® Paper Distress Tool, Tonic Studios
- Stamps - Funky Paisley (wfs-004-012); Remember Journaling Set (wfs-009-002), Wildflower Stamps, wildflowerstamps.com
- Cardstock - Bazzill Basics, bazzillbasics.com; Club Scrap, clubscrap.com
- Journaling Spot, Heidi Swapp, heidiswapp.com
- Niji Water Brush, Yasutomo®, yasutomo.com
- Embroidery Floss
Instructions
(1) Randomly stamp paisley images on 12″ x 12″ cardstock with Vintage Photo Distress Stamp Pad.
(2) Fill in the outside border of the paisleys with Gold Stickles and let dry.
(3) Rub Adirondack Stamp Pad onto Craft Sheet and with water brush, paint in center of the stamped paisley images.
(4) Use a water brush to mix a quarter-sized drop of Dimensional Pearls with water to create a paint wash. Paint the background paper, making sure to only paint around the paisleys and not the centers. Let dry.
(5) Cut two squares and mats. Stamp sentiment on squares with Distress Embossing Ink and emboss with Adirondack Powder. Distress edges and ink with Vintage Photo Distress ink. Adhere sentiments to mats.
(6) Cut an arrow and border out of cardstock. Stamp images on arrow, then paint with water brush. Distress and ink edges. Stamp sentiments on border. Distress and ink edges.
(7) Cut two photo mats for main photo. Stamp edges of largest photo mat. Distress and ink edges. Adhere together, and then adhere photo. Once photo is attached, carefully “paint” the edges of the smaller photo mat with Gold Stickles; be careful not to get Stickles on the photo.
(8) Assemble layout. Ink a Journaling spot using Lettuce ink and Cut ‘N Dry Foam and place on layout.
(9) Stitch corners of photo mat, border, arrow, and sentiment boxes with Embroidery Floss.
(10) Distress edges of 12″ x 12″ background paper and ink with Vintage Photo.


