by Jenny Marples

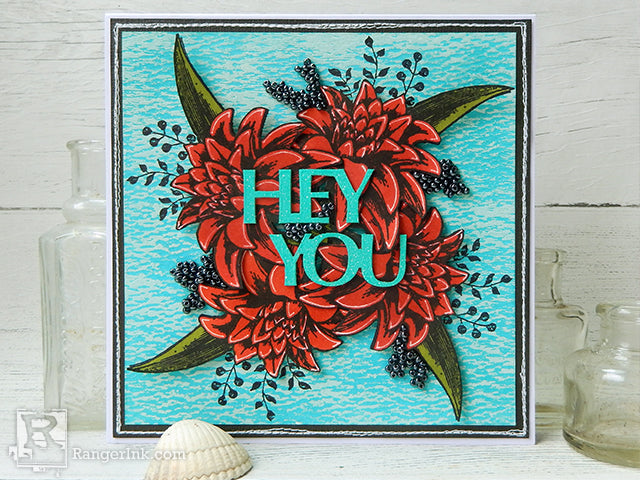
Wendy Vecchi Hey You Card by Jenny Marples
- Materials
- Instructions
- Wendy Vecchi Archival Ink™: Garden Patina, Carnation Red, Leaf Green
- Wendy Vecchi Enamel Accents: Garden Patina
- Wendy Vecchi Perfect Cardstock: White Panels, Grey Panels
- Archival Ink™ #0 Pads: Jet Black
- Ranger Watercolor Paper
- Ranger Black Cardstock
- Ranger Adhesive Foam Rolls: Black
- Ranger Mini Blending Tool with Foam
- Ranger Emboss It™ Ink Pad Clear
- Ranger Heat it™ Craft Tool
- Ranger Brayers
- Dina Wakley Media Acrylic Paints: White
- Dylusions Paint Pens: White Linen
- Tim Holtz Distress® Collage Mediums: Matte
- Stampers Anonymous Studio 490 Wendy Vecchi Stamp Set: Birthday Art
- Stampers Anonymous Studio 490 Wendy Vecchi Mat Minis: Words
- Tim Holtz Tonic Studios Stamp Platform
- Gunmetal Colored Seed Beads
- 6-inch Square White Card Blank
Instructions

Step 1: Cut a 5 ½ inch square piece of Watercolor Paper. With the textured side facing you blend Garden Patina Archival Ink all over the Paper using a Mini Distress Tool, ensuring the entire surface is covered with ink.

Step 2: Add Dina Wakley Media White Acrylic Paint to your craft mat. Run the brayer through it back and forth until it is completely covered, then gently roll the brayer over the raised texture of the Watercolor Paper.

Step 3: Place the largest flower from the Birthday Art Stamp Set diagonally on the Stamp Platform as shown. Stamp the flower onto the inked Watercolor Paper using Jet Black Archival Ink, repeating to get a good impression.

Step 4: Leave the stamp in place on the Stamp Platform. Turn the inked Watercolor Paper by 90 degrees and stamp the flower again with the Jet Black Archival Ink, repeat stamping again to get a good impression on the Paper.

Step 5: Again, leave the stamp in place on the Stamp Platform. Turn the inked Watercolor Paper by 90 degrees and stamp the flower again with the Jet Black Archival Ink, repeat stamping to get a good impression on the Paper.

Step 6: For the last time leave the stamp in place on the Stamp Platform. Turn the inked Watercolor Paper by 90 degrees and stamp the flower again with the Jet Black Archival Ink, repeating again to get a good impression.

Step 7: Stamp the largest of the flowers from the Birthday Art Stamp Set onto one side of a piece of Perfect Cardstock using Jet Black Archival Ink. Repeat three times more, stamping two images on each piece of Cardstock.

Step 8: Make sure the black ink is dry, using your Heat It tool if necessary. Place the matching Birthday Art stencil (which comes in the stamp set) over the flower and blend Carnation Archival Ink over it with a Mini Blending Tool.

Step 9: Place the corresponding leaf sections on the stencil over the stamped flower and blend Leaf Green Archival Ink over it using the Mini Blending Tool. Repeat Step 8 and 9 for the remaining three stamped flowers.

Step 10: Cut around each of the colored flowers removing the bottom section as shown. For a professional finish use a black pen to color the edges of the Paper. Draw highlights on the flowers with the White Dylusions Paint Pen.

Step 11: Stick pieces of Black Adhesive Foam Roll onto the reverse of each of the colored flowers. Remove the backing and place each one in turn onto the background, covering the corresponding stamped flowers.

Step 12: Carefully remove the HEY and YOU Mat Mini shapes from the Words set. Apply Emboss It™ Clear Ink across it and cover with Garden Patina Embossing Powder. Melt the embossing powder with the Heat It™ tool.

Step 13: Apply ribbons of Matte Distress Collage Medium using the fine tip on the 1fl. oz. bottle on and around the flowers as shown. Cover the wet Medium entirely with seed beads and leave to air dry completely.
To finish stick the embossed words onto the flowers as shown. Cut a 5 ¾ inch square piece of Black Cardstock and stitch a line around the edge (or draw lines with the White Paint Pen if you’d prefer). Mount the floral card onto the black card then onto a 6 inch white card blank.


