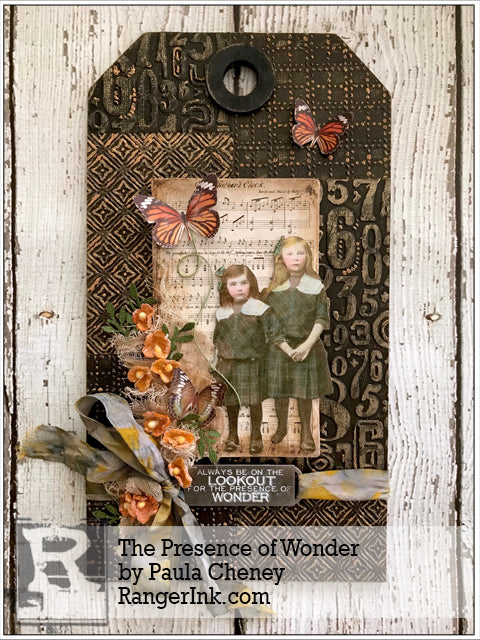
by Paula Cheney

The Presence of Wonder by Paula Cheney
- Materials
- Instructions
- Tim Holtz® Distress Collage Mediums : Matte
- Tim Holtz® Distress Stickles™ Dry Glitter – Clear Rock Candy
- Tim Holtz® Distress Spray Stains : Ripe Persimmon, Tattered Rose, Fossilized Amber, Ice Spruce
- Tim Holtz® Distress Crayons : Tarnished Brass, Gathered Twigs, Picket Fence
- Tim Holtz® Distress Ink Pads : Walnut Stain, Iced Spruce
- Ranger Brayers
- Ranger Non-Stick Craft Sheet™
- Tim Holtz Idea-ology Kraft Stock
- Tim Holtz Idea-ology Bouquet
- Tim Holtz Idea-ology Layers Botanical
- Tim Holtz Idea-ology Paper Dolls Christmas
- Tim Holtz Idea-ology Baseboards Chirstmas
- Tim Holtz Idea-ologyQuote Bands
- Tim Holtz Idea-ology Crinkle Ribbon
- Tim Holtz by Stampers Anonymous Etcetera Thickboard Tag Small
- Tim Holtz Alterations by Sizzix Stitched Plaid Texture Fade
- Tim Holtz Alterations by Sizzix Numeric Texture Fade
- Tim Holtz Alterations by Sizzix Diamonds Texture Fade
- Tim Holtz Alterations by Sizzix Laurel Punch
- Eclectic Elements Craft Thread
- Cheesecloth
- Foam Squares
Instructions

Step 1: To start you will need a few supplies like black cardstock, a few Tim Holtz Texture Folders, Collage Medium Matte, Metallic Distress Crayons, and a brayer. I’m using a small Etcetera Tag as my foundation but any hard surface would work for this technique.

Step 2: Cut 3 to 4 pieces of black cardstock to fit Sizzix texture folder (4 1/4 x 5 1/2”). Note: I found it best to use a cardstock that has a textured surface like Tim Holtz Kraft-Stock. Paint a thin layer of Collage Medium over the cardstock to strengthen and give the surface a slick finish. Collage Medium dries very quick so paint it on fast and leave it to dry.

Step 3: Using multiple Texture Folders, run each piece of black cardstock through the Vagabond machine to create a different patterns.

Step 4: Using a Tarnished Brass Distress Crayon, scribble over the surface of each embossed card to highlight the pattern.

Step 5: Cut up the cardstock pieces and adhere them to the Etcetera Tag with Collage Medium. Using a brayer to secure the cardstock to the board is very helpful. Cut away any excess that might hang off the edge of the board with a cutting knife. Set aside to work on the remaining parts of the collage.

Step 6: Using Distress Markers in a variety of colors, tint Tim Holtz Paper Dolls by coloring and wiping away the excess with a bit of a paper towel. Let dry.

Step 7: Pull apart at least two bunches of Bouquet flowers (10 total flowers).

Step 8: Place flowers on a Craft Sheet and spray with a variety of Distress Spray Stain starting with the lightest color. Move each flower to a paper towel and dry with a heat tool. The paper towel allows you to cup the flowers so the heat tool does not blow them away in the drying process.

Step 9: To “sugar” the paper flowers, use your fingers to quickly wipe Collage Medium on the inside and outside of each flower then dip into the jar of Clear Rock Candy Glitter. Set aside to dry.

Step 10: I’m using an Idea-ology Baseboard as the center of project. The Baseboards have a slick surface which is perfect Distress Crayons. I scribbled around the edge with a Gathered Twigs crayon and then smudged it with my finger tip.

Step 11: Adhere foam pads to the back of the Baseboard and Paper Dolls and adhere to the Etcetera Tag.

Step 12: Use Collage Medium to add the painted reinforcer to the top of the tag, a few butterflies from the Layers Botanical pack and a bit of cheesecloth to the left side of the collage. Let dry.

Step 13: Color Crinkle Ribbon with Distress Spray Stain – Iced Spruce and Fossilized Amber – dry with a heat tool. Use a Picket Fence Distress Crayon to fill in the words on the Quote Band. Wipe away excess crayon with a paper towel..

Step 14: Thread the ribbon through the right side of the Quote Band. Even out the ends, then wrap around the back and up onto the left side. Only thread one of the strands through the metal band, then tie the bow. Add additional cheesecloth behind and below the bow.

Step 15: Using the Sizzix Laurel Punch, punch at least 4 leaves. Rub Distress Ink over the surface to highlight the pattern in the cardstock and create texture.

Step 16: Using Collage Medium, add the sugared flowers, laurel leaves and an additional butterfly.

Step 17: Cut a small piece of Eclectic Elements Craft Thread. Add a bit of glue to the end and place under the butterfly. Make a loop and glue the end to the the hand of the Paper Doll.


Paula Cheney
I have been a “maker” all my life. Sewing, stamping, paper arts, I love it all. Creating and teaching is a passion for me, whether it is in the classroom or on my blog, One Lucky Day. I have worked in the scrapbooking/mixed media field since 2005 and for the last five years I have worked as the Creative Coordinator for Tim Holtz Brands, a dream job if there ever was one. On a personal note, I live on the Central Coast of California with my husband, Jay. I love to travel to new places to look for old junk and am willing to pack a bag at a moment’s notice. On an ordinary day you can find me working away in my craft room with the windows wide open and music playing in the background.


