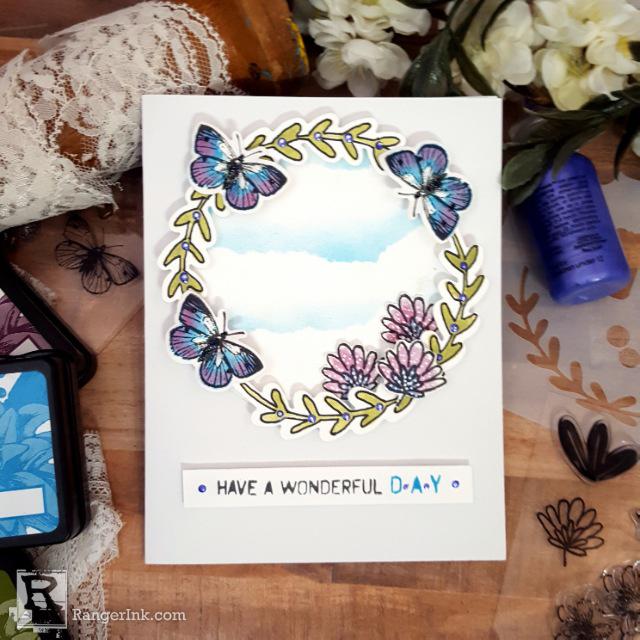
Bring a bit of spring into your next card with this tutorial by Terri Burson. Create a beautiful butterfly wreath using Wendy Vecchi MAKE ART Stamp, Die, Stencil Sets and Blendable Dye Inks.

Spring Wreath Card by Terri Burson
- Materials
- Instructions
Instructions
Hello friends! Terri here, bringing you this sweet Spring Wreath Card. I often like to challenge myself by picking just three colors to create with (not including black). It’s also a great way to get your crafty mojo going, when you’re surrounded with supplies and can’t figure out where to begin! We’ve all been there, right? Plus, we’re going to rip some paper today which is always a great way to let off a little steam! Let’s get started.

Step 1: Tear a sheet of lightweight paper (printer or note book paper) into 3 strips, varying the design of the tears.

Step 2: Trim a 4 x 4-inch section of Simon Hurley create. Stark White Cardstock. Using the Wendy Vecchi MAKE ART Stay-tion, place one torn paper strip approximately 1” below the top and anchor with the accompanying magnets. With your Ranger Mini Ink Blending Tool with Foam and Blendable Dye Ink Pad in Bluebird, blend the ink just above the tear line of your paper, leaving white space at the top.

Step 3: Repeat the blending steps above, alternating your torn strips each time and leaving white space in between each inking.

Step 4: Cut a large 3.5 x 3.5-inch circle with a circle die and die cut machine, or trace the circumference measurements and fussy cut. Set aside.

Step 5: Next, take a piece of Ranger Watercolor Paper and stamp three butterfly images from the Country Flowers and three flowers (as seen above) from the Flower Pot Set, using Jet Black Archival Ink, anchored with the Perfect Stamp Positioner Set and Wendy Vecchi Make Art Perfect Stamp Block.

Step 6: To stamp the sentiment from the Birthday Bash set, mask the word “birth” with tape and using Jet Black Ink stamp the remaining words into one long line (masking as needed), onto a strip of Simon Hurley create. Stark White Cardstock that measures 0.5 x 3.5 inches. Then mask out everything except the word “Day,” ink it with Bluebird ink to finish stamping the phrase. Embellish with Violet Liquid Pearls.

Step 7: To watercolor the butterflies and flowers, press the top edge of your ink pads onto the Wendy Vecchi Make Art Stay-tion using Bluebird and Thistle Blendable Ink Pads. A little goes a long way. Blend using the Tim Holtz Waterbrush Detailer Tip. Express liquid from the waterbrush onto a paper towel in between each color, to blot and avoid muddying the colors.

Step 8: Die cut your butterflies using the accompanying butterfly die and fussy cut your flowers. Embellish the flowers with the Ranger White Opaque Pen. Embellish the butterflies with Star Dust and Black Diamond Stickles. Once dry, use the handle of the Wendy Vecchi MAKE ART Perfect Stylus Set to round the wings of the butterflies.

Step 9: To finish the wreath elements, stencil two leaf images as shown above from the Warm Wishes Stamp, Die and Stencil Set, blending with the Mini Ink Blending Tool and Fern Green. For an added pop, trace the outline of the stenciled images with the Black Fineliner 04 tip Pen, prior to die cutting with the accompanying die. Embellish with Violet Liquid Pearls.

Step 10: Last, adhere the elements to a Wendy Vecchi Perfect Portrait card base. Adhere the cloud circle die cut centered and near the top of the card, using Perfect Card Adhesive. Apply strips of Ranger White Adhesive Foam Tape to the back of the wreath die cuts, one flower and one butterfly. Add a double layer of Adhesive Foam Tape to two of the butterflies. Arrange the items as pictured, using the butterflies with double adhesive tape to fill in the gaps from the wreath. Adhere two of the flowers with the card adhesive, tucked inside the lower right of the wreath. Apply remaining elements, including the sentiment, also popped up with Foam Adhesive and centered approximately 1” from the bottom edge of the card.
 Hello, my name is Terri Burson. I’m a native New Yorker, transplanted in the deep South. My husband and I are parents to a 19 year old son and numerous fur babies. I’m an avid card make but love dabbling in many forms of art and mediums. You can find me on most social media platforms @wavingmywand and on my blog at wavingmywand.blogspot.com.


