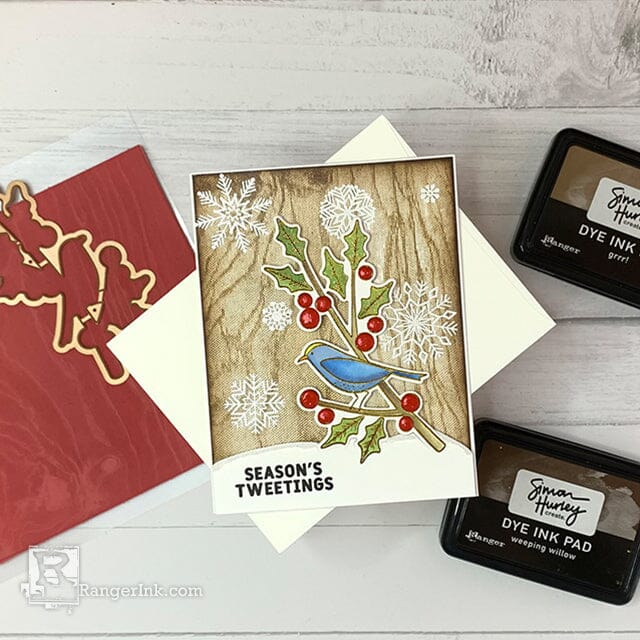
Still in the holiday spirit? Follow along as Lieschen Harshbarger uses Simon Hurley create. stamps and dies to make this lovely wintery card.

Simon Hurley Seasons Tweetings Card by Lieschen Harshbarger
- Materials
- Instructions
Simon Hurley create. Background Stamp Stitched Snowflakes
Simon Hurley create. Winter Woodland Stamp & Die Set
Simon Hurley create. Dye Ink Pad: Breakup Blue, No Diving, Midnight Snack, Guppy, Shooting Star, Fake Plant, Viper, Cookie Dough, Grrr!, Weeping Willow
Simon Hurley create. Stark White Cardstock
Simon Hurley create. Acrylic Stamping Blocks
Simon Hurley create. Acrylic Stamping Block 5x6
Archival Ink™ Pads Jet Black
Archival Ink™ Pads Coffee
Ranger Heat It™ Craft Tool
Wendy Vecchi MAKE ART Perfect Card Adhesive
Ranger Artist Brushes
Ranger Silicone Mat
Ranger Mini Ink Blending Tool
Ranger Mini Ink Blending Tool Domed Replacement Foams
Emboss It Ink Pad Clear
Embossing Powder Super Fine White
Embossing Powder Clear
Tim Holtz Distress® Glitter - Clear Rock Candy
Tim Holtz® Tools by Tonic Studios – Trimmer
Wendy Vecchi Liquid Pearls Carnation Red
Other:
Scissors
Heat gun
Foam adhesive
Score board
Die Cutting & Embossing machine
Instructions
Hi crafty friends! I’m so excited to share with you this wintery card I made using stamps and dies from Simon Hurley. I hope you enjoy this tutorial as much as I enjoyed making the card!

Step 1: Create an A2 card base out of Stark White Cardstock. Cut the 8½ x 11 cardstock down to 4¼ x 11. Then score at 5½. Cut another piece measuring 4 x 5¼ to be your front panel.

Step 2: Use the Woodgrain background stamp with Cookie Dough, Grrr!, and Weeping Willow to stamp the front panel piece. Then use the mini ink blending tool with the Weeping Willow ink to ink around the edges.

Step 3: Heat emboss the snowflakes from the peel apart Stitched Snowflakes background stamp with White Embossing Powder.

Step 4: On a separate piece of cardstock measuring 4 x 5¼, stamp the bird image from the Winter Woodland stamp set with Coffee archival ink. Then heat emboss with Clear Embossing Powder.

Step 5: Once the image is heat embossed, color the leaves and branch using Ranger Ink Artist Brushes with Viper, Fake Plant, Grrr!, and Weeping Willow inks.

Step 6: Next, color the body of the bird with Breakup Blue, No Diving, and Midnight Snack. Then use Guppy for the beak and Shooting Star for the top of its head.

Step 7: Use the coordinating dies for the bird image to do a partial die cut using a die cutting machine. Then trim off the leftover card stock so you have a snowy hill.

Step 8: Stamp one of the sentiments from the Winter Woodland stamp set on the partial die cut piece.

Step 9: Glue the Woodgrain background on the card base using Perfect Card Adhesive.

Step 10: Add adhesive foam on the partial die cut piece.

Step 11: Tape the die cut piece onto the front panel. Then add Carnation Red Liquid Pearls to the berries. To make the partial die cut look like snow – and some extra sparkle! – add some Perfect Card Adhesive and Rock Candy glitter to it.

Step 12: You’re done! Add an envelope to this card and it is ready to be sent to a loved one this season!
Your Cart
- Choosing a selection results in a full page refresh.


 Hi! My name is Lieschen Harshbarger. I’m married to my best friend and even though we don’t have children yet, our dog Sophie fills our hearts with lots of love and joy. By day, I work for the State of Texas, but during my evenings and weekends you’ll find me in my craft room – making cards and trying out new techniques with my crafty supplies. I enjoy being creative, but mostly I have enjoyed getting to know others and learning fun new things in this wonderful crafty industry! You can see more of my crafty projects on my blog
