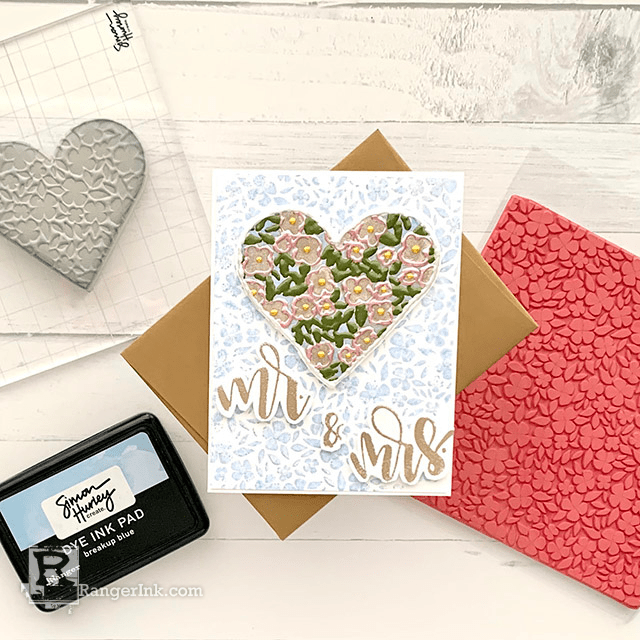
From heart to hand, a special touch for newlyweds! Follow along as Lieschen Harshbarger creates this enchanting wedding card with the Simon Hurley create. Bitty Botanicals Stamp and the Heart Cut Stamping Foam.

From heart to hand, a special touch for newlyweds! Follow along as Lieschen Harshbarger creates this enchanting wedding card with the Simon Hurley create. Bitty Botanicals Stamp and the Heart Cut Stamping Foam.
Hello crafty friends! I hope you are having a fantastic day. Today I want to share with you a card I made using the Heart Cut stamping foam to make a wedding theme card. You will see that had a moment where something that I had in mind did not work out, but I was able to still make this card work. I think most of us have been there while working on a crafty project, am I right? I do hope you enjoy this tutorial and that it gives you inspiration to do something fun and creative today!

Step 1: Use low tack tape to tape Heart Cut stamp foam on the 5x6 stamping block. Then, heat stamp foam with the Heat It Craft Tool and press stamping foam onto the Bitty Botanicals background stamp. Next, apply Breakup Blue ink on stamping foam.

Step 2: After stamping the heart image on a front panel piece for an A2 card, use a detail blending tool to apply Emboss it ink on the flowers. Then, apply Heirloom Gold Perfect Pearls with a flat brush

Step 3: Outline each flower with Ballerina Liquid Pearls, apply Green Fern Liquid Pearls on the leaves, and Sunflower Liquid Pearls on the center of each flower. Then, use White Opal Liquid Pearls to outline the shape of the heart.

Step 4: Stamp and heat emboss with Liquid Pearls embossing powder the Mr. & Mrs. sentiments from the Wedding stamp set.

Step 5: Use Breakup Blue ink to stamp the ring image from the Wedding stamp set. (This is where I noticed that my idea did not workout with what I had in mind, but still used what I had created so far to continue making the card.)

Step 6: Use scissors to cut out the sentiments and the heart image.

Step 7: Trim a piece of cardstock to use as the front panel piece for an A2 card base. Next, stamp Bitty Botanicals on the front panel piece with Breakup Blue ink.

Step 8: Place foam adhesive behind the heart and sentiments. Then, tape them on the front panel piece.

Step 9: Apply Stardust Stickles on the center of each flower of the front panel piece.

Step 10: To finish the card, match it with a complimentary envelope and it is ready to be sent to a loved one on their special day!
 Hi! My name is Lieschen Harshbarger. I’m married to my best friend and even though we don’t have children yet, our dog Sophie fills our hearts with lots of love and joy. By day, I work for the State of Texas, but during my evenings and weekends you’ll find me in my craft room – making cards and trying out new techniques with my crafty supplies. I enjoy being creative, but mostly I have enjoyed getting to know others and learning fun new things in this wonderful crafty industry! You can see more of my crafty projects on my blog Harshgurl and Instagram at @harshgurl.
Add eye-catching texture and shimmer to your cards like Miriam Prantner did with this stunning floral design! In this tutorial,...
Read More
In this tutorial, Tami Bastiaans is sharing one of her go-to techniques — using Distress Embossing Glazes with the...
Read More