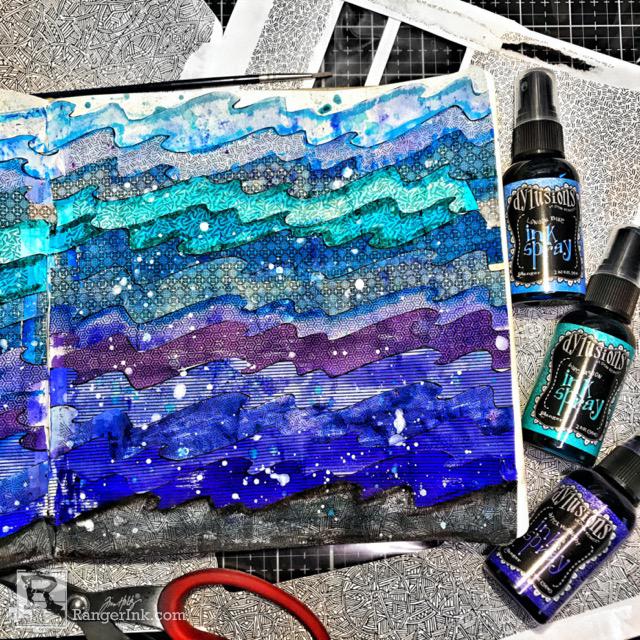
Turn junk mail into an incredible piece of original art with this tutorial by Renae Davis. Create a bright waved art journal spread with recycled paper and Dylusions Ink Sprays.

Sailing the Junk Mail Waves by Renae Davis
- Materials
- Instructions
Instructions
Junk mail will always be a favorite resource for the recycled crafting community- free collage images, paper to print, stamp, ink, punch and even those favorite fake plastic credit cards we wish really had money on them. The printed envelope is an unbridled gem of its own. These once thin paper protectors of the bills they carry can be turned into a much more pleasant reminder of the creative ability we have to recycle trash into treasure.

Step 1: Gather all the junk mail envelopes you can possibly find with different ink security patterns on the inside of the envelope (this project requires about 6). If you don’t happen to have any patterns, feel free to stamp or doodle some if you choose. Unfold and flatten the envelopes.

Step 2: On each flattened envelope, with a permanent marker draw two-inch-wide sections starting with the bottom crease of the envelope (just below the clear window if you have one). You should be able to draw at least 3 strip sections from each envelope.

Step 3: Using a permanent marker, draw an ocean wave-like line in the middle of each strip using a stencil, die cut or even a traceable image found online. From each strip there will be two separate waves equaling about six wave strips per envelope, depending on the size of the envelope.

Step 4: Choose an Ink Spray and spray three generous sprays of ink color onto the Media Mat. Paint one complete set of waves with this concentrated color. With the ink leftover on the mat, spray two sprays of water using a Distress Sprayer. Paint one complete set of waves with this diluted color. Lastly, with the ink leftover on the mat, spray three or more sprays of water using a Distress Sprayer.
Paint the remaining set of waves on the envelope. Continue these steps for each envelope using a different color of Ink Spray. (See supply list for a suggested list of colors)
Remember, these types of envelopes are very thin and very absorbent. Once the ink is on the paper, it will not move or blend. Adding too much water to the paper can make them tear very easily so try to avoid soaking down the paper.

Step 5: By diluting each color with more and more water, it is quite easy to create an ombre effect with very little ink. The top color picture here is concentrated Periwinkle Blue while the bottom color is the same Periwinkle Blue diluted with water.

Step 6: One good thing about this project and using all the colors of the blue family is there is no need to clean the mat in between colors. Using whatever amount of ink is left on the mat and a generous amount of water, soak up the remaining ink with an envelope. It will be very wet at first but when it dries there will be hints of blue on a white envelope that will be make the perfect top layer of the background.

Step 7: Once the envelopes are completely dry, cut along every permanent marker line drawn on the envelopes, both straight and wavy.

Step 8: Before gluing, arrange the waves in the order that you wish starting from lightest at the top to the darkest at the bottom. Because the shades will vary with the water diluting process, there will be lots of colors to choose from. How many waves needed will depend on the size of the surface the waves are being adhered too. For this 8x8 surface in the Dylusions Journal, I used 14 waves.

Step 9: Starting at the top of the page, glue down the lightest color wave with Matte Medium. Glue down the second wave below the first wave while overlapping the first wave making sure the surface underneath isn’t visible.

Step 10: Continue gluing down all the waves until the entire surface is covered. If there is space left at the bottom, feel free to create another set of waves using shades of Balmy Night or even Black Marble. (It is very dark at the bottom of ocean after all!)

Step 11: Dilute White Linen Acrylic Paint on the mat and added splashes of white with a small paint brush all over the page. Repeat this method with Blue Lagoon acrylic paint or another similar blue color.

Garnish the page with your favorite quote or even some ocean ephemera like a sailboat or your favorite sea animal. If you're an ocean lover, you might find this page beautiful as it is - admiring the beautiful ocean for what it is, as the wavy blue wanders of creation. This technique can also be done with many different colors and line patterns to create a variety of junk mail goodness.
 Renae Davis.
Art Journaler. Photographer. Daydreamer.
Art journaling is my jam. I started out Bible Journaling a couple of years ago that has now evolved into 20+ active luscious art journals of all sorts, sizes, and themes. I love making my own recycled art supplies and using every bit of scrap paper and pigment that I can get my inky hands on. You can visit Renae's website at www.splendiferossity.com or follow her on Instagram @redhedtm and on YouTube.


