Use Perfect Pearls™ to add a lusterous, pearly sheen to this shadowbox project!

Perfect Pearls™ Surprise Shadowbox Book By Lisa Mallette
- Materials
- Instructions
- Ranger Adhesive Foam Rolls
- Ranger Heat it™ Craft Tool
- Tim Holtz Distress® Ink Pads
- Ranger Embossing Powders
- Ranger Ink Refresher
- Perfect Medium™
- Perfect Pearls™ Pigment Powders
- Old book from the thrift store
- Brown paper lunch bag
- Metal brads, any color, five small, three large
- Chipboard Flowers, three, Basic Grey, basicgrey.com
- Chipboard Frame, Basic Grey
- Mother of Pearl Shell Buckle - Wal-mart
- Origami Paper, printed, one sheet
- Scrap of pink cardstock
- Black Ribbon, Reminisce, reminisce.com
- Metallic marker, blue, Marvy Uchida - marvy.com
- Stencil, Asian Eternity Kanji, Delta - deltacrafts.com
- Rubber stamps, Japanese Beauty (5376-W) and Japanese Script (5377-X) by 100 Proof Press, 100proofpress.com; Tiny Chinese Wishes (LL592) by Hero Arts, heroarts.com
- Craft Knife, X-acto, xacto.com
- Paintbrush
- Tweezers
- Cosmetic sponge
- Tacky Glue that dries clear
Instructions
Instructions
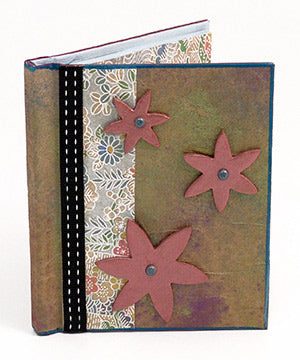
(1) Cut along one side of brown paper bag and cut off bottom to create a flat sheet (remove seam). Crumple bag, and then flatten out.
(2) Spray bag with Perfect Ink Refresher to lightly dampen. With a stiff paintbrush, “flick” Kiwi Perfect Pearls onto bag, covering most of the surface. Add small areas randomly of Blue Smoke and Rust Perfect Pearls. Spray bag again with Perfect Ink Refresher to spread and blend colors, let dry.
(3) Glue bag onto cover of book, trimming edges as needed.
(4) Spread white glue around edges of all the book pages and on last page to glue the entire stack of pages together and to the back cover of the book. Allow to dry with front cover open, clamping if necessary.
(5) With craft knife, cut an opening in the stack of book pages a little larger than the inside opening of the chipboard frame. Work carefully, cutting and removing only a few pages at a time.
(6) Mix a small amount of Blue Smoke Perfect Pearls with white acrylic paint to create a sky blue color. Paint entire inside of book with paint mixture and allow drying.
(7) Stamp inside front book cover with background script stamp inked with Perfect Medium and dust with Blue Smoke Perfect Pearls.
(8) Stamp a scrap of pink cardstock with Japanese Beauty image Black Soot ink. Cut into rectangle and dip edges into Perfect Medium ink and dust edges with Rust Perfect Pearls. Adhere to inside front cover.
(9) Create a “wash” of color by mixing a small amount of Kiwi Perfect Pearls with water. Spread the wash onto the origami paper with a paintbrush and allow drying.
(10) Adhere origami paper to top of book pages with glue stick, cutting a window for the opening.
(11) Cut remaining origami paper into strips and adhere to book cover and horizontally along inside front cover.
(12) Adhere black ribbon along edge of origami strip on front cover.
(13) Mix Rust Perfect Pearls with a little water to create a thick “paint.” Paint the chipboard flowers. Repeat with the Kiwi Perfect Pearls and paint the chipboard frame.
(14) Outline both the frame and the outside book cover with blue metallic marker. Adhere frame to top of pages over opening.
(15) Hold “eternity” kanji stencil on shell buckle. With a sponge, dab Perfect Medium into stencil openings. Remove stencil and dust with Rust Perfect Pearls.
(16) Mix a tiny amount of Blue Smoke Perfect Pearls into about a teaspoon of clear embossing powder.
(17) Color the tops of all the brads by dipping first into Perfect Medium ink, then dipping into the embossing powder mixture.
(18) Heat each brad, using a tweezers to hold the “legs” of the brad to avoid burning fingers. When embossing powder has melted, dip and heat again to create a smooth finish. Insert small brads into holes in shell buckle and chipboard flowers. Adhere flowers to book cover and shell buckle to opening inside pages with foam tape.
(19) With Black Soot Stamp pad, ink Love, Health and Longevity images and ink onto scraps of leftover painted brown paper bag.
(20) Trim to size and glue stamped pieces onto inside front cover alongside Geisha panel.
(21) Cut the legs off the large brads and adhere above the bag pieces with tacky glue.


