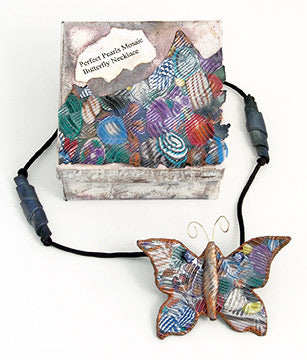
Perfect Pearls™ pigment powders are the “perfect” finishing touch on this polymer clay necklace!

Perfect Pearls™ Mosaic Butterfly Necklace By Kris Nettleingham
- Materials
- Instructions
- Perfect Pearls™ Pigment Powder Kits
- Ranger Mini Misters
- Ranger Glossy Accents™
- Perfect Pearls™ Pigment Powders
- Ranger Non-Stick Craft Sheet™
- Pasta machine or acrylic roller
- Cutting blade, Kato NuBlade™, Kato PolyClay, katopolyclay.com
- Polymer Clay, Kato Polyclay™, three ounces Black, one ounce Translucent, one ounce White, Van Aiken, vanaiken.com
- Scrap polymer clay, small amount of various colors
- Cookie cutter, Butterfly shape
- Wire, gold, two inches, Artistic Wire, artisticwire.com
- Texture Sheet for Clay
- Silk cord, Black, one yard
- Wood skewers
- Polyester batting
- Small paper mache gift box
Instructions
Conditioning the Clay:
(1) Using the Non-Stick Craft Sheet to cover and protect your work surface, condition small sections of translucent clay by slicing the clay into 1/8″ thick slices using the cutting blade.
(2) Run slices through pasta machine on the widest setting about 20 times. Fold the clay each time and run it through (fold first to prevent air bubbles).
(3) Repeat process with each color, but condition the black clay last.
“Pearlizing” the Clay:
(4) Color small sections of the translucent and white conditioned clay with Perfect Pearls by sprinkling about ¼ teaspoon onto the center of the slab of clay then folding the clay with the Perfect Pearls inside.
(5) Run the clay through the pasta machine, alternating between fold first and fold last, as this will help evenly distribute the pearlescent powders through the clay. Add additional Perfect Pearls if desired. Repeat process to make as many colors as desired.
(6) Make a variety of canes with colored and scrap clay. Try the Skinner Blend, bull’s eye, checkerboard and striped patterns.
Creating the Butterfly:
(7) With the pasta machine on a medium thickness setting, roll out a slab of black clay that is larger than the cookie cutter image (extra will be needed to form the body of the butterfly).
(8) Place thinly sliced cane pieces randomly on the black clay. Tap the end of some canes into Perfect Pearls before slicing to create additional iridescence.
(9) Roll out small amounts of darker scrap clay colors and dust with Perfect Pearls. Cut into shapes to fit the large gaps in the mosaic. Option: brush Perfect Pearls colors in the uncovered, black spaces.
(10) Spray a texture sheet with water, then place the cane decorated sheet face down onto the texture plate. Put this through the Pasta machine using the widest setting or roll with acrylic roller.
(11) Cut out butterfly shape with cookie cutter.
(12) Form the body of the butterfly from the excess clay by gently rolling a piece and attaching it to the center.
(13) Roll out black clay and cut another butterfly shape. Lay the textured butterfly on top and gently press together.
(14) Flip the piece over and brush with a few colors of Perfect Pearls. Use the skewer to make holes in the wings.
(15) Cut two inches of gold colored wire. Fold in half and curl ends to make antennae. Insert the fold of the antennae wire into the clay. Place butterfly on batting; prop wings on extra batting to add shape. Bake according to the clay manufacturer’s directions. Let cool.
(16) Mix Glossy Accents with Perfect Bronze Perfect Pearls on the Craft Sheet. Using Outline the edges of the butterfly with a Cut n’ Dry Nib.
Making the Beads:
(17) To create the beads, roll out black clay and cut two triangles. Wrap each triangle around a skewer and brush with Perfect Pearls. Bake according to clay manufacturer’s directions. Let cool.
(18) To finish, add beads and knots onto silk cord and secure, ending with a final overhand knot on each side of the front of the butterfly.
(19) Use Glossy Accents to seal the knots and apply a small amount of Perfect Pearls over the still wet Glossy Accents. If antennae are loose, pull them out and use Glossy Accents to glue them securely into place.
Gift Box:
(20) Use leftover textured clay to decorate a box. After baking, glue into place with Glossy Accents.


