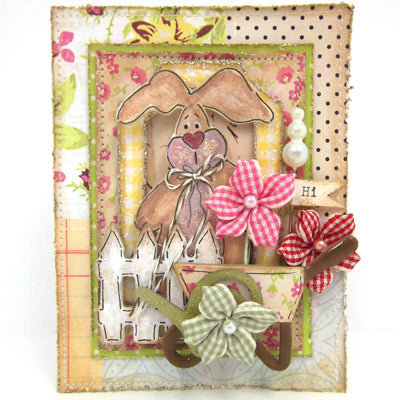
Use Perfect Pearls Pigment Powders and Mists to make this adorable card.

Perfect Pearls Bunny Card By Lisa M. Pace
- Materials
- Instructions
Instructions
(1) Using a paper trimmer cut a piece of white cardstock to 4½” x 7”, fold in half.
(2) Using a paper trimmer cut patterned paper pieces to 3½” x 4½”, 2¾” x 3¾” and 2½” x 3½.”
(3) Using a Paper Distresser, distress the edges of each patterned paper piece.
(4) Using a glue stick type adhesive, attach the smaller patterned paper piece to the medium patterned paper piece, making sure the smaller piece is centered.
(5) Using a sewing machine and white thread, sew a straight stitch all along the inner edge of the smaller patterned paper piece.
(6) Using a sewing machine and white thread, sew a straight stitch all along the inner edge of the larger patterned paper piece.
(7) Accent the edges of the patterned paper pieces with Platinum Stickles, let dry.
(8) Apply glue stick adhesive to a chipboard frame and attach patterned paper.
(9) Using a craft knife, cut around the edges of the chipboard frame, sand the inner and outer edges of the chipboard frame.
(10) Apply Multi-Medium to the top of the patterned paper frame then while still wet apply glitter, tap off excess, let dry.
(11) Accent the inner and outer edges of the altered chipboard frame using Platinum Stickles, let dry.
(12) Using glue stick adhesive, attach patterned paper to the back of the chipboard frame.
(13) Using Multi-Medium, attach the frame to the center of the smallest piece of patterned paper.
(14) Using Blank Canvas paint, paint the fence chipboard embellishment, let dry. Once dry, accent the edges using Vintage Photo Distress Ink and outline the fence with a black pen.
(15) Cover the chipboard watering can with peeled paint Distress Ink, then accent the entire front using Peeled Paint Distress Stickles. Using Multi-Medium, attach a blossom to the center of the watering can, let dry.
(16) Using Vintage Photo Distress Ink, ink the handle, wheel and legs of the wheelbarrow, cover the remaining area of the wheelbarrow with patterned paper, ink the edges of the patterned paper using Vintage Photo Distress Ink then accent the patterned paper with a black pen.
(17) Apply Glossy Accents to the handle, wheel and legs of the wheelbarrow, let dry.
(18) Spray a few sprays of Perfect Pearl Mist onto a Non-Stick Craft Sheet, mix a small amount of Perfect Pearls – Perfect Bronze with your paintbrush.
(19) Place a bunny stencil onto watercolor paper and begin filling in the image with the Perfect Pearl mixture leaving the cheeks, nose, tummy and tail area lighter.
(20) Spray a few sprays of Perfect Pearl Mist onto a Non-Stick Craft Sheet; mix a small amount of Perfect Pearls Cappuccino with your paintbrush.
(21) Accent the outer edges of the bunny’s ears, arms and feet. This will add a little dimension to your bunny.
(22) Spray a few sprays of Interference Red onto a Non-Stick Craft Sheet; mix a small amount of Perfect Pearls – Interference with your paintbrush.
(23) Accent the bunny’s cheeks, tummy and tail with this Perfect Pearl mixture.
(24) Spray a few sprays of Forever Red mist onto a Non-Stick Craft Sheet; mix a small amount of Perfect Pearls Forever Red with your paintbrush.
(25) Using a fine bristle paintbrush fill in the nose.
(26) Once all the Perfect Pearls are dry, accent the bunny’s cheeks, tummy and tail using Diamond Stickles, let dry.
(27) Once dry, outline the bunny’s body and add eyes and eyebrows. Using a craft knife, cut the bunny out, attach foam squares to the back and attach to the center of the altered chipboard frame.
(28) Create a bow from brown and white baker’s twine and attach below the bunny’s chin with a liquid adhesive.
(29) Using liquid adhesive attach the patterned paper piece with the chipboard frame attached to the large piece of patterned paper, let dry.
(30) Using a strong liquid adhesive attach the chipboard fence, wheelbarrow, watering can and blossoms.
(31) Type a sentiment onto cardstock to create your banner, cut out with scissors and attach to a stick pin using Multi-Medium.
(32) Place a small amount of Multi-Medium to the back of the pin and attach to the card.
(33) Using Multi-Medium, attach the patterned paper card front to the white cardstock base of your card.
Your Cart
- Choosing a selection results in a full page refresh.


