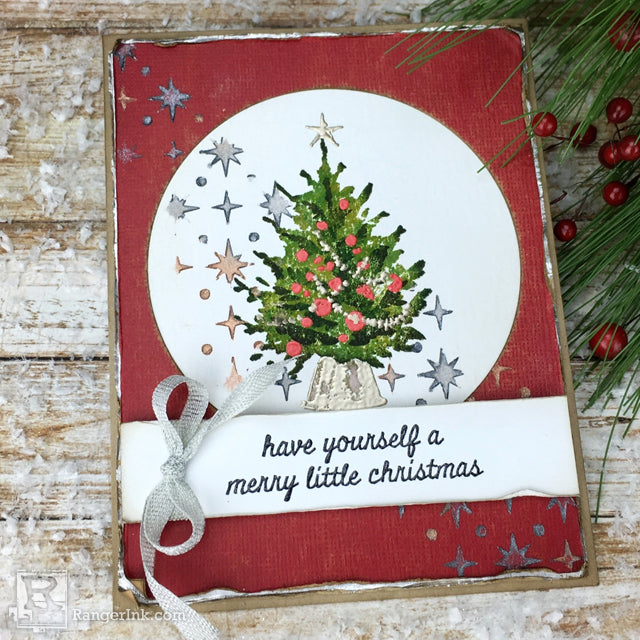
Hi everyone, Bobbi here. I’m so happy to be with you on the Ranger blog today! I’m sharing a really fun festive Merry Little Christmas card, with lots of color layering and a little shimmer and shine! Hope you’ll join me.

Merry Little Christmas Card by Bobbi Smith
- Materials
- Instructions
- Tim Holtz® Distress Ink Pads : Shabby Shutters, Bundled Sage, Crushed Olive, Mowed Lawn, Peeled Paint, Forest Moss, Pine Needle, Walnut Stain,Pumice Stone
- Tim Holtz® Distress Crayons : Antiqued Bronze, Brushed Pewter
- Tim Holtz® Distress Watercolor Cardstock
- Ranger Surfaces Kraft Cardstock
- Tim Holtz® Distress Clear Embossing Ink
- Tim Holtz® Distress Mixed Media Archival Ink Palette
- Ranger Embossing Powders : Liquid Platinum, Clear
- Wendy Vecchi Embossing Powder : Carnation Red
- Tim Holtz® Distress Collage Mediums : Matte
- Ranger Ink Blending Tool & Foam
- Ranger Non-Stick Craft Sheet™
- Ranger Heat it™ Craft Tool
- Ranger Paper Creasers
- Ranger Adhesive Foam Rolls : Black
- Tim Holtz Classic Kraft Paper Stash- Red Cardstock
- Tim Holtz Metallic Kraft Paper Stash - Silver
- Tim Holtz Sanding Grip
- Tim Holtz Scissors
- Tim Holtz Idea-ology Metallic Trimmings - Silver
- Tim Holtz Sizzix Stitched Circles Die 662229
- Tim Holtz Stampers Anonymous Mini Layering Stencil - Starry THMS093
- Tim Holtz Stampers Anonymous Watercolor Trees CMS317 Stamp Set
- Tim Holtz by Tonic Studios Craft Stamp Platform
Instructions

Step 1: Using a sheet of 5 1/2 x 4 1/4 Distress Watercolor Cardstock, place in Tim Holtz Stamping Platform securing with magnets in upper lefthand corner. Place largest watercolor tree from the Tim Holtz Stampers Anonymous Watercolor Trees CMS317 stamp set, in center of cardstock. Close lid for Stamping Platform to pick up and secure stamp for inking. I have chosen several green Distress Inks for this technique, but it’s not necessary to use so many. Start with the lightest green and work your way to darkest to create nice depth. Open Stamping Platform lid and ink tree stamp with Shabby Shutters Distress Ink sporadically, as not to cover all of
stamp with ink.

Step 2: Close Stamping Platform lid to transfer image to Distress Watercolor Cardstock. I know it doesn’t look like much now, but you will continue to build the color of the tree to create depth of image. Now repeat inking process with the next lightest color, Bundled Sage Distress Ink.

Step 3: Continue to build color until image is solid, with multiple levels of color.

Step 4: Remove largest tree stamp from Stamping Platform. Select the medium size tree from the Watercolor Tree stamp set and place in center of colorized tree on Distress Watercolor Cardstock. Close Stamping Platform lid to pick up stamp. This time use two of the darkest green Distress Inks for stamping so the shadow will show up nicely. Once stamped, remove Distress Watercolor Cardstock from Stamping Platform (the stamping platform is not heat safe). Then dry stamped tree image with Heat Tool on Ranger Non-Stick Craft Sheet.

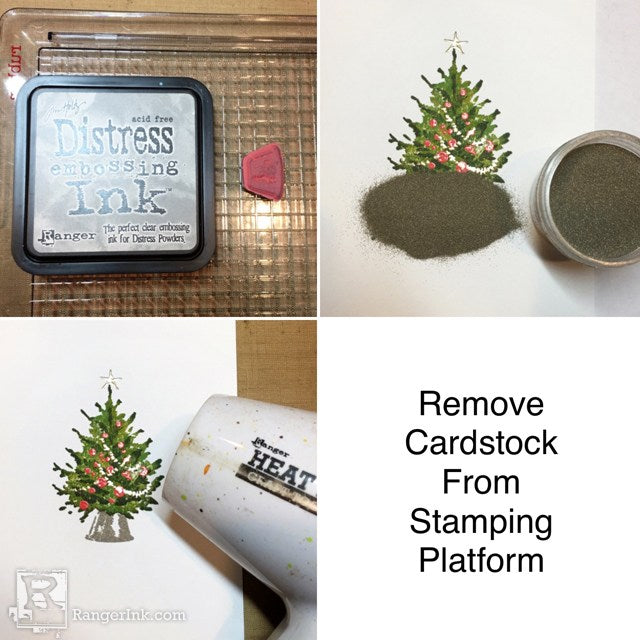
Step 5: Now it’s time to decorate the tree! Place stamped image back in Stamping Platform, in same position. Place the baubles stamp from same stamp set on tree image and close lid. Ink up bauble stamp with Distress Embossing Ink and stamp onto tree image. Remove stamped image from Stamping Platform. On a scrap piece of paper, generously sprinkle Wendy Vecchi Carnation Red Embossing Powder over stamp image. Shake off excess Embossing Powder and return to jar.

Step 6: Heat stamped image with Heat Tool to melt Embossing Powder. Return stamped image to same position in Stamping Platform. Now place the garland and star stamps on tree and close lid. Ink up garland and star stamp with Distress Embossing Ink and stamp onto tree image. Remove stamped image from Stamping Platform. On a scrap piece of paper, generously sprinkle Liquid Platinum Embossing Powder over stamp image. Shake off excess Embossing Powder and return to jar.

Step 7: Heat stamped image with Heat Tool to melt Embossing Powder.

Step 8: Repeat process with tree stand and heat emboss with Liquid Platinum Embossing Powder as well.

Step 9: Now for those of you that don’t know, Archival Inks are totally heat embossable you just have work a little faster before the ink dries. Using the Black Soot from the Distress Mixed Media Ink Palette, stamp the Christmas greeting onto Distress Watercolor Cardstock. Quickly sprinkle with Ranger Clear Embossing Powder over stamped image. Shake off excess Embossing Powder and return to jar. Heat stamped image with Heat Tool to melt Embossing Powder. Trim down greeting to 4 x 7/8.

Step 10: Shade cardstock borders of stamped images with Pumice Stone Distress Ink and a Blending Tool.

Step 11: Die cut a circle using the 3 1/2 inch Tim Holtz Sizzix Stitched Circles Die in a 4 1/4 x 5 1/2 piece of red cardstock from the Classic Kraft Paper Stash. Cut a 4 1/4 x 5 1/2 piece of silver Metallic Kraft Paper Stash. Sand both the red and silver cardstock on a scratch piece of paper using a sanding grip, to expose some of the underlying kraft.

Step 12: Cut a piece of Ranger Kraft Cardstock down to 8 1/2 x 5 1/2, then score and fold at 4 1/4 x 5 1/2 to create an A2 card. Shade all cardstock edges with Walnut Stain Distress Ink and a Blending Tool. Tack down stamped tree image and red cardstock with a little painters tape. Then tack down the Tim Holtz Stampers Anonymous Starry Mini Layering Stencil to the left on cardstock with a little painters tape. You don’t want things moving around on you once you start applying the Distress Crayons. Swipe the Brushed Pewter Tim Holtz Metallic Distress Crayon over a small area of the stencil, then move color around with finger to get in all the nooks and crannies. Apply a little Antiqued Bronze Metallic Distress Crayon over stencil and move color with finger, it blends beautifully with the Brushed Pewter. Carefully lift stencil and move to lower right of card to continue pattern. Repeat Metallic Distress Crayon application. Remove stencil and speed up drying time with a little heat from the Heat Tool.

Step 13: Trim down silver, red and watercolor cardstock so they layer with a slight border on kraft card base. Distress all cardstock edges with Ranger Paper Creaser. Use Tim Holtz Distress Collage Medium Matte to adhere kraft card base, silver, watercolor and red cardstocks together. Tie a small ribbon/bow to left side of greeting using Tim Holtz Idea-ology Metallic Silver Trimmings. Last but not least, attach greeting to card front using Ranger Black Adhesive Foam.

I really enjoyed creating this fun little Christmas card. I hope you give it a try.


