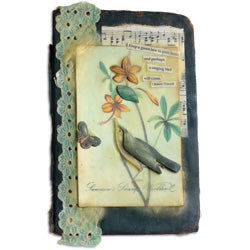
Use Beeswax and the Melting Pot to create this layered book cover with vintage appeal!

Melt Art™ Singing Bird Collage Book Cover By Lisa Dixon
- Materials
- Instructions
- Perfect Pearls™ Pigment Powders
- Tim Holtz Distress® Ink Pads
- Ranger Heat it™ Craft Tool
- Ranger Non-Stick Craft Sheet™
- Ranger Ink Blending Tool & Foam
- Beeswax
- Bird postcard - Cavallini & Co.
- Two color photocopies of chosen bird postcard; hardcover from an old book (about 5½ x 8½"); scrap of vintage sheet music; scrap of white cardstock for quotation; length of vintage lace trim; foam tape; paintbrush for melted wax
Instructions
(1) Use the Blending Tool and Foam to ink the edges of the old book cover with Vintage Photo Distress Ink.
(2) Cut a 3 x 5″ rectangle from the scrap of vintage sheet music and use the Blending Tool and Foam to ink the edges with Vintage Photo Distress Ink. Adhere the sheet music to the book cover ½” from the top and ½” from the right side.
(3) Adhere a 9″ length of lace trim to the left side of the book cover.
(4) Use the Blending Tool and Foam to ink the edges of the bird postcard and adhere to the book cover on top of the lace trim and the sheet music; about 1¼” from the top and ¾” from the right side.
(5) Cut duplicate images from the first color photocopy of the bird, butterfly, flower and leaf. Ink the edges with Vintage Photo Distress Ink and layer them over the original images on the postcard using foam tape.
(6) Cut duplicate image from the second color photocopy of the bird’s wing and tail. Ink the edges with Vintage Photo Distress Ink and layer over the image on the postcard using foam tape.
(7) Print the Chinese proverb onto white cardstock and cut apart into phrases. Ink the edges with Vintage Photo Distress Ink using the Blending Tool and Foam. Adhere the quotation to the top right corner of the postcard.
(8) Melt natural beeswax in the Melting Pot using a Project Pan. (Using the Project Pan allows for easier clean up. When finished, just let the Beeswax cool and pop out the Project Pan until Beeswax is needed in a project again.)
(9) Brush melted wax onto the entire surface of the bird collage.
(10) Use the Heat It Craft Tool to smooth out the brush marks and fuse the layers together. Continue to build up layers of wax as desired.
(11) Brush on some Perfect Gold Perfect Pearls pigment powder to highlight the ridges and layers of the beeswax.
Your Cart
- Choosing a selection results in a full page refresh.


