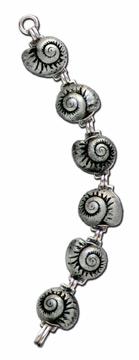
Melt Art™ Seashell Bracelet

Melt Art™ Seashell Bracelet By Robin D. Beam
- Materials
- Instructions
- Ranger Non-Stick Craft Sheet™
- Bracelet Blank, Renaissance Art Stamps
- Shell Button
- Loctite® Super Glue with Easy Brush Applicator
Instructions
To Create the Mold:
(1) Take out equal parts of the Mold n’ Pour putties. Separately they are inert, but when mixed together, they chemically react to make a permanent, flexible mold. Evenly mix the putties together until they create an even colored light purple color.
(2) Roll the mixed putty into a ball, removing any cracks or folds. Place on the Non-Stick Craft Sheet and push button in. Be sure not to push in too far as you don’t want it to push through the mold.
(3) Allow to cure, 5-7 minutes.
To Create the “Charms”:
(4) Plug in Melting Pot and turn thermostat to “UTEE” setting.
(5) Pour in Clear UTEE followed by Black. Note: because the Black UTEE is pigmented, adding in Clear makes it more fluid for pouring into the mold.
(6) Place lid on UTEE and allow to completely melt. Note: do not stir as it will cause bubbles to in the melting UTEE.
(7) Once mold has cured, remove it from the button and place on the Non-Stick Craft Sheet and begin pouring the melted UTEE into the mold. Option: if making many bracelets, you may want to make more than one shell mold.
(8) Allow the poured UTEE to cool and remove from the mold. See how the Mold n’ Pour shows every detail!
(9) Create enough shell charms for the bracelet. Count the number of “up” beads.
Coloring the Charms:
(10) Shake up Silver Metallic Mixative. Metallic Mixatives are a quick-drying pigment based ink that colorizes and dries onto many non-porous surfaces such as UTEE.
(11) Squeeze a small amount of Silver Metallic Mixatives onto the Non-Stick Craft Sheet. Rub your finger into it so there is some on your finger, and lightly rub the shell UTEE charms. See how the detail pops! With a small amount of ink on your fingers, you have the ability to hit the “high” spots of the molded item so that the indentations on the design remain black, creating a more “antique” effect.
(12) Add more ink to your finger as needed and color all charms.
Putting It All Together!
(13) Set up shells onto the bracelet blanks in a design that is appealing to you. Place a small amount of adhesive on the bracelet blank as well as the back of the charm. Place onto blank and allow to cure.
It’s easy to create coordinating looks. Create a mold from a button on an outfit (remember all those extra buttons you have that were provided when you purchased it?!) and create a wonderful ensemble!


