Create this gorgeous wedding celebration page using Adirondack® Alcohol Inks and Paint Dabbers, and Inkssentials™ tools and accessories on vellum paper!

Key to My Heart By Lisa Dixon
- Materials
- Instructions
- Inkssentials™ Cut n’ Dry™ Foam
- Inkssentials™ Non-Stick Craft Sheet
- Inkssentials™ Heat It™ Craft Tool
- Inkssentials™ Pop It Shapes™ - Squares
- Adirondack® Dye Ink Stamp Pad - Stream, Pool
- Adirondack® Metallics Acrylic Paint Dabber - Copper
- Adirondack® Alcohol Ink - Terra Cotta
- Adirondack® Metallic Mixatives™ - Copper
- Adirondack® Alcohol Ink Applicator and Felt
- Stickles™ - Orange Peel
- Key Charm - Blue Moon Beads, bluemoonbeads.com
- Rubber Stamp - Autumn Leaves, Scribbles Hearts/Stars (2510), autumnleaves.com
- Clear Vellum - 12"-square, Grafix, grafixarts.com
- White Cardstock - Bazzill, bazzillbasics.com
- Scallop Notecard - Jenni Bowlin Studio, jennibowlin.com
- Silk Ribbon - Treenway Silks, treenwaysilks.com
- Mini Glue Dots - Glue Dots International, gluedots.com
- Computer Font - Harrington, MS Word
- Old magazine for cutting out words/phrases
Instructions
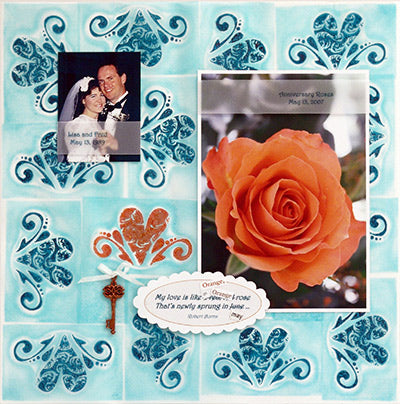
(1) Create a stamp using the gray side of a 2¼” x 3½” piece of Cut n’ Dry Foam. Use the Craft Tool to heat the gray side of the foam until it looks a bit shiny then firmly press the heart stamp into the foam until cool. You now have your own custom negative image of the rubber stamp.
(2) Stamp this custom image with Pool Adirondack Stamp onto a 12″ x 12″ sheet of clear vellum. You can stamp randomly to cover the sheet or follow the following steps for a symmetrical pattern:
• Visualize the paper in four 6″ x 6″ quadrants. (Use care when you are stamping on vellum in the following steps. It’s easy to smear ink while you work as the ink takes a while to dry completely.)
• Quadrant One: Start in the upper left corner of the vellum with your custom stamp vertical and the heart facing to the left. Ink the stamp with Pool and stamp the image in the upper left corner of the paper.
• Turn the stamp counter-clockwise 90°. Your stamp is now horizontal with the heart shape facing the bottom. Ink with Pool and stamp to the right of the first image and at the top of the paper.
• Turn the stamp counter-clockwise 90°. Your stamp is now vertical with the heart facing to the right. Ink with Pool Inkpad and stamp beneath the second image. Line your stamped edge up to the right edge of the second image.
• Turn the stamp counter-clockwise 90°. Your stamp is now horizontal with the heart facing up. Ink with Pool and stamp to the left of image three and below image one. Your first quadrant is now complete with four stamped images and an uninked square section in the middle.
• Now turn your paper counter-clockwise 90° so that quadrant two is now in the upper left corner.
• Repeat stamping and rotating until all four quadrants are stamped.
(3) Cut a 1½”-square of Cut n’ Dry Foam. Ink the gray side with the Pool inkpad and use to stamp in the four uninked squares in the centers of each quadrant.
(4) Let the ink dry on the vellum. Use the Heat Tool to speed the drying process.
(5) When the ink is completely dry, turn the vellum over and use Stream Adirondack Ink Stamp Pad to stamp the positive rubber stamp image over the top of each negative image. Use Copper Paint Dabber to stamp one image in the bottom left quadrant. Let the ink and paint dry completely before assembling the rest of the layout. Use the Heat Tool to speed the drying process.
(6) When ink and paint is completely dry, adhere the vellum background to a sheet of 12″ x 12″ white cardstock to make the colors pop.
(7) Print journaling onto 1″-wide strips of vellum and wrap around a wallet-sized photo and a 5″ x 7″ photo. Attach photos to the layout as shown.
(8) Print quote onto vellum and trim to fit the scallop notecard. Adhere vellum quote to notecard and attach to the layout with Pop It Shapes squares. Alter the quote if desired by cutting and pasting snippets of old magazines.
(9) Use Alcohol Ink Applicator to color a silver key charm using Terra Cotta and Copper Alcohol inks. When dry, tie a small piece of silk ribbon to the top and attach the key to the layout with mini glue dots.>
(10) Complete the layout by embellishing the copper painted heart image with Orange Peel Stickles.


