by Carisa Zglobicki

In Full Bloom by Carisa Zglobicki
- Materials
- Instructions
- Tim Holtz Distress® Sprayer
- Dylusions Stencils: Large Fronds of Foliage, Dotted Flowers
- Dina Wakley Mixed Media Archival Ink Palette
- Dina Wakley Media Stencils & Masks: Senciled Queenie
- Dina Wakley Media Fine Tip Applicator
- Dina Wakley Media Stamps: Positive Women
- Dina Wakley Media Brushes
- Dina Wakely Media Board: 9
- Dina Wakley Media 1 oz. Mica Sprays: Lapis
- Dina Wakley Media Heavy Body Acrylic Paints: Ocean, Evergreen, Fuchsia, Cheddar, Elephant, Blushing, Magenta, Night, White
Instructions

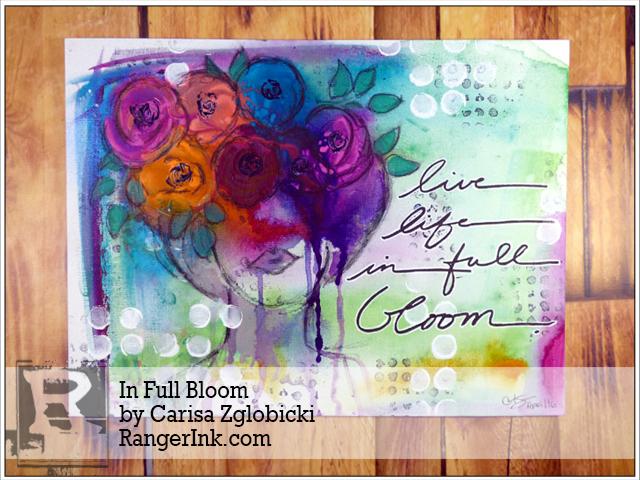
Hi everyone! Carisa here with you today and I’m so excited to be here on the Ranger blog sharing a mixed media piece using brand new Dina Wakley Media products! It’s no secret how much I love Dina Wakley Media Heavy Body Acrylics and I have to say the new colors are amazing. I love the darker, moodier hues and I had a lot of fun using them to create my spring inspired piece on the new Media Boards. I’m slightly obsessed with abstract florals right now and I would love to show you how I created this spring inspired piece today.
 Step 1:
First, I started by spraying the Media Board with some water using the Distress Sprayer. Then, I took some paint and a Dina Wakley Media Stiff Bristle Brush. I have seen Dina Wakley use this technique and it gives you the most unexpected bursts of color. I love how it softens the paint and gives it a more watercolor look in areas. The hardest part for me using this technique is allowing the paint to dry naturally allowing the colors to move and blend more organically rather than trying to speed that up with a heat tool. I’ve learned that it’s worth the wait!
 Step 2:
Once that layer is dry, I wanted to add more texture and depth to my canvas so I pulled out the Positive Women stamp set because I love the dots texture stamp in this set and inked it up with the new Dina Wakley Media Archival Ink Palette using the color Night. I also used the stencils Dotted Flowers with some Dina Wakley Heavy Body Media in White to bring in some more white into the canvas. I have a hard time leaving white space…it’s one of my things. I just love color so much I have a hard time knowing when to stop!
 Step 3:
Next I pulled out Stenciled Queenie and using the new color Elephant (which can I just mention how much I love the names of these paints!?) and stenciled the face onto my canvas. Now…I have to admit something here, once I had this on my canvas I tried to outline the face with a Stabilo All pencil in black and kinda made a boo boo. I was almost tempted to start completely over but one of my mottos in mixed media is pushing past the ugly. So I kept moving forward. It was time to start adding some flowers and I gave my girl a crown of flowers by putting some paint on my finger and creating some loose circles, overlapping the colors in places. Then I took out my Distress Sprayer again and generously sprayed the flowers while tilting my Media Board up allowing the colors to blend and drip down the page which is one of my personal favorite techniques and this is when I found my happy in the page because those drips covered up my earlier mistake! I also added some Dina Wakley Media Mica Sprays in areas while the paint was still wet. I love the beautiful pearlescent shimmer it leaves behind.
 Step 4:
Once again, I allowed the paint to air dry…well, mostly – I did try to heat set it a bit, but really wasn’t liking the way the paint was reacting to the heat so I did set it aside to dry the rest of the way. It really is best to let it dry naturally!! I then redefined the bottom of the face as well as outlined the hair and flowers with the Stabilo All pencil to give the shapes a little more definition but not too much because I really was going for a most abstract look. Then I took the Fronds of Foliage stencil to create some leaves around the stencils using Evergreen. Finally, I added my sentiment using a brush pen with permanent ink and I outlined it with a white gel pen.

It took me a long time to love my own handwriting but I think it adds a personal touch and defining signature that you just can’t get any other way. Play with different pens and styles of writing until you find something that feels comfortable. Now I love adding a fun quote or lyric to complete my page with my own personal touch.
 Here are some close ups of the finished piece. You can see the beautiful mica shimmer here. I love how it mixed with the drips and creates new colors as the light shifts across the page.
 Another close up of the beautiful mix of paint and water. I love the fun bursts and new shades of color that is created as the paint dries. I absolutely love the combination of texture created here with the mix of water and heavy body acrylics with more defined flower centers using the fine tip applicator with Dina Wakley Media Heavy Body Acrylics.
I filmed the entire process for you as well so you can see each step as it comes together. I am trying to keep my cool here but this is a huge honor for me to be able to share my love of mixed media here on the Ranger blog and I’m so grateful for the opportunity! I hope you are inspired to get messy, push past the ugly and create beautiful art using the entire Dina Wakley Media Line!


