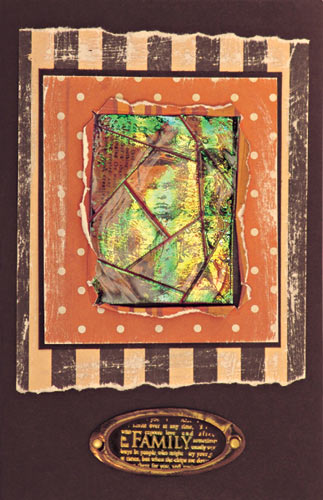
Using Ultra Thick Embossing Enamel, create a clever iridescent glass-like feature in your card-making!

Holographic Mosaic UTEE Card By Judi Hayes
- Materials
- Instructions
- Tim Holtz Distress® Clear Embossing Ink
- Ranger Heat it™ Craft Tool
- Ranger Glossy Accents™
- Archival Ink™ #0 Pads
- Perfect Pearls™ Pigment Powder Kits
- Ranger Non-Stick Craft Sheet™
- Crafters Choice Mylar Iridescent Tissue, Marvel Products, Inc.
- Scissors
- Stamps: Tim Holtz Collection M4-1086, Stampers Anonymous and Hero Arts C-3001
- Cardstock: Scenic Route Paper Co., Slab IV Provocraft; Eclipse Black, Astrobright
- Sizzix Oval Bookplate die cut from chipboard
- Mini brads
- Glue Stick
- 1/8” hole punch
- Sanding block
Instructions
(1) Pour Clear UTEE into the Melting Pot; plug in and turn thermostat to “UTEE” setting. Cover with lid and allow to completely melt. Tip: Do not stir UTEE while it is melting because it may result in bubbles in your finished product.
(2) Cut out a piece of Mylar Tissue and place on Non-Stick Craft Sheet. Note: make sure you use the Mylar Iridescent Tissue, as it holds up to the heat; other iridescent plastics may not. Test first.
(3) Using Jet Black Archival Ink, stamp image onto Mylar Iridescent Tissue.
(4) Once the clear UTEE has melted, pour a “puddle” over the mylar tissue, just pouring enough to cover the stamped image on the tissue.
(5) In order to cut up the UTEE, it still needs to be a little bit warm, but cool enough to touch. Be sure that the UTEE has fully solidified before peeling off of the Non-Stick Craft Sheet.
(6) Cut up UTEE into squares or other shapes (to make a more “broken tile” effect, randomly cut into triangles, squares, etc.)
(7) Re-assemble holographic “tiles” to match stamp design. Once placement has been determined, pick each piece up, place a small amount of Glossy Accents on the back and press onto colored cardstock. If Allow to dry completely. Use a piece of lighter colored cardstock to highlight the face on the image. The rest of the pieces can be mounted on darker colored cardstock. Note: Glossy Accents goes on the Mylar tissue side of tile.
(8) Pour rest of clear UTEE onto craft sheet to use at a later time. Turn off heat and let pan cool completely. Cooled UTEE can be lifted from craft sheet and reused at a later time.
(9) Mount the assembled holographic mosaic onto a piece of black cardstock using glue stick. Assemble patterned cardstocks onto front of card as shown in sample. Note: Rub cardstock with sanding block to weather the paper and have the white core show through.
(10) Stamp “family” (Hero Arts) using Emboss it clear ink. Apply Gold detail embossing powder and heat-set with Heat It Craft Tool.
(11) Using bullet tip brush from the Aged Patina Kit, dip brush into Green Patina and brush over embossed area to highlight the word “family”. Dust away excess powder with larger brush.
(12) To prepare the Oval Bookplate Hinge hardware, follow Melting Pot process in step 1 using Black UTEE.
(13) Using Kool Toolz Tweezerz, dip Oval Bookplate die cut into black UTEE and submerge to completely cover. Carefully remove from UTEE and place on craft sheet to dry. Note: if holes plug up, use Craft Heat Tool to soften area so you can insert mini brad.
(14) Insert mini brads into both sides of bookplate.
(15) Using bullet tip brush from the Aged Patina Kit, dip brush into Heirloom Gold and brush over oval bookplate and mini brads. Dust away excess powder with larger brush. Add Green Patina highlights using the same technique. Use heat tool to set Perfect Pearls.
(16) Position oval bookplate over embossed “family”, punch holes left and right and affix to card.


