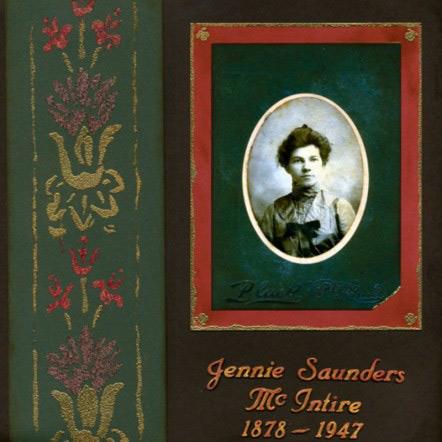
Use embossing powders to create a beautiful scrapbook page honoring your family heritage!

Heritage Portrait Scrapbook Page By Cat Confer
- Materials
- Instructions
- Inkssentials™ Crackle Accents™
- Ranger Embossing Powder - Antique Gold
- Adirondack® Embossing Powder - Terra Cotta
- Embossing Antiquities™ - Chinese Red
- Perfect Pearls™ Perfect Pen
- Distress Embossing Ink Stamp Pad
- Tim Holtz Distress™ Ink - Walnut Stain
- Inkssentials™ Cut n’ Dry Foam™
- Inkssentials™ Heat It Craft Tool™
- Perfect Ink Refresher™
- Perfect Pearls™ Pigment Kits - Metallics, Perfect Pearls™ brushes
- Inkssentials™ Non-Stick Craft Sheet
- Cardstock - deep brown, dark green, dark red
- Liquid adhesive
- QuicKutz Snow Angel alphabet dies and Squeeze tool
- Small paintbrush
- Wall border stencil
- Copy of an old family photo
Instructions
(1) Pour a heavy layer of Crackle Accents over the oval section of the photo. This will simulate a piece of glass over just this portion of the photo. Set aside to dry overnight.
(2) Cut a border strip and a photo mat out of the dark green and dark red cardstock.
(3) Align the wall border stencil on the cardstock border strip. Apply Distress Embossing Ink by pushing down on gently the pad directly over the stencil. Don’t rub back and forth, as this will cause the ink to go underneath the stencil.
(4) Sprinkle embossing powders over the Distress Embossing Ink, coloring in different areas with separate colors of embossing powder. Shake off the excess embossing powder, and emboss the border with the Heat It Craft Tool.
(5) Ink the edges of the photo mat with the Perfect Pen, apply the Antique Gold embossing powder, shake off the excess and emboss.
(6) Ink the edges of the photo, photo mat, border and page background with a piece of Cut N Dry Foam and Walnut Stain Distress Ink.
(7) Cut out four of each letter in the page title using the QuicKutz alphabet dies and Squeeze tool.
(8) Layer each of the four layers of each letter together by applying a thin coat of glue with the paintbrush. The letters will be about 1/8″ thick once all of the layers are glued together.
(9) Spritz Perfect Ink Refresher onto the layered letters.
(10) Dust a couple of colors of the Perfect Pearls Metallics onto the damp letters. Brush off excess.
(11) Pour a small puddle of Crackle Accents onto the Non-Stick Craft Sheet. Brush a thin coat of Crackle Accents onto each letter, then set aside to dry.
(12) Once the Crackle Accents have dried on the photo and the letters, assemble the page.


