by Josefine Fourage

Handmade Greeting Cards Mixed Media Style by Josefine Fourage
- Materials
- Instructions
- Dylusions Paint: White Linen, Vanilla Custard, Rose Quartz, Pure Sunshine, Pomegranate See, After Midnight
- Dylusions Ink Sprays: Crushed Grape, Calypso Teal
- Dylusions Paint Pens: Set #2
- Dylusions Washi Tape: Set #4, Set #5
- Dylusions Creative Dyary Dy-Cuts: #4, #5, #6, #7
- Dylusions Creative Dyary Back Chat
- Dylusions Colouring Sheets: Borders & Quotes
- Dylusions Small Stencils: Sugar Lumps, Angles, Honeycomb
- Ranger Gel Plate: 3 Pack Assortment
- Ranger Gel Plate Brayer: Small
- Ranger Archival Ink Pad: Jet Black
- White and Black Cardstock
Instructions
Hello there! Josefine here and I’m super excited to get inky with you. Who loves monoprinting? I know I do! And if you have never monoprinted before, now is your chance to get started.
Ranger has two options for monoprinting plates (called Gel Plates) – one big one and a set with 3 different sizes. That’s the one I used for this project; to be precise, I used the 3.5” x 6.75” sized one. For my cards, I cut three pieces of white card stock to the size 3” x 6.75”.

Step 1: I added a little bit of paint to the Gel Plate and used the small brayer to spread it out. As you can see, I didn’t cover the entire plate, just parts of it. Same with the paper. I pressed the paper partially onto the Gel Plate.

Step 2: Usually, I finish one layer with only paint before I start getting the stencils out, but for this technique (partial printing) I wanted to try combining these two steps.

Step 3: One of the cards got rather busy, so I added a thin layer of white. Because the cardstock is smaller than the Gel Plate, I laid the other cards on top which allowed me to press all the edges of the card with the busy background into the paint. The nice side effect was that I now had some white lines on the other two cards.

Step 4: The card on the very right was still rather busy and I didn’t like the combination of the After Midnight blue with the yellow and orange layers underneath.

Step 5: Instead of throwing it away, I decided to experiment with the Dylusions Ink Sprays. First, I added more White Linen paint on top of the card to tone it down. Then, I used the Ink Sprays, dropped those on top of the 3” circular Gel Plate and pressed the card on top.

Step 6: That came out really nice, but I was still missing some contrast. So, I added more white to the Gel Plate and pressed that on top of the paper.

Step 7: Next up, I added a bunch of marks all over the cards using the different colors from the Dylusions Paint Pens.

Step 8: I was done with the backgrounds and started working on the finishing touches. It started with a variety of washi tape…

Step 9: …and continued with several die-cuts. I mixed the different sets – heads from one set and bodies from another – to create the figures for my cards. Once I decided which ones to use together, I cut them out. Even though the die-cuts are already cut to size, I thought it would look better, if they had no borders at all.

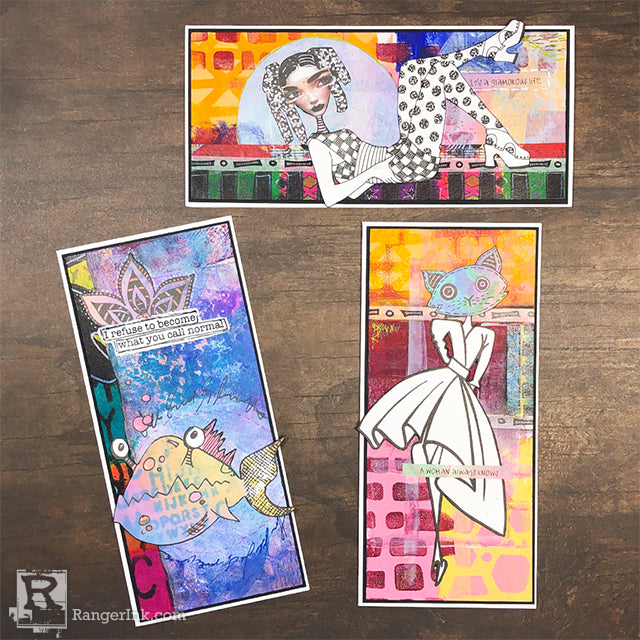
Step 10: I adhered them down, added a few more doodles and sentiments and then put together the cards.

Step 11: I’m so glad that I didn’t throw away this background, because it first perfectly with the fish die-cut and the snarky sentiment.

Step 12: When I have a very busy background I like to use simple patterns for the foreground. These paper dolls are great and with the white circle from the Gel Plate makes a good contrast for the card.

Step 13:
It’s just a lot of fun to work in so many layers and not think too much about how everything fits together. Eventually, it all comes together.
Thanks so much for stopping by. I hope you enjoyed my mixed media greeting cards and feel inspired to get that Gel Plate out yourself. Have fun!


