by Carisa Zglobicki

Hand Painted Vintage Inspired Christmas Card by Carisa Zglobicki
- Materials
- Instructions
- Dina Wakley Media Scribbly Vintage Holiday Stamp and Stencil Set
- Archival Ink™ #0 Pads : Sepia, Jet Black
- Tim Holtz® Distress Ink Re-inkers : Aged Mahogany, Crushed Olive, Stormy Sky, Spun Sugar, Tattered Rose, Tea Dye
- Tim Holtz® Distress Crayons : Hickory Smoke
- Tim Holtz® Distress Ink Pads : Aged Mahogany, Crushed Olive
- Tim Holtz® Woodgrain Cardstock
- Dina Wakley Media Tape : Blank
- Dina Wakley Media Heavy Body Acrylic Paints : Gilt
- Ranger Mini Blending Tool
- Stickles™ & Liquid Pearls™ Holiday Kits : Yuletide
- Ranger Non-Stick Craft Sheet™
- Ranger Heat it™ Craft Tool
- Ranger Surfaces Watercolor Paper
- Ranger Adhesive Foam Rolls
- Ranger Adhesive Strips
- Tim Holtz Scissors
- Watercolor Brush (Round 4, Round 8)
Instructions

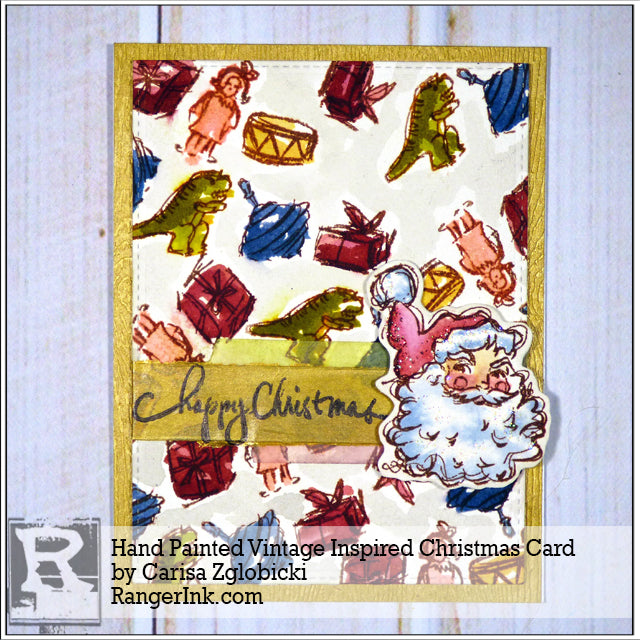
Hi everyone! Carisa here with you today and I’m so excited to be on the Ranger blog sharing a Christmas card I made using the brand new Dina Wakely Media Scribbly Vintage Holiday stamps! I fell in love with this stamp set as soon as I first saw it. I love all the vintage inspired images – especially that Santa and Reindeer! As I thought about my project for today, I knew I wanted to create a Christmas card and thought it would be fun to do a little watercoloring with you as well.

Step 1: First, I started by stamping all the smaller images in Sepia Archival Ink to create a background panel for my card. I originally thought the toy images were all separate but it is actually a cute border stamp of images but for what I had in mind, I wanted it to look more random (perhaps like vintage wrapping paper) so I cut the stamp in half so that I could create that more easily. Don’t be afraid to cut your stamps to suit your needs. You can easily place them back together on your stamping block to use as a border if you want later. I also stamped the frame and Santa image to get ready to watercolor later.

Step 2: When I first started crafting, I started by making cards and coloring is my favorite thing about card making. So, I decided to use my Distress Inkers as my watercolor for this card. I wanted to create a card that is easily reproduced and I think stamping a lot of backgrounds and then sitting down to watch my favorite holiday movie while coloring is the perfect thing to do with this design. I also used a Distress Crayon to lightly fill in the areas between the images just to soften my background panel a bit.

Step 3: Next I pulled out my Blank Dina Wakley Media Tapes. These are perfect for customizing to suit any project you are working on. I knew I wanted to create a border for my Santa image as well as stamp the Happy Christmas sentiment from the stamp set. I started by painting the medium tape with Dina’s Heavy Body Acrylic Paint, and then used my Distress Inks to add color to the other two sizes. Once the Gilt paint was dry, I stamped Happy Christmas twice using Black Archival Ink and then layered them onto my background panel.

Step 4: I decided to layer my background panel on the Distress Woodgrain Cardstock but first I added color around the edges with the Gilt paint to tie everything together. I love how adding paint or ink to the woodgrain cardstock really brings out all that pretty texture.

Step 5: At this point, I realized the frame I stamped with the Santa image was just too busy and big for my card so I decided to fussy cut my Santa out since I already watercolored that. I then used foam tape to adhere my background panel as well as the Santa image to my card.

Step 6: As a finishing touch, I pulled out my new Yuletide Stickles & Liquid Pearl set and used the Poinsetta color to add a bit of sparkle to the darker areas of the Santa hat. I also used Stardust Stickles on the white areas of my image. I don’t think a Christmas card is complete without a little shimmer!


Here are some close ups of my finished card and all the watercoloring. I think coloring is so relaxing and it was fun to create this vintage inspired Christmas card for you today!
I filmed the entire process for you as well so you can see each step as it comes together. I love sharing my process and letting you see the entire project come together. Thank you Ranger again for inviting me to share my art with your readers using my favorite Ranger products. I hope you have been inspired to pull out your Ranger holiday stamps and have a little coloring fun as you create your holiday cards!
Your Cart
- Choosing a selection results in a full page refresh.


