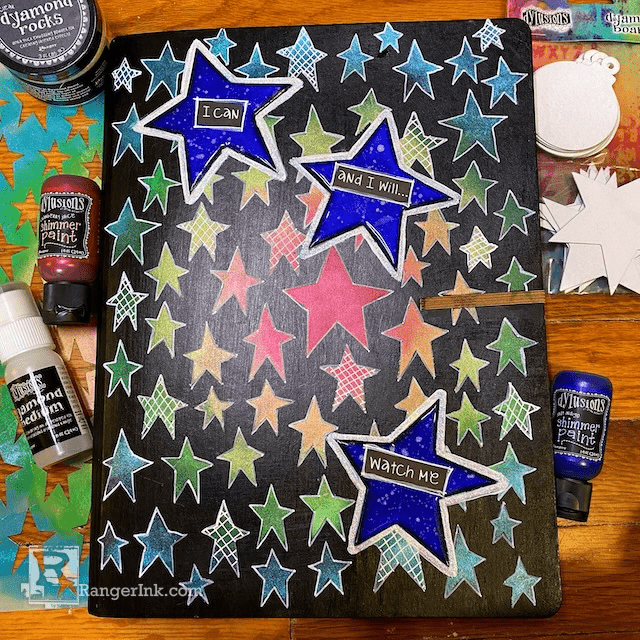
Create a journal cover that inspires! In this tutorial, Jess Peters has transformed her large Dylusions Ledger Journal with the newest Dylusions Shimmer Paints and Dyamond Boards! The Shimmer Paints add a vibrant, sparkling touch, while the Dyamond Boards bring dimension and detail.

Dylusions Dyamond Board Journal Cover by Jess Peters
- Materials
- Instructions
Dylusions Brush Set 5pc
Dylusions Flip Cap Paint: Black Marble, White Linen
Dylusions Large Stencil - Starstruck
Dylusions Shimmer Paints: Cranberry Juice, Tree Bark, Jungle Leaf, Cut Grass, Blue Lagoon, Just Indigo
Dylusions Mini Archival Ink Kit #1
Ranger Mini Ink Blending Tool
Dylusions Dyamond Medium Dabber
Dylusions Clear Dyamond Rocks
Dylusions Dyamond Boards - Small Baubles & Stars
Ranger Heat It Craft Tool
Ranger Silicone Mat
Dylusions Paint Pens Black & White
Dylusions Bigger Back Chat Black Set #2
Dylusions Stickles Stardust
Ranger Glossy Accents
Hello again, friends! Ever since I was in school one of my favorite things to do has been to decorate book covers and since my Large Ledger Journal is almost complete I decided to give it a proper cover. The new shimmer paint colors from Dylusions are absolutely dazzling and the Dyamond boards are perfect as three dimensional embellishments. I hope this inspires you to have fun and break out your inner child!

Step 1: Paint the cover of your Large Ledger Journal with Dylusions Flip Cap Paint in Black Marble.

Step 2: Place the Large Starstruck Stencil on the cover. With a makeup sponge, apply Dylusions Shimmer Paint in Cranberry Juice to the center of the stencil. (Tip: use a bit of washi tape to secure your stencil at the corners.)

Step 3: Apply Dylusions Shimmer Paint in Tree Bark around the Cranberry Juice area in a ring. Continue with rings of Jungle leaf, Cut Grass, and Blue Lagoon out to the edge.

Step 4: Remove the stencil and allow the cover to dry. Use Dylusions White Paint Pen and draw a border around the stars.

Step 5: Paint 3 stars from the Baubles & Stars Dyamond Board set with Just Indigo Shimmer Paint and splatter with White Linen Flip Cap Paint.

Step 6: Ink the edges of your stars using a Ranger Mini Ink Blending Tool and Dylusions Mini Archival Ink in Black Marble.


Step 7: After your stars are dry, cover one of them completely with the Dyamond Medium Dabber. Add a layer of Clear Dyamond Rocks and gently tap off excess.


Step 8: Use your Ranger Heat It Tool to melt the rocks. While it’s still hot, quickly add another layer of Clear Dyamond Rocks. (Tip: Use the Ranger Silicone Mat to protect your Surface from the heat.)


Step 9: Lightly tap off excess Dyamond Rocks and melt. Add a third layer and melt for a smooth, glassy finish. Repeat steps 7-9 to complete your remaining stars.

Step 10: Find the quote that reads “I can and I will… watch me” from Dylusions Bigger Back Chat set #2, cut into 3 segments, and stick them onto your stars.

Step 11: Use Ranger Glossy Accents to securely glue the stars to your cover.

Step 12: Paint a white border around the large stars with White Linen Flip Cap Paint to make them stand out.


Step 13: With your White Paint Pen, add some doodles to the smaller stars and borders around the quote. Don’t forget to dial up the sparkle with Dylusions Designer Series Stickles in Stardust to complete your cover!


 Hello friends! My name is Jess and I live in New Jersey where I was born and raised. I discovered the world of art journaling and mixed media in 2022 and I’ve been obsessed ever since! I love bright bold color and I’m a sucker for all things that glitter and shine. I’m also inspired by music and song lyrics and often include them in my layouts. If you’d like to check out more of my art and process pics you can find me on Instagram