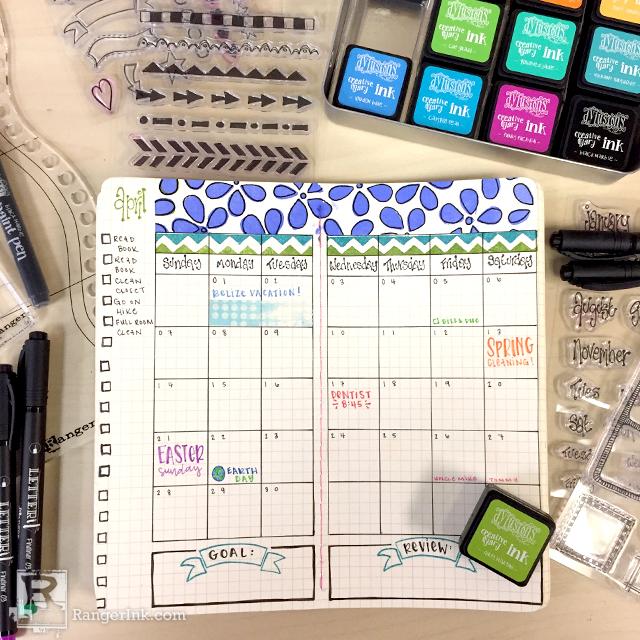
Dyalog Monthly Bullet Journal Spread by Taylor Huizenga
- Materials
- Instructions
- Dylusions Dyalog Insert Book: Grid
- Dylusions Creative Dyary Inks: Dirty Martini, Vibrant Turquoise, Black Marble
- Dylusions Dyalog Stamps: The Full Package, Blind Date, All the Right Boxes, On the Edge
- Dylusions Dyalog Stencils: Doodle It
- Dylusions Paint: Periwinkle Blue
- Dylusions Paint Pens: Black Marble
- Dylusions Journaling Block
- Dylusions Washi Tape
- Letter It™ Black Fineliners
- Letter It™ Colored Fineliners
- Letter It™ Acrylic Stamping Block
- Dina Wakley Media Tape: Printed
- Ranger Mini Ink Blending Tool & Foam
Instructions

Step 1: Begin by drawing a basic calendar template across your bullet journal grid layout with the Dylusions Journaling Block and the Letter It™ Black Fineliner 04 pen. For this calendar, leave four spaces for the day of the week, and each box was 5 boxes high by 5 boxes wide. Also, leave space at the top for a decorative header.

Step 2: Once the calendar outline was done, go in with the Letter It™ Black Fineliner 01 pen and added the dates to each daily box.

Step 3: Next, use the Dylusions Dyalog Blind Date stamp to add the days of the week to the top boxes. Stamp in the Dylusions Dyary Ink in Black Marble.

Step 4: Using the Dylusions Dyary Ink in Dirty Martini and Vibrant Turquoise, add a decorative border to the top half of my days of the week. Use the triangle border from the On The Edge stamp to create a zig zag pattern of the two colors. Tape off the edges when stamping to create crisp lines and not to go past where you want to stamp.

Step 5: Along the left side of the page, there was additional space. Stamp the month along the top, and proceeded to stamp check boxes down the side in Black Marble. This will be the monthly “to-do list”. This stamp works great, because once a task is done, it has a check box built in already to mark it completed.

Step 6: Again, use Dina Wakley Media Tape to tape off the top section. Use Dylusions Periwinkle Blue through the Dylusions Dyalog Stencil with a Ranger Mini Ink Blending Tool to add a pattern to the header.

Step 7: Once dry, roughly outline the flowers.

Step 8: In the open bottom space, use the banner stamp with Vibrant Turquoise to stamp out two banner centered under the calendar squares. Label one “Goal” to set a goal of the month, and the other label “Review” where at the end of the month you can take notes on how achieving your goal went and assess for the following month.

Step 9: Once the spread was completely laid out, go back in and started marking important dates, birthdays, appointments, and holidays down using the Letter It™ Colored Fineliners. Go in and start adding tasks to my to-do list for the month.


