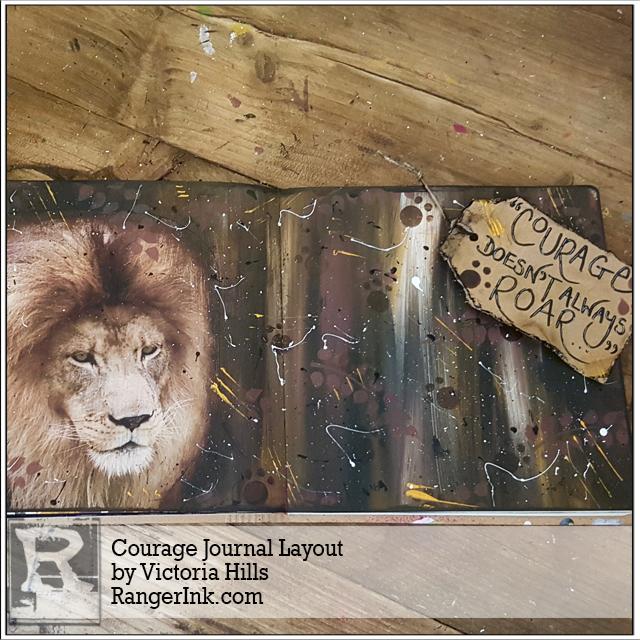
Hi, it’s Victoria…I’m delighted to be here on the Ranger Ink blog, sharing another page with you – this time in my Dylusions Square Journal. When I came across the last two lines in a poem by the American writer and author Mary Anne Radmacher, I knew I wanted to create something around them. A lion image seemed to be the perfect compliment to the first line in particular: ‘Courage doesn’t always roar’. For me, the beauty of Dylusions paints is the way in which I can use a blend of colours to create a unique background that reflects the colours in my chosen image.

Courage Journal Layout by Victoria Hills
- Materials
- Instructions
- Dylusions Square Creative Journals
- Dylusions Paint : Pure Sunshine, Melted Chocolate, Ground Coffee, Black Marble, White Linen
- Dylusions Stencils : Fronds of Foliage, Holes
- Dylusions Paint Pens : White Linen, Black Marble
- Dylusions Journaling Tags : #12 Kraft
- Ranger Craft Tags : #8 Manila
- Ranger Non-Stick Craft Sheet™
- Ranger Mini Blending Tool with Foam
- Tim Holtz® Distress Collage Mediums : Matte
- Tim Holtz® Distress Collage Brushes
- Tim Holtz® Distress Ink Pads : Vintage Photo, Antique Linen, Black Soot
- Dina Wakley Media Gesso : White Gesso
- Palette Knife Set
- Ranger Heat it™ Craft Tool
- Tim Holtz by Tonic Studios Paper Distresser
- Tim Holtz by Tonic Studios 102e Non Stick Micro Serrated Multi Cutter
- Free lion image: Dreamstime.com ID 1287358 © Laurie L. Snidow
- Faber-Castell Pitt Artist Brush Pen: Black
- Large and fine paintbrushes e.g. 1” flat and round 1 or 2
- Single Hole Punch
- Twine
Instructions

Step 1: Choose the image and text for your page. I found my lion image online, and needed to resize it to fit my journal page. Getting it to the size you want can take a couple of attempts, so I usually print in draft until I’m happy with the size before printing a couple of ‘best’ copies. I used normal quality white A4 printer paper, however you could use something thicker or textured if you wanted to add dimension to your page. Cut out your image; I deliberately left about half an inch round the lion’s mane to enable me to blend the image into the background later in the process.

Step 2: Choose Dylusions paints for your background that echo the colours in your image. I wanted the lion to stand out on the page, so looked for colours that would mirror the darker tones in his mane.

Step 3: Put clean scrap paper behind your journal pages and use a palette knife to put some of each paint onto your Craft Sheet. Having them here before you start helps you to build up the layers quickly. I apply them dark to light, so put them out in this order. Using a large flat paintbrush, apply the darkest paint randomly over the page in long, straight strokes. Work briskly, so that each layer is applied while the other layers are still wet. This helps the colours to blend, creating a unique background every time. I started with a small amount of Black Marble followed by Ground Coffee…

Step 4: …my third layer was Melted Chocolate…

Step 5: …and then Pure Sunshine.

Step 6: I thought the Pure Sunshine was too prominent, so I applied more Ground Coffee and Melted Chocolate before adding the final layer: a few brushstrokes of White Linen. I used the leftover paint on a large black Dylusions journal tag, so I’ve got the start of a background for another project.

Step 7: Here’s a close-up of the still-wet background after all the layers were applied. This type of blended background can use a lot of paint, so leave it for a few hours to ensure it’s completely dry before starting the stencilling.

Step 8: If you don’t have a kraft tag to use for your quote, this is the ideal time in which to make it. Using a #8 Ranger manila tag as a guide for your tag’s width, measure and then cut three tags across the length of a large #12 Dylusions kraft journal tag. Make a hole in the top, and cut off two of the corners to complete your tag (and spares!).

Step 9: Write out your quote. I did mine in pencil first, and then wrote over it with a thick black permanent ink brush pen.

Step 10: Stencil onto your background using two or three of the paint colours you’ve already used. I wanted marks on the background that complimented the image of the lion, so used Melted Chocolate to stencil some of Dyan’s fronds, and then the small Holes stencil with Ground Coffee to make paw prints.

Step 11: When the stencilling is dry, use Matte Collage Medium to stick your image to the page, trimming any excess that’s overlapping the edge of the pages when the medium itself is dry. Go back to the palette of colours you’ve already used to blend the image into your background. I used Ground Coffee and a little bit of Black Marble, applied and blended with a combination of my fingers and a thin paintbrush. When you’re happy with the blending, add some random paint marks to the stencilled background, overlapping the image with some of the marks to help it further integrate with your background. I used Pure Sunshine on the edge of a palette knife to make claw marks, and then splattered some Black Marble paint and white gesso using a thin paintbrush. Before I added the marks, I stencilled a couple more fronds over the lions face to give the suggestion of him hiding behind bushes. Complete this part of your page by edging it with Black Marble paint, using either a blending tool or your finger (or both).

Step 12: The final stage is finishing your tag. Stencil a couple of marks onto the tag to reflect those on your background, and then add some highlights to your letters with a White Linen paint pen.

Step 13: When the highlights are completely dry, distress the edge of your tag with the Tim Holtz tool (or carefully, with a pair of scissors). Gently scrunch up the tag so that it creases, and then add some grungy marks with Distress Inks and a blending tool. I used Antique Linen, Vintage Photo and Black Soot. Add a couple of small claw marks with Pure Sunshine paint and a few splashes of white gesso, being careful that the quote is still easy to read. Add your twine…I rubbed a bit of Black Marble paint onto mine so that it looked more worn.

Step 14: Punch a hole through your journal page, and tie on the tag with its twine.

Here’s the finished page…

…and a closer look at the way in which the lion’s mane really blends into the background.
I loved creating this page – it never ceases to amaze me what amazing backgrounds the Dylusions paints make when they’re blended together like this. I hope you like it too.


