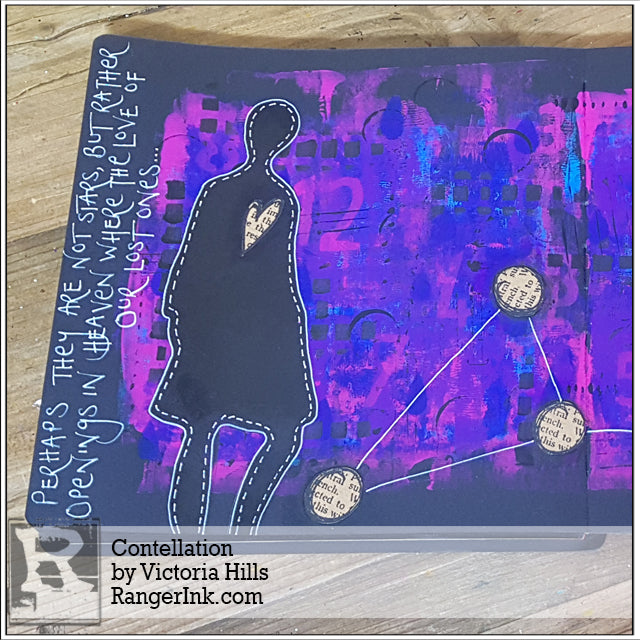
Hi, it’s Victoria…I’m really looking forward to sharing my ‘Constellation’ journal page with you. There were a few things that influenced this page…I love using silhouettes – particularly when I’m working on a black background – I think they add real impact. This ‘Jay’ silhouette looked quite pensive, and having lost my dad unexpectedly to cancer at the end of last year, it really resonated with me. Dad’s star sign was Leo, so I put the constellation together with the beautiful words of an Eskimo Proverb and made this page. Dylusions paints look stunning when they’re used on the black journal and journaling tags – or a solid Black Marble painted background. If you haven’t experimented with them on a black surface yet, then I’d really recommend it. I hope this journal page inspires you to give it a go!

Constellation by Victoria Hills
- Materials
- Instructions
- Dylusions Square Creative Journals : Black
- Dylusions Paint : After Midnight, Crushed Grape, Bubblegum Pink, London Blue, Black Marble
- Dylusions Stencils : Jay Silhouettes, Old School Number Large, Raindrops Small, Squares Small
- Dylusions Journal Block
- Dylusions Cling Mount Stamps : Love Struck Lucy
- Dylusions Paint Pens : White Linen
- Dylusions Journaling Tags : #12 Kraft
- Ranger Craft Tags : #8 Manila
- Ranger Non-Stick Craft Sheet™
- Ranger Mini Blending Tool with Foam
- Tim Holtz® Distress Collage Mediums : Matte
- Tim Holtz® Distress Collage Brushes
- Archival Ink™ #0 Pads : Jet Black
- Ranger Brayers
- Palette Knife Set
- Ranger Heat it™ Craft Tool
- Tim Holtz byTonic Studios Kushgrip Snips
- Small round paintbrush
- A printed image (for reference) of your chosen constellation
Instructions

Step 1: Choose your background colour scheme. I wanted the colours to suggest a night sky, however didn’t want it to be too dark, so included Bubblegum Pink to lighten the overall effect. I decided to use my black journal for this spread because it mirrors the black of the silhouette in a way that makes the figure really stand out.

Step 2: Using a palette knife, add some Bubblegum Pink onto your Craft Mat; put some on your brayer, and then gently roll it onto your journal page in horizontal and vertical ‘stripes’. The aim is to get a textured, patchy background, so use a light touch; not too much paint, and avoid blending the paints by ensuring that each layer is dry before adding the next. I left a border of untouched paper round the edge of the page so that I can add my quote later.

Step 3: I pressed a manila tag into the leftover paint before cleaning my Craft mat – it makes a great textured background. Clean your brayer and mat, and let the first layer of paint dry (or use a heat tool) before adding the next colour.

Step 4: Repeat the process with your second colour – in my case, London Blue…

Step 5: …followed by After Midnight…

Step 6: …and Crushed Grape. I deliberately left the two darker colours to the end so that the colours in the top layer were more reminiscent of a night sky. You can see how the Bubblegum Pink really pops against the black journal page, and therefore stops the overall effect being too dark.

Step 7: Stencil over your background using a selection of the same colours you have already used. I used After Midnight and Bubblegum Pink, and then added some stencilling and marks in Black Marble to bring together the black journal page and silhouette.

Step 8: Position the ‘Jay’ silhouette stencil on the page (I’m using the middle figure)…

Step 9: …and then put the mask in. Use a pencil to draw an outline of the figure’s legs on your page, and then carefully take the mask back out.

Step 10: Stencil the silhouette with Black Marble paint using a Mini Blending Tool, taking care to stay within the pencil outline of the legs you’ve just drawn. You can always correct any slips with a Black Marble Paint Pen when the stencil is dry.

Step 11: Print out a copy of your chosen constellation. The hand-written note is my chosen quote – an Eskimo Proverb that I love.

Step 12: Using Archival Jet Black ink, stamp the largest circle – as many as you’re going to need for your constellation plus a couple of spares! – and one of the smaller hearts from the ‘I Love Lucy’ set onto a Dylusions Journal Kraft Tag, and cut them out.

Step 13: Place your ‘stars’ on your journal page, using your reference image as a guide. When you’re happy with their positions, stick them down with collage matte medium. When the collage medium is completely dry, cut-off the edge of any of the stars that overlap your page, and then use Black Marble paint to add a subtle shadow around the edge of the stamped circles to help them integrate into your background. I applied the paint with a small round paint brush and blended it with my fingertip.

Step 14: Stick on your stamped heart with collage medium. Draw round the stencilled silhouette with a Dylusions White Linen paint pen – I added a broken line to make the silhouette really stand out against the background. Join up the stars in your constellation with the same paint pen, and finally, add your text. I decided to add the text at each side of the spread so that as you read the words, your eye is drawn from the silhouette over to the end of the constellation.


