By Wendy Vecchi

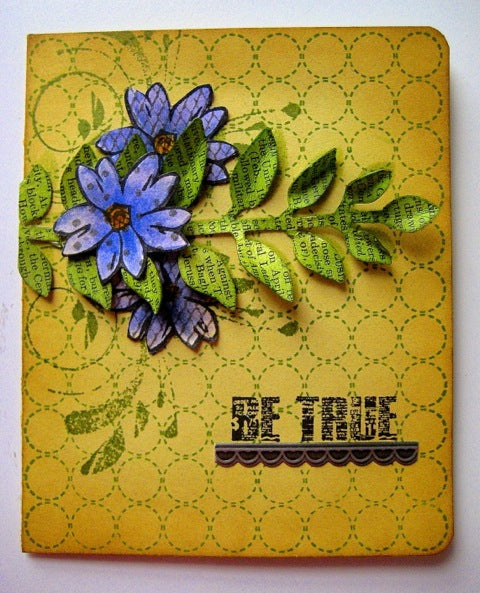
Be True Card
- Materials
- Instructions
- Archival Ink™ Designer Series: Wendy Vecchi: Fern Green, Watering Can, Leaf Green
- Archival Ink™ #0 Pads: Jet Black
- Tim Holtz® Distress Ink Pads: Scattered Straw, Brushed Corduroy
- Tim Holtz Distress® Watercolor Cardstock
- Tim Holtz® Distress™ Markers Shaded Lilac, Wild Honey
- Tim Holtz® Waterbrush
- Ranger Ink Blending Tool & Foam
- Ranger Non-Stick Craft Sheet™
- Ranger Heat it™ Craft Tool
- Ranger Brayers
- Ranger Glossy Accents™
- Tim Holtz Idea-ology: Industrious Frames and Trims
- Tim Holtz Sizzix: Vagabond or other embossing machine Garden Greens die
- Tim Holtz Tonic: Scissors
- Stampers Anonymous Wendy Vecchi studio 490: Clearly For Art (clear) Dots and Dashes Background stamp (WVBG010) Large Collage Background stamp (WVBG011) Flowers (SCS119 Blooming Art) Be True (SCS123 True Art) Flourish stamps (LCS092 My Kind of Art)
- Vintage Dictionary Page
- Paper Trimmer
- Corner Rounder
Instructions
1. Cut manila cardstock to 7 3/4 x 4 3/4 inches. Score in half to make a side opening card.
2. Use Scattered Straw to ink over the card front. Use Fern Green to stamp the dots and dashes background over the card front.

3. Use Jet Black to stamp 3 flowers on Distress Watercolor Cardstock.
4. Use the Shaded Lilac Distress Marker to color the flowers and the detail waterbrush to spread the color. Cut out flowers. Add color to the flower centers with the Wild Honey marker.

5. Use Watering Can to stamp dots over one flower and the mesh over 2 flowers.

6. Cover a piece of Clearly for Art (CFA) with a vintage dictionary page, using Glue N Seal.
7. Die cut the leaves and save the negative leftover.
8. Use the negative leaves as a stencil. Use Fern Green to stencil the leaves across the card as shown.

9. Ink the CFA die cut leaves with Fern Green and Leaf Green.
10. Heat the leaves to soften the CFA and shape leaves.

11. Use Leaf Green to stamp the flourishes as shown in the photo.
12. Use Jet Black to stamp the sentiment toward the bottom right.

13. Add shading to the card edges with Brushed Corduroy on a blending tool.
14. To assemble the card, trim off excess leaves then glue the die cut leaves over the stenciled leaves, leaving some leaves unglued, to show the shadow.
15. Add the flowers and accent the sentiment with the industrious sticker.

Tips from Wendy
1. Clearly for Art can be reheated and reshaped many times and it will always return to flat.
2. Using Jet Black for the sentiment and another color for the background makes the sentiment POP!
3. The leftover from the die cut makes a great stencil and a perfectly coordinating shadow.
4. YES…I did surgery on my large collage background stamp to transform it into 9 mini stamps. 30 years in surgery paid off!


