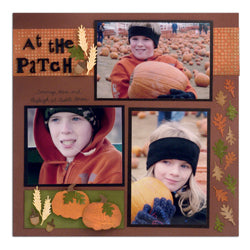
Use Distress Ink, Stickles and Crackle Paint to accent your fall scrapbook layouts.

“At the Patch” Scrapbook Layout By Patti Behan
- Materials
- Instructions
- Tim Holtz® Distress Crackle Paint - Spiced Marmalade, Vintage Photo
- Tim Holtz® Distress Ink Pads - Vintage Photo, Rusty Hinge, Scattered Straw, Forest Moss
- Tim Holtz® Distress Stickles™ - Forest Moss, Rusty Hinge, Rock Candy, Tea Dye
- Inkssentials™ Craft Nibs
- Inkssentials™ Ink Blending Tool and Foam
- Claudine Hellmuth Studio Multi-Medium - Matte
- Inkssentials™ Non-Stick Craft Sheet™
- Inkssentials™ PopIt!™ Shapes - Square
- Inkssentials™ Surfaces - Manila ATCs
- Core'dinations Tim Holtz® & Ranger Distress™ Collection - Forest Moss, Black Soot
- Core'dinations Tim Holtz® Kraft-Core™ Nostalgic Collection - No. 7, No. 20 and No. 21
- Tim Holtz® idea-ology® Grungeboard
- Tim Holtz® idea-ology® Sanding Grip
- Tim Holtz® idea-ology® Alpha Parts - Ransom
- Tim Holtz® Alterations™ by Sizzix® Vagabond™ Machine
- Tim Holtz® Alterations™ by Sizzix® Movers & Shapers - Mini Pumpkin
- Tim Holtz® Alterations™ by Sizzix® Texture Fades™ Embossing Folders - Dot Matrix
- Tim Holtz® Alterations™ by Sizzix® Decorative Strip - Autumn Gatherings
- Tim Holtz® by Tonic Studios® Kushgrip Snips
- Paper trimmer
- Scrap paper
- Tape adhesive
Instructions
(1) Cut two mini pumpkins from Grungeboard. Paint the stem with Vintage Photo and the pumpkin with Spiced Marmalade Crackle Paint. Set aside to dry.
(2) Cut two large acorns and one small acorn from No. 21 cardstock (use the Kraft side). Repeat with No. 21 cardstock (use the Dark Brown side). Ink Kraft acorn with Rusty Hinge Distress ink using a Cut ‘N Dry Nib. Cut the top of the acorn off the brown side and glue on top of the Kraft side using Multi-Medium. Apply Tea Dye Stickles to the acorn Tops and set aside to dry.
(3) Cut various oak leaves from Forest Moss cardstock. Ink with Forest Moss Ink using Blending Tool, apply Forest Moss Stickles. Set aside to dry. Repeat with No. 7 cardstock and Rusty Hinge Ink and Stickles. Last, cut some leaves using the Kraft side of cardstock and ink with Vintage Photo Ink. Set aside to dry.
(4) Cut four wheat sprigs from Manila cardstock. Ink with Scattered Straw using Nibs and apply Rock Candy Stickles. Set aside to dry.
(5) Ink edges of No. 20 cardstock with Vintage Photo Ink using the Blending Tool.
(6) Cut a 2-1/2” x 12” strip of No. 7 cardstock and emboss with Dot-Matrix print. On a piece of scrap paper, sand the top of the cardstock lightly to reveal the kraft core of the cardstock. Glue to No. 20 cardstock about ¾” from the top.
(7) Remove protective liner from Ransom letters and adhere to Dot-Matrix as shown. Glue down leaf and attach wheat and acorn with Pop It Shapes.
(8) Mat photos with Black Soot Cardstock and glue as shown.
(9) Cut a 2” x 5-1/4” rectangle from Forest Moss cardstock. Ink edges with Forest Moss using the Ink Blending Tool. Glue down in the left bottom corner of the page. Adhere pumpkins, wheat and acorns to Forest Moss rectangle using Pop It Shapes.


