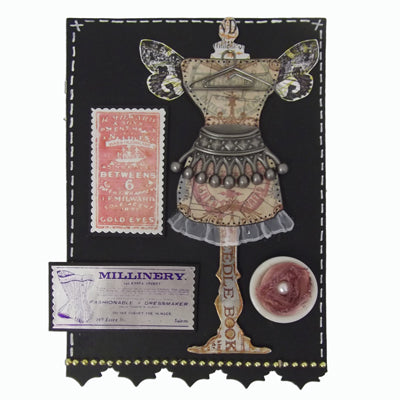
Make this clever collage with Archival Ink Pads and Metal Foil Tape Sheets.

Archival Ink and Metal Foil Millinery Collage By Linda Cain
- Materials
- Instructions
- Ranger Multi-Medium
- Ranger Non-Stick Craft Sheet™
- Ranger Heat it™ Craft Tool
- Ranger Gloss Paper
- Ranger Glossy Accents™
- Ranger White Opaque Pen
- Ranger Metal Foil Tape Sheets
- Archival Ink™ #0 Pads
- Tim Holtz® Distress Stickles - Spiced Marmalade
- Stampers Anonymous Tim Holtz® Collection Stamp Sets - Papillon, Adverts, Haberdashery, Urban Chic
- Tim Holtz® Idea-ology® Hanger Clip
- Tim Holtz® Idea-ology® Accoutrements - Shabby
- Tim Holtz® Idea-ology® Lavish Trimmings
- Tim Holtz® Idea-ology® Adornments - Regal
- Tim Holtz® Alterations™ by Sizzix® Vagabond machine
- Tim Holtz® Alterations™ by Sizzix® On the Edge Dies - Ornate and Sewing Room
- Black chipboard
- 29 gold nail head stickers
- Decorative and straight edge scissors
Instructions
(1) Cut a piece of black chipboard to 4 ½ x 8 inches. Cut bottom edge with On the Edge-Ornate Die. Add white pen stitching to top and sides, and gold nail heads across the bottom.
(2) Working on the Non-Stick Craft Sheet, stamp Papillon background stamp on Gloss Paper with Chrome Yellow. Over-stamp the Large Moth with Jet Black ink. Cut out wings.
(3) Add Fired Brick Distress Ink to flower from Lavish Trimmings. Add pearl to center and Spiced Marmalade Distress Stickles. Glue to Accoutrement Button.
(4) Apply a generous amount of Glossy Accents to the Metal Foil Tape, and spread evenly in a very thin layer. The smoother and thinner the layer, the less bubbles appear. Let dry or heat set with Heat Tool.
(5) Die Cut Dress Form from black chipboard.
(6) Use same die to cut the stand and top of form from Metal Foil Tape with Glossy Accents. Die cut a piece of Crowded Attic Paper Stash for body.
(7) Stamp a piece of treated metal with Gold Eyes Needle package stamp with Rose Madder. Heat set. Cut out with decorative scissors. Layer to black chipboard piece.
(8) Stamp treated metal with Millinery stamp and Deep Purple ink. Heat set. Cut out with decorative and straight edge scissors. Layer to black chipboard piece.
(9) Stamp the stand metal with the Needle Book stamp and the top with Paris stamp using Sepia and Jet Black ink. Use a Cut N’ Dry nib to add ink to center of O’s and edges of stand. Add to dress form chipboard piece.
(10) Stamp paper dress body with Thread Spool stamps using Rose Madder and Viridian Inks. Use small decorative stamp from Urban Chic with Sepia and Ultramarine ink to edge the paper body.
(11) Cut a piece of Lavish Trimming in half and glue to bottom of paper body.
(12) Glue paper body to dress form and wings at the shoulder with Multi-Medium. Add pen dots around body.
(13) Add Crown from Regal Adornments to waist of form, and Hanger Clip at shoulders, with Multi-Medium.
(14) Use Medium to add all 4 pieces to black chipboard base.


