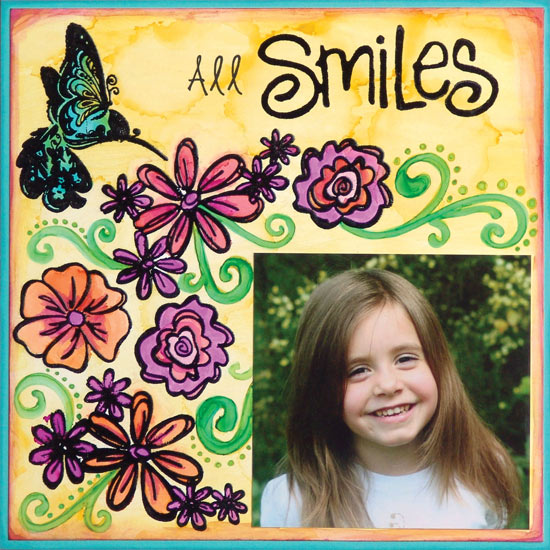
Use Adirondack® Alcohol Inks and Fillable Pen to create this vibrant, cheery scrapbook page!

All Smiles 8″ x 8” Alcohol Ink Layout By Jen Starr
- Materials
- Instructions
- Adirondack® Alcohol Inks - Lemonade, Sunshine Yellow, Sunset Orange, Raspberry, Pool, Citrus, Pink Sherbet
- Adirondack® Ink Fillable Pens - (6)
- Adirondack® Alcohol Blending Solution
- Archival Ink Pad - Jet Black
- Inkssentials™ Glossy Paper - (7¾" square)
- Distress™ Embossing Ink - Clear
- Ranger Embossing Powder - Black
- Claudine Hellmuth Studio Artist Brushes - 1” flat paint brush
- Inkssentials™ Non-Stick Craft Sheet™
- “Smiles” foam stamp
- Small rub-on alphabet, Making Memories
- Clear Hummingbird stamp, Inkadinkado
- “Second Nature” clear floral stamps, Rhonna Farrer for Autumn Leaves
- 4" x 4” photo
- 8" x 8” Blue Cardstock, Bazzill
Instructions
(1) Fill the Alcohol Ink Fillable Pens on both sides as directed on the labels, one for each color (Pool, Citrus, Raspberry, Sunset Orange, Pink Sherbet and one with just Blending Solution). Leave the pens on their sides while you work on the rest of the layout so the ink has time to wick in to the tips.
(2) Cut a piece of Inkssentials Glossy Paper to 7¾” square.
(3) Place your 4″ x 4” photo in position (no adhesive yet) on your glossy paper to use as a stamping guide.
(4) Stamp the hummingbird image first in the upper left corner using clear Distress Embossing Powder and heat emboss with black embossing powder. Repeat the embossing process with the floral stamps around the left side and above the photo.
(5) Using a Non-Stick Craft Sheet as your palette, apply a few drops of Lemonade Alcohol Ink directly on the craft sheet. Add Blending Solution to lighten the color slightly. Use a 1” flat paint brush to quickly paint the lemonade color in a horizontal direction on the entire background, excluding the insides of the stamped images. Add a small amount of Sunshine Yellow Alcohol Ink to the Lemonade on the craft sheet and apply to the top and bottom of the layout, blending as you brush it on.
(6) Randomly drip a few drops of Blending solution directly from the bottle on to the yellow background to create a textured effect. Let dry.
(7) Use the pens to color in the embossed images. Add different colors to the flower petals and use the blending solution pen to blend the colors together.
(8) Use the Pool pen to doodle flourishes and dots. Use the brush tip for the flourishes for a varied width and the bullet tip for the dots.
(9) Stamp title using Jet Black Archival Ink add rub-on words and adhere photo.
(10) Mount the glossy paper to an 8″ x 8” piece of coordinating blue cardstock.


