by Audrey Pettit

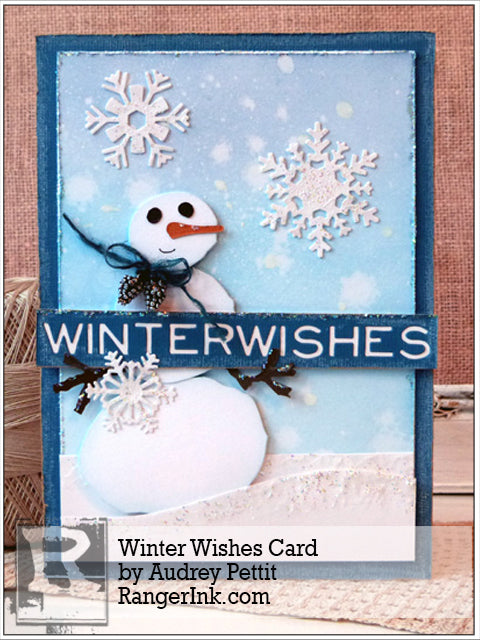
Winter Wishes Card by Audrey Pettit
- Materials
- Instructions
- Tim Holtz® Distress Watercolor Cardstock
- Ranger Surfaces Specialty Stamping Paper
- Tim Holtz® Distress Ink Pads : Tumbled Glass, Salty Ocean, Stormy Sky
- Tim Holtz® Distress Paint : Picket Fence
- Tim Holtz® Distress Crayon Kits : Set #3
- Tim Holtz® Distress Collage Mediums : Crazing
- Ranger Texture Paste : Transparent Matte
- Ranger Multi-Medium : Matte
- Ice Stickles™ Glitter Glue
- Stickles™ Glitter Glue
- Tim Holtz® Distress Sprayer
- Ranger Mini Blending Tool
- Ranger Artist Brush Set
- Ranger Non-Stick Craft Sheet™
- Palette Knife Set
- Ranger Adhesive Foam Rolls
- Tim Holtz Kraft Core
- Tim Holtz Sizzix Assembly Snowman Bigz Die
- Tim Holtz Sizzix Paper Snowflakes, Mini Thinlits Die Set
- Tim Holtz Sizzix Holiday Words: Thin Thinlits Die Set
- Tim Holtz Idea-ology Jute String
- Tim Holtz Idea-ology Adornments- Pinecones
- Tonic Tim Holtz Paper Distressor
- Fine-tipped Black Marker
Instructions

I have a serious soft spot for snowmen. Love them for the holidays, but what’s even better is that they can be used for lots of different projects throughout the holidays and all winter long. Perfect excuse to pull out one of my favorite snowmen dies, and just play.

This sweet Assembly Snowman just makes me smile. I usually think Christmas when I look at this die, but today I want to show how easy it is to convert this holly jolly guy into a winter wonderland snowman with a few easy modifications.

By simply omitting some of the images from the die, and adding in a few snowflakes and an icy Distress color palette, you can completely change the look from holiday to winter. Great way to stretch the use of some of your seasonal supplies.
Let’s take a closer look.

Step 1: To begin, create a 5×7 side-folding card base from white cardstock. Cut a 4.5 x 6.5 piece of Ranger Watercolor Cardstock. Using an Ink Blending Tool, apply blue Distress inks onto the watercolor paper. Start with Tumbled Glass ink at the bottom, and then gradually blend in Salty Ocean ink in the middle, ending with Stormy Sky ink at the top.

Step 2: Spritz water onto the inked watercolor panel using a Distress Sprayer. Let the water set for about 30 seconds, and then dab the paper with a clean paper towel to remove the water droplets.

Step 3: Place a small amount of Picket Fence Distress paint onto the craft sheet, and mix it with a bit of water from the Distress Sprayer. Pick up the paint mixture with a paintbrush, and flick the paint onto the watercolor panel. Set the paper aside to dry.

Step 4: Cut a 5×7 piece of blue Distress cardstock to add to the card base. Using a white Distress crayon, draw an outline around the edge of the Distress cardstock, and smudge the pigment a bit with your fingertip. Distress the edge of the watercolor panel using a paper distresser tool.

Step 5: Cut two 3 x 4.5 pieces of Specialty Stamping Paper. Leave one piece as is, and cut a curved slope across the top of the second piece. These will be snowbanks for our scene.

Step 6: Using a palette knife, add Texture Paste to the top edge of both snowbank pieces. Set them aside to dry.

Step 7: Die cut a variety of snowflakes from Specialty Stamping Paper using the Paper Snowflakes, Mini Thinlits die set. I ended up using three snowflakes for my card.

Step 8: Brush the snowflakes with Crazing Distress Collage Medium, and set them aside to dry. Once they are dry, add a bit of Ice Stickles or clear Stickles Glitter Glue. Smooth the glitter glue out with the tip of your finger or a paintbrush.

Step 9: Cut a 1 x 5 strip of Distress cardstock. Die cut the sentiment from the strip using the Holiday Words: Thin Thinlits die set. Outline the edge of the strip with white Distress crayon. Adhere the strip onto Specialty Stamping Paper, and trim out. Apply Stickles to the top of the strip and set aside to dry.

Step 10: Die cut the snowman body from Watercolor cardstock. Using an ink blending tool, apply Tumbled Glass Distress ink to the edges of each body shape. Die cut the arms from brown Distress Cardstock, the nose from orange, and the eyes from black. Apply a bit of the Stickles glitter glue to the top of the nose and arms. Apply Stickles to the tops of the snowbank pieces. Set aside to dry.

Step 11: Adhere the larger, rectangular snowbank to the bottom of the watercolor panel. Using Multi Medium Matte, adhere the largest snowman section to the top of the curved snowbank piece. Add foam adhesive to the bank of this section, and then adhere it to the bottom of the watercolor panel.

Step 12: Adhere the snowman head to the middle section using Multi Medium Matte. Adhere the eyes and nose, and draw a small smile using a fine-tipped black pen. Tie a strand of blue hemp string around the snowman’s neck. Dab Picket Fence Distress paint onto two small Idea-ology Pinecone Adornments, and let dry. String the pinecones onto the cord, and tie into a small bow. Place foam adhesive behind the snowman shapes, and adhere to the card base.

Step 13: Apply Multi Medium Matte to the back of the die cut snowflakes, and adhere them to the card base. Place foam adhesive onto the back of the sentiment strip, and adhere it across the snowman’s body. Add Multi Medium to the back of the die cut arms, and tuck them under the sentiment strip to look like they are holding up the strip.

Enjoy!


