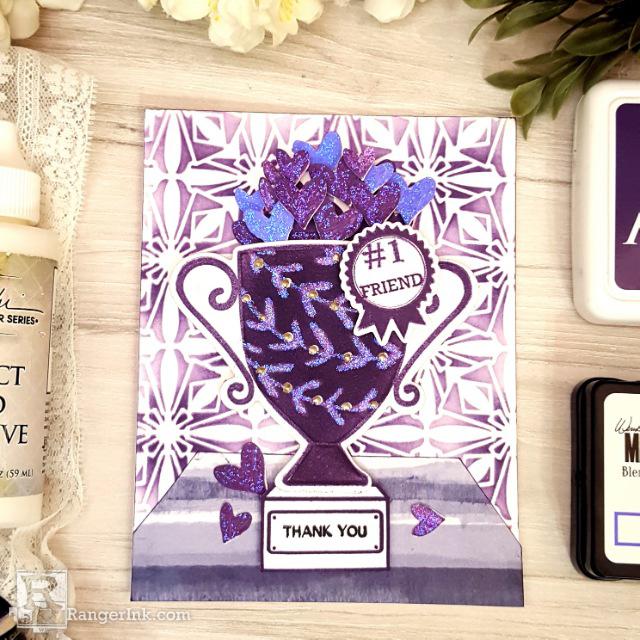
In this tutorial, Terri Burson uses Wendy Vecchi MAKE ART products to create this regal card that celebrates a special friendship. As a bonus, she shares some great tips for masking and giving your stamps a different look.

Wendy Vecchi Royal Cup Friendship Card by Terri Burson
- Materials
- Instructions
Instructions
Today’s project is all about celebrating those treasured friends in your life. Purple is the color of royalty, so what better way to show your gratitude than with a royal decorative cup as the centerpiece of your card? Let’s get glittery!

Step 1: Begin by covering the decorative lines on the trophy stamp, from Wendy Vecchi’s Award Winning Stamp Set, with masking tape.

Step 2: Use the Wendy Vecchi Make Art Stay-tion, Perfect Stamp Positioner and Stamp Block, to perfectly ink your trophy image with the Petunia Archival Ink. Remove masking tape, then stamp onto a Wendi Vecchi Perfect White Cardstock Panel.

Step 3: Mask the outer lines of the stamp and blend with Petunia Archival Ink with the Ranger Blending Tool and Domed Foam applicators. Die cut the cup with the accompanying die and a tabletop die cut machine.

Step 4: Using the stencil from the Wendy Vecchi Warm Wishes set, angle the stencil over the cup. Pour a tiny amount of Isopropyl Alcohol into the bottle cap. Dip your brush into the alcohol and lightly dab onto a paper towel to absorb some of the excess. Paint the alcohol from the inside leaves and work your way out to avoid excess bleaching outside the lines of the stencil. Paint until desired amount of light effect occurs. Continue the stencil/paint process and angle the leaves in opposite directions, every other row. Rinse brush when finished.

Step 5: Embellish the faded leaves with Stickles Glitter Glue in Twinkle. You can also choose to paint with Blendable Dye Ink or add Liquid Pearls. Set cup aside to dry or speed the process along with the Ranger Heat Tool.

Step 6: Take another Wendy Vecchi Perfect White Cardstock Panel and center the Simon Hurley Stained Glass Stencil on top. Anchor the stencil with masking tape or with the Stay-tion magnets. Apply Petunia Archival Ink with the Ink Blending Tool and Domed Foam applicators. Blend ink darker at the center of each cross. Remove and wash stencil and clean the Stay-tion.

Step 7: If you find fussy cutting a good form of therapy, then this next step is for you. Stamp multiple hearts (approximately 15-20) from the Wendy Vecchi Merci & More Stamp Set with Petunia Archival Ink and Violet Blendable Dye Ink onto a Perfect White Panel. Hand cut, or use a die cut machine that images and cuts the stamp for you. Set aside.

Step 8: Create a faux table for your trophy by trimming a piece of decorative or patterned scrapbook paper. Trim to approximately 2”x5.25”, and create an angle at each end. Adhere to the bottom of the stenciled panel with Wendy Vecchi Perfect Card Adhesive.

Step 9: Add more embellishments to the cup, using the ribbon stamped in Petunia Archival Ink and the wording from the Award Winning Stamp Set. Also stamp the trophy base using the same ink and Perfect White Cardstock but mask the words “thank you” from the Merci & More Stamp Set. Die cut both images and trim out the additional block from the base.

Step 10: Mount the stenciled panel onto a Wendy Vecchi Perfect White Portrait Card and build your trophy. Mount the elements for added dimension with trimmed Ranger Adhesive Foam Tape. Adhere some of the hearts flat with the Perfect Card Adhesive, then layer more hearts popped up with Adhesive Foam. Embellish hearts with Stickles Glitter Glue in Twinkle. Add more embellishments as desired, such as the Liquid Pearls in Platinum Pearl that are dotted on the cup, then, finish by adhering loose hearts around the base of the trophy.
 Hello, my name is Terri Burson. I’m a native New Yorker, transplanted in the deep South. My husband and I are parents to a 19 year old son and numerous fur babies. I’m an avid card make but love dabbling in many forms of art and mediums. You can find me on most social media platforms @wavingmywand and on my blog at wavingmywand.blogspot.com.
Your Cart
- Choosing a selection results in a full page refresh.


