by Jenny Marples

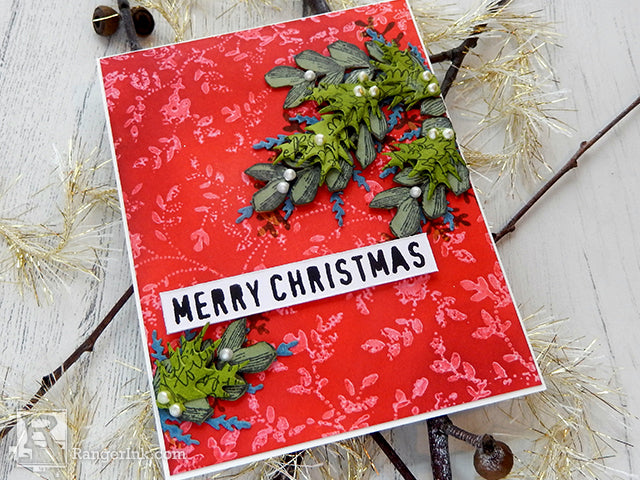
Wendy Vecchi Merry Christmas Card by Jenny Marples
- Materials
- Instructions
- Wendy Vecchi MAKE ART Blendable Dye Inks: Cornflower Blue, Poppy, Red Geranium, Fern Green
- Wendy Vecchi Archival Ink™: Peat Moss, Fern Green
- Wendy Vecchi Perfect Card Adhesive
- Wendy Vecchi Perfect Cardstock: White Panel, Portrait White Card
- Archival Ink™ #0 Pads: Jet Black
- Liquid Pearls™: White Opal
- Ranger Adhesive Foam Rolls: White Foam
- Ranger Brayers
- Ranger Mini Blending Tool with Foam
- Ranger Non-Stick Craft Sheet™
- Stampers Anonymous Studio 490 Wendy Vecchi Stamp Set: Special Art
- Stampers Anonymous Studio 490 Wendy Vecchi Background Stamp: Faded Floral, Handwritten
- Stampers Anonymous Studio 490 Wendy Vecchi Stencils For Art: Ferns, Happy Holidays
- Stampers Anonymous Studio 490 Wendy Vecchi Mat Minis: Special Art
- Tim Holtz Sizzix Alterations Thinlits Die Set: Funky Festive
Instructions

Step 1: To use a technique originally taught by Wendy Vecchi, gather together a Perfect Cardstock White Panel, the Faded Floral Background Stamp, Perfect Card Adhesive and a Ranger Brayer. Squeeze a little Perfect Card Adhesive onto the Craft Sheet.

Step 2: Roll the brayer through the Perfect Card Adhesive and roll across the Faded Floral Background Stamp to apply a thin layer onto it. Stamp onto the White Panel repeating to cover and then clean the stamp immediately in cold water.

Step 3: Once the Adhesive had dried completely use a Mini Blending Tool to blend a mix of Poppy and Red Geranium Blendable Dye Inks over the stamped White Panel. Continue to reapply the ink in circular motions until completely covered.

Step 4: Take a piece of cloth or paper towel and apply a fine mist of water to slightly dampen it. Rub gently over the stamped panel to remove some of the ink from the stamped areas. You won’t remove all the ink but the resist areas will become brighter.

Step 5: Remove four of the branch shapes from the Mat Minis Special Art pack and sand the little joining part until smooth. Blend Peat Moss Archival Ink over one side of each of the branches with the Mini Blending Tool until covered.

Step 6: Take the coordinating branch stamps from the Special Art Stamp Set and lay flat on the Craft Sheet. Apply Jet Black Archival Ink over each of the stamps. Press the inked side of each Mat Mini branch onto the coordinating stamp in turn.

Step 7: Returning to the stamped background panel, take the Ferns stencil and blend Fern Green Archival Ink through it to create the basic design as shown. You will need to use the reverse side of the stencil for the medium fern shape.

Step 8: Blend Fern Green Blendable Dye Ink onto another small piece of Perfect Cardstock White Panel. Stamp the Handwritten Background Stamp over it with Jet Black Archival Ink then cut the holly leaves from the Funky Festive die set.

Step 9: Blend Cornflower Blue Blendable Dye Ink onto another small piece of Perfect Cardstock White Panel using a Mini Blending Tool as before. Cut four of the pine fronds from it using the dies from the Funky Festive die set.

Step 10: Layer the blue pine fronds over the stencilled ferns on the stamped background. On top add the stamped Mat Minis branches and finally add the stamped holly leaves as shown. Apply small dots of White Opal Liquid Pearls across the branches.

Step 11: On a small strip of Perfect Cardstock White Panel blend Jet Black Archival Ink through the larger of the two Merry Christmas sentiments on the Happy Holidays stencil. Mount onto a strip of White Adhesive Foam Roll.

To finish mount the decorated panel onto a Perfect Cardstock White Portrait Card and add the sentiment strip between the layered branches.
Your Cart
- Choosing a selection results in a full page refresh.


