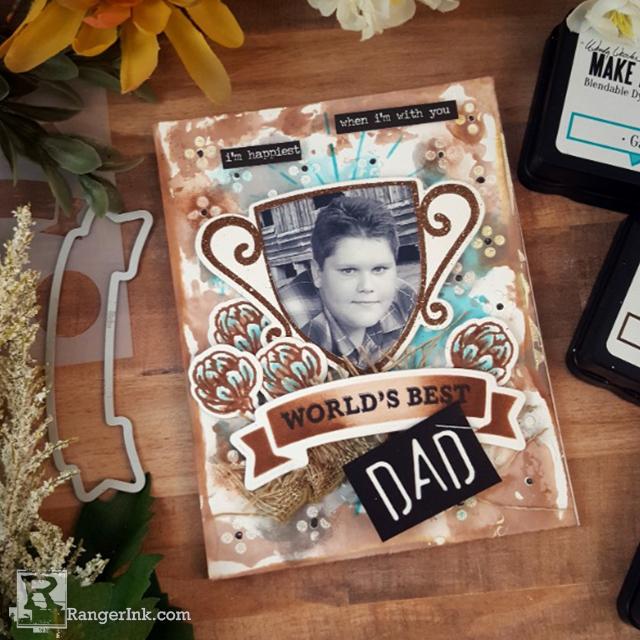
Learn how to create this picture-perfect Father's Day card using Wendy Vecchi MAKE ART products. In the process,Terry Burson shows you how to make an eye-catching mixed media background that highlights the focal point in this project.

Wendy Vecchi Father's Day Photo Card by Terri Burson
- Materials
- Instructions
Other:
Tim Holtz Idea-ology Small Talk Sticker Book
Stapler
Staples
Scissors
Die Cut Machine
Burlap Ribbon
Pencil
Instructions
Today’s card is all about honoring the Dad in your life by creating a trophy winning photo card that he will treasure and display for years to come. Thanks to the Wendy Vecchi Award Winning Make Art stencil, this is easier than you think! Stick around for a few minutes, as I share the creative details.

Step 1: To create the mixed media background, you will use a smooshing technique. Using the Wendy Vecchi Blendable Dye Ink Watering Can, press ink onto the Ranger Craft Sheet or Wendy Vecchi Make Art Stay-tion, then spritz with water using the Ranger Mister.

Step 2: Press or “smoosh” a Wendy Vecchi White Card Panel onto the spritzed ink in random patterns. Clean ink off surface between each inking. Dry cardstock with a Ranger Heat It Craft Tool.

Step 3: Repeat the process using the Blendable Dye Ink Garden Patina and dry again with the Heat Tool. Repeat using the Blendable Dye Ink Potting Soil but this time, only dredge the sides of the card panel into the spritzed ink, then dry.

Step 4: Next, take the stencil from the Wendy Vecchi Make Art stamp set Merci and More and place on top of the card panel. Anchor with the Stay-tion magnets and with the Tim Holtz Distress Palette Knife, randomly spread Ranger Distress Crackle Texture Paste. Gently peel back the stencil and wash the stencil and knife immediately. Allow paste to dry or speed up the process with a Ranger Heat It Craft Tool.

Step 5: To color intensify some of the stenciled images, accent with more Blendable Dye Ink using the Ranger Ink Detail Blending Tools. At this point, you may wish to also stencil the sun ray image from the Award Winning set as seen in the finished photo. Stencil with the Garden Patina Blendable Dye Ink and Ranger Mini Blending Tools with Domed Foam Applicator Foam. Stencil at the top and bottom center. When finished, adhere the card panel to a Wendy Vecchi Perfect White Landscape card with Ranger Adhesive Foam and set aside.

Step 6: Begin creating the card elements by anchoring a 4x4 inch trimmed piece of white cardstock onto the Stay-tion with the Perfect Stamp Positioner. Position the trophy image from the Make Art Award Winning stamp set and, using Ranger Clear Embossing Ink, stamp the image at least twice, using the Perfect Stamp Block. Sprinkle Ranger Potting Soil Embossing Powder, tap off excess and dry with the Heat Tool. Set Aside.

Step 7: Using the stencil from the Award Winning set, place over the focal point of the photograph, tracing inside the lines with a pencil. Use scissors to trim the traced image along the outside edge of the pencil mark, then gently erase the penciled line.

Step 8: Adhere the trimmed photo to the center of the trophy using the Wendy Vecchi Perfect Cardstock Adhesive. Set Aside.

Step 9: Once again, use the same stencil to ink the banner image onto a 3x3 inch trimmed piece of white cardstock. Apply the Blendable Dye Ink Potting Soil, along with the Ranger Mini Blender Tool and Domed Foam Replacement Tips. Blend darker color at both ends of the stencil and lighter towards the center. Stamp with your preferred sentiment from the Award Winning stamp set, using the Ranger Archival Ink Pad in Jet Black.

Step 10: To create the “Dad” mini panel, use a set of small alpha dies, such as the Tim Holtz Sizzix Thinlits set called, Treat Bag. Line up the letters onto Letter It Black Cardstock and cut using a die cut machine. Remove the letters and adhere a small, trimmed piece of white cardstock to the back of your negative cut. Trim to desired size and staple to the stenciled banner or add Ranger Adhesive Foam.

Step 11: Assemble the elements onto the card with the trophy placed near the top and center and banner element below the trophy. Pop up all elements with Ranger Adhesive Foam. Add any additional embellishment as desired, such as the stamped and die cut watercolored flower buds from the Wendy Vecchi Make Art set called Thank You. Keeping a stash of ready-made die cuts is a great way to pick and choose when building your card. The buds were stamped with Potting Soil Blendable Dye Ink and watercolored with the same ink (as well as Garden Patina Blendable Dye Ink) and a Tim Holtz Detailer Water Brush. Finishing touches include burlap ribbon, random dots of Onyx Pearl Liquid Pearls and Tim Holtz Idea-ology Small Talk Chat Sticker sentiments.
Your Cart
- Choosing a selection results in a full page refresh.


 Hello, my name is Terri Burson. I’m a native New Yorker, transplanted in the deep South. My husband and I are parents to a 19 year old son and numerous fur babies. I’m an avid card make but love dabbling in many forms of art and mediums. You can find me on most social media platforms
