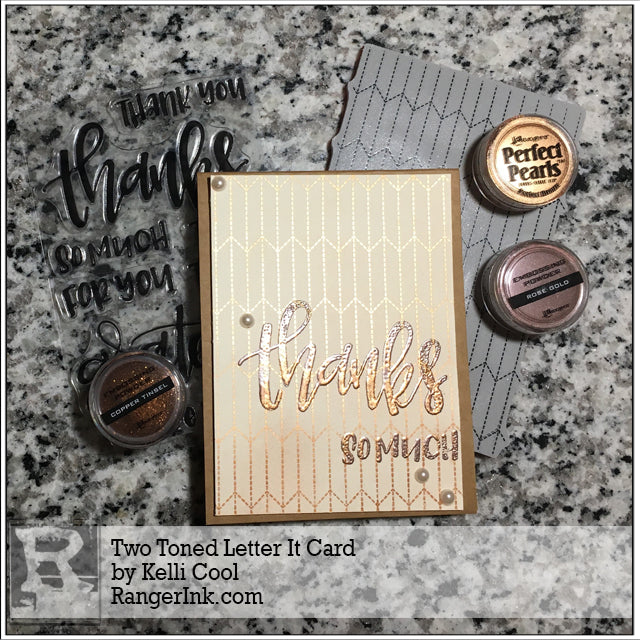
Hey y’all! Kelli here, and I’m so excited to show off Ranger’s new line – Letter It! I’ve created a fun card using a Letter It stamp set, Perfect Pearls, and embossing powder. It’s the perfect Thank You card for a classy friend!

Two Toned Letter It Card by Kelli Cool
- Materials
- Instructions
- Letter It™ Perfect Pearls : Perfect Bronze
- Letter It™ Stamp Sets : Thank You
- Letter It™ Surfaces : Ivory
- Letter It™ Embossing Powders : Rose Gold, Copper Tinsel
- Letter It™ Embossing Ink Pad
- Letter It™ Medium Pens
- Ranger Mini Mister
- Ranger Heat it™ Craft Tool
- Stampers Anonymous Tim Holtz Cling Mounted Rubber Stamp Set – Tailor & Houndstooth
- Tim Holtz by Tonic Studios Stamp Platform or acrylic block
- Card Base
- Dry Sweeping Pad
Instructions

Step 1: Gather all your materials and have them handy to get started. See materials list above.

Step 2: Place your clear stamp on top of your cardstock where you want the embossing powder to go. I used the Tim Holtz Stamp Platform for this, but you can easily use an acrylic block. If you’re using a stamp platform make sure to lightly tape down or place magnets to hold your cardstock in place.

Step 3: Close the stamp platform lid to pick up the clear stamp. Ink up the clear stamp with the embossing ink pad.

Step 4: Close the stamp platform lid and press down so your stamp gets even coverage on your cardstock.

Step 5: Look over your cardstock to make sure the embossing ink covered where you wanted it to. If there’s missing spots, repeat steps 3 and 4.

Step 6: Sprinkle down the embossing powder. Here I used Rose Gold embossing powder.

Step 7: Shake off the excess powder and return to container to use next time!

Step 8: Heat up the embossing powder with your heat gun. You’ll see it start to turn shiny and that’s how you know you’ve melted the powder correctly. Be sure not to hold your gun on one area too long or else you might warp your paper!

Step 9: This step is for if you want to make your embossing two-toned or ombre. I highly suggest this- it just steps the card up a notch! Just take the Letter It Embossing Pen and color in the bottom of each letter where you want the embossing powder to go.

Step 10: Cover with embossing powder – I used Copper Tinsel – and shake off the excess. Then, heat it up with the heat gun and bam! Looks two toned!

Step 11: Now it’s time to start with the Perfect Pearls. For the background, I used the Tailor stamp from the Tailor and Houndstooth set. Place it over the cardstock and line it up where you want it to cover.

Step 12: Shut the stamp platform to grab the background stamp and open back up. Cover your stamp with the Ranger Perfect Medium Pad. For this step, I suggest using the stamp platform so you can go back and fill in places you might’ve missed. However, the stamp platform is not required! You can use an acrylic block instead.

Step 13: Shut the stamp platform and press down so the Perfect Medium gets good coverage.

Step 14: Like Step 5, look over your cardstock and make sure you have good coverage. If not, repeat steps 12 and 13.

Step 15: Next, get out your brush and Perfect Pearls – I chose to use Perfect Bronze for this card. Put your brush in the pearls – but be careful not to get too much – a little goes a long way!

Step 16: Pounce the brush over the cardstock and then move the Perfect Pearls around in a circular movement to cover the entire background. You can easily see where your Medium was because the Perfect Pearls will adhere to it.

Step 17: Clean up the excess Pearls with a dry sweeping cloth. Be sure to move the cloth gently over the card so you don’t smudge the background!

Step 18: To set the Perfect Pearls in place, spray lightly with water from the Ranger Mister. Then, adhere what you’ve just created to your card base and jazz up with some rhinestones or pearls and there you go! The perfect Thank You card!
Your Cart
- Choosing a selection results in a full page refresh.


