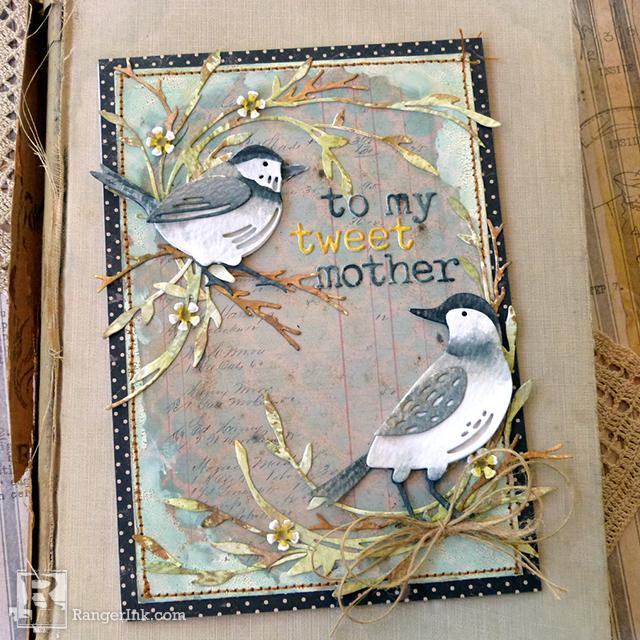
Show that special lady just how "tweet" she is this Mother's Day with this nature inspired handmade card by Audrey Pettit. Use Tim Holtz Distress® Oxides to create this subtle, yet simply adorable card.

To My Tweet Mother Card by Audrey Pettit
- Materials
- Instructions
Tim Holtz Distress® Oxide Ink Pads: Tumbled Glass, Broken China
Tim Holtz Distress® Mini Ink Pads: Mustard Seed, Bundled Sage, Old Paper, Pumice Stone, Brushed Corduroy, Walnut Stain, Black Soot
Tim Holtz Distress® Texture Paste : Crackle
Ranger Multi Medium Matte Adhesive
Ranger Mini Ink Blending Tool with Foam
Tim Holtz Distress® Sprayer
Ranger Adhesive Foam Tape: White
Ranger Artist Brushes
Ranger Silicone Craft Mat
Tim Holtz® idea-ology®: Materialize 8x8 Paper Stash
Tim Holtz® Alterations by Sizzix® Dies: Feathered Friends, Funky Wreath, Tiny Type Lower, Small Tattered Florals
Natural Twine
Instructions

Hi everyone, it’s Audrey, and I’m back on the Ranger project page today to share some Mother’s Day inspiration with you. My mother loves nature, so I always try to come up with nature-inspired projects to give her. Today’s card features one of my all-time favorite bird die sets from Tim Holtz and Sizzix. And of course I mixed these dies with lots of beautiful Ranger Distress products.

These wonderful birds are from the Feathered Friends thinlits dies, and I paired them with several other sets from the Tim Holtz collection. The images were watercolored with regular Distress Inks, and I used Oxide ink and Distress Texture Paste to create that pretty layered background. Love all the things you can do with Distress.

Step 1: To begin, cut two pieces of patterned paper to use for the base of the card. The bottom layer should be cut to 5x7, and the second piece slightly smaller than that. Place the stencil down onto the smaller paper, and add tape on the backside to keep things from shifting.

Step 2: Using an Ink Blending Tool with Foam, apply Distress Oxide Ink over the stencil. Use Tumbled Glass Oxide in the center of the stencil, and darken it up with Broken China Oxide around the edges.

Step 3: Using your finger, spread Crackle Distress Texture Paste around the outside edges of the paper. Set the paper aside until the paste is completely dried. Once dry, sand the pasted areas to a smooth, flat finish. Adhere the two layers together, and add machine stitching around the edge, if desired.

Step 4: Apply Old Paper Distress Ink to the pasted areas using an Ink Blending Tool. Die cut the wreath and the loose branches from Distress Watercolor cardstock. Continue die cutting pieces until you have a big stack of them. The number of pieces you use is totally up to you, so simply die cut as many pieces as you think you would use.

Step 5: Dab Old Paper and Bundled Sage Distress Inks onto the Silicone Craft Mat. Spray the inks with water using a Distress Sprayer. Press and swipe the greenery pieces through the ink mixture, and set them aside to dry. Continue this process until you have the color desired. Wipe the ink off of the mat, and repeat this process with the branch die cut pieces using Brushed Corduroy and Walnut Stain Distress Inks. I went back and dabbed the greenery pieces into the brown ink mixture, too. Cut apart several of the wreaths into half pieces.

Step 6: Die cut all the pieces from the Feathered Friends die set from Distress Watercolor Cardstock. Watercolor the birds with Pumice Stone and Black Soot Distress Ink to resemble a chickadee bird. Google images of the birds if you need a guide. Assemble the bird pieces with Ranger Multi Medium Matte adhesive and small pieces of Adhesive Foam Tape.

Step 7: Begin to glue down the wreath and branch pieces onto the upper left and bottom right corner of the card using Multi Medium Matte. Don’t be afraid to manipulate the wreath or branch pieces to move how you would wish, or trim out small sections of the wreaths to get the movement you want. Use the birds as guides for where to place your items. Continue working until the scene is as you would like.

Step 8: Once the branch pieces are in place, attach the birds using more Multi Medium Matte adhesive. Create a loose sloppy bow from natural twine, and glue it to the bottom right corner.

Step 9: Watercolor a scrap piece of Watercolor Cardstock with Pumice Stone and Black Soot Distress Inks. Once the paper is dry, die cut the words “to”, “my”, and “mother” using the Tiny Type Lower Alphanumeric die set.

Step 10: Repeat the above step with Pumice Stone and Mustard Seed Distress Ink, this time die cutting the word “tweet”. Adhere the lettering to the top right corner of the card using Multi Medium Matte Adhesive.

Step 11: Create a 5x7 card base from white cardstock. To do this, cut one 5x7 piece and one 5.5x7 piece. Score the 5.5” paper at .5”. Fold the flap inwards and add adhesive along the flap. Attach the back to the front piece. Then glue the card to the card base using Multi Medium Matte adhesive.

Step 12: Die cut 5 small flowers from Watercolor Cardstock. Watercolor the flowers with Pumice Stone and Mustard Seed Distress Ink, and set the flowers aside to dry. Once dry, press the end of a paintbrush into the center of the flowers to create a small divot. Attach the flowers to the branches using Multi Medium Matte.

Enjoy! And Happy Mother’s Day to all you wonderful mothers out there!
Enjoy!

Your Cart
- Choosing a selection results in a full page refresh.


