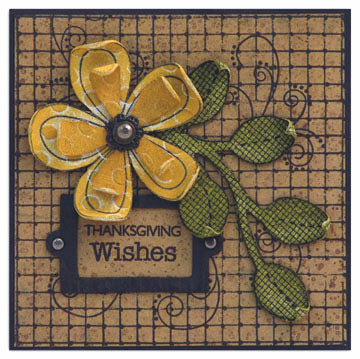
Archival, Distress and Pigment Ink Pads bestow the rich colors of Autumn on this wonderful card.

“Thanksgiving Wishes” Card By Wendy Vecchi
- Materials
- Instructions
- Ranger Glossy Accents™
- Ranger Non-Stick Craft Sheet™
- Ranger Ink Blending Tool & Foam
- Tim Holtz Distress® Ink Pads
- Archival Ink™ #0 Pads
- Tim Holtz™ Idea-ology™ Grungeboard label holder, www.timholtz.com
- Studio490 Background grid, poinsettia, leaves, dots, screen stamp, Stampers Anonymous, www.stampersanonymous.com
- Flower Stamp, KI Memories, www.kimemories.com
- Thanksgiving Wishes Stamp
- Black cardstock
- Kraft cardstock
- 2 brads
- Pinwheel flower American tag, www.americantag.com
Instructions
(1) Cut black cardstock base to 10” x 5”. Score to create a 5” x 5” card.
(2) Cut kraft cardstock 4¾” x 4¾”, then stamp with the grid stamp using black archival ink.
(3) Stamp the background again, using Coffee ink & the dot stamp.
(4) Stamp the poinsettia stamp, again with Jet Black ink.
(5) Stamp the leaves on a plain sheet of Grungeboard. Cut out, then ink the front & back with Peeled Paint Distress Ink, using the blending tool. Overstamp the front & the back with the screen stamp, using black archival ink. Curl the leaves to create dimension.
(6) Stamp the flower twice on the dot embossed Grungeboard, then cut out one complete flower and a smaller flower as shown.
(7) Ink the front & the backs of the flowers with the Butterscotch pigment ink & heat dry.
(8) Use the craft pick to make a hole in the smaller flower to accommodate the hitch fastener. Assemble the flower center & adhere to the small flower, with Glossy Accents.
(9) Form the flower by rolling the petals. MAGICALLY…they stay in place.
(10) Glue flower and leaves in place.
(11) Stamp a sentiment on a kraft colored scrap using Jet Black Archival ink and adhere behind a grunge board label holder, which has been inked with black soot distress ink.
(12) Insert the brads, then glue in place as shown.
(13) Any sentiment would work well with this card!


