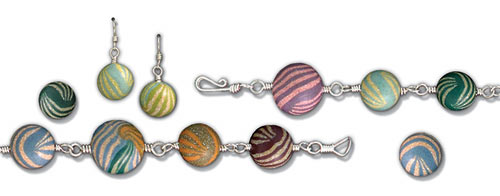
Use two Distress Embossing Powder colors, in translucent polymer clay to create striped beads with visual texture!

Striped Distress Embossing Powder™ Jewelry By Debbie Tlach
- Materials
- Instructions
- Ranger Non-Stick Craft Sheet™
- Makin's Clay Machine
- Kato Polyclay - Translucent
- Kato Nublade
- Scrap polymer clay (for center of beads)
- Small piece of polyester batting
- Skewer or drill bit and pin vise
- Wire - 20 gauge
- Round nosed pliers
- Flat nosed pliers
- Findings - clasps and earwires
- Zap-a-Gap - or any cyanoacrolate
Instructions
(1) Working on the Non-Stick Craft Sheet, condition the clay by slicing the block into pieces approximately 1/8” wide using the Kato Nublade. Feed the slices through the clay machine on the largest setting. Fold the pieces when they come out of the machine and run them, folded side first through the machine. Repeat about 12 times.
(2) Add Distress Embossing Powder (color A) a little at a time to the center of the clay. Fold and run, folded side first through the clay machine. Repeat as needed to get the color density you desire. If the clay begins to crumble add more translucent clay to the mix. Set aside.
(3) Repeat steps 1 & 2 with color B. Make slightly more of the embossing powder and clay mixture.
(4) Roll out 1 slab (at least 3” x 4”) of each color of embossing powder clay on the 3rd thickest setting on the pasta machine. Stack the 2 slabs. Square off the stack by cutting off the edges with the Nublade. Set aside the excess piece of color B. Cut the combined slab across the 4’ side so that the pieces are 3”x 2” & stack. Repeat once. You will have a striped cane. Add the extra slab of color B clay to the stack on top of color A.
(5) Cut the cane lengthwise so that the cane is about an inch and a half wide. Pinch and round the sides of the cane.
(6) Slice off two 1/16″ cane slices.
(7) Make a ball of scrap clay about ½” in diameter.
(8) Wrap one slice of the cane around the ball then place another slice perpendicular to the first and gently smooth and roll the ball, gently stretching the slices to cover the scrap clay (similar to the cover of a softball).
(9) If you wish, you can make holes in the beads by gently poking with a skewer. Alternately, make holes after they are baked with a small drill bit in a pin vise. For earrings, only partially drill/make holes.
(10) Bake on a piece of batting following the polymer clay manufacturer’s directions for time & temperature.
(11) Let cool. Cut wire and make wrapped eye pins on each end, attaching each wrapped end as you proceed. Check length for necklace or bracelet. Attach clasp.
(12) Use beads with partially drilled holes to make earrings. Make a wrapped loop with wire and glue the end into the bead with the Zap-A-Gap.
(Color A) The following Distress Embossing Powders have a speckled look after baking:
Scattered Straw
Worn Lipstick
Tea Dye
Antique Linen
Dried Marigold
Tattered Rose
Mustard Seed
Weathered Wood
Milled Lavender
Old Paper
Brushed Corduroy
Frayed Burlap
(Color B) The following Distress Embossing Powders have a single flat color after baking:
Aged Mahogany
Fired Brick
Walnut Stain
Black Soot
Broken China
Dusty Concord
Shabby Shutters
Spiced Marmalade
Faded Jeans
Peeled Paint
Vintage Photo
Pine Needles
The following Distress powder combinations are pictured in the sample:
Worn Lipstick & Dusty Concord
Dried Marigold & Faded Jeans
Scattered Straw & Broken China
Antique Linen & Pine Needles
Frayed Burlap & Aged Mahogany
Brushed Corduroy & Spiced Marmalade


