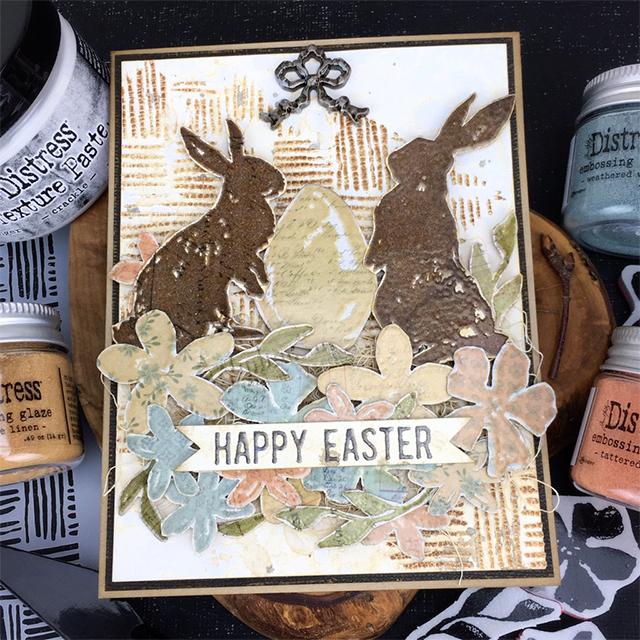
Bobbi Smith shares a Distress Happy Easter card tutorial featuring Distress Glaze and Crackle Texture Paste!

Springtime Easter Card by Bobbi Smith
- Materials
- Instructions
-
Tim Holtz Distress® Embossing Glaze: Walnut Stain, Vintage Photo, Peeled Paint, Hickory Smoke, Tattered Rose, Antique Linen, Weathered Wood
Tim Holtz Distress® Spray Stain: Antique Linen
Tim Holtz Distress® Mini Ink Pad: Walnut Stain
Tim Holtz Distress® Watercolor Cardstock
Tim Holtz Distress® Embossing Ink Pad
Tim Holtz Distress® Texture Paste: Crackle
Ranger Anti-Static Pouch
Ranger Mini Ink Blending Tool w/Foam
Ranger 4 pc Palette Knife Set
Ranger Heat It™ Craft Tool
Tim Holtz Distress® Sprayer
Letter It™ Foam Roll Tape: Black
Tim Holtz Distress® Collage Medium: Matte
Letter It™ Acrylic Stamping Block
Tim Holtz® Idea-ology: 8 x 8 Paper Stash Blackout Kraft Stock
Tim Holtz® Idea-ology: Memoranda Paper Stash Kraft Cardstock
Tim Holtz® by Tonic Studios: Craft Pick, Scissors
Tim Holtz® Idea-ology Ribbons & Bows Adornments
Tim Holtz® Stampers Anonymous Stamp Set: Spring Shadows
Tim Holtz® Stampers Anonymous Mini Stencils Set: Thatched
Hi everyone, Bobbi here! I’m so happy to be with you on the Ranger Projects Page today. I’m sharing this fun Springtime Easter Card with a tutorial! Hope you’ll join me.

Step 1: Lay the Tim Holtz Mini Thatched Layering Stencil over the smooth side of a 4.25" x 5.5" sheet of Distress Watercolor Cardstock. Using a Palette Knife, spread a thin layer of Distress Texture Crackle Paste over the surface of the stencil. Carefully lift the stencil and repeat pattern on cardstock, leaving a little white space. Then carefully lift stencil from Watercolor Cardstock. Submerge stencil and palette knife in a small dish of water, so the paste doesn’t dry on them.

Step 2: Place texturized panel on a scrap piece of paper. Working quickly while texture paste is still wet, sprinkle Distress Embossing Glaze in Antique Linen sporadically on portions of texture paste. Shake off excess and return to jar. Repeat process with Distress Embossing Vintage Photo Glaze on remainder of wet texture paste. Shake off excess and return to jar. This is going to give you a two-toned effect on the textured thatched weave. Let air dry.

Step 3: Once texture paste is completely dry, melt Distress Embossing Glaze with Heat Tool. It will look something like this. I just love that crackle effect.

Step 4: Spritz the texturized sheet of Distress Watercolor Cardstock with a little water using a Distress Sprayer. Then spritz Antique Linen Distress Spray Stain onto wet Distress Watercolor Cardstock, leaving a little white space in the upper right side. Then dry with a Heat Tool. Repeat process on smooth side of 1/2’ x 3’ strip of Distress Watercolor Cardstock (for stamped greeting) and a 6’ strip of Idea-ology Mummy Cloth.

Step 5: Working on small pattern cardstock from the Tim Holtz Idea- ology Memoranda Paper Stash, swipe the Ranger Anti-Static Pouch across surface to prepare for stamping. Stamp the 3 florals from the Tim Holtz Stampers Anonymous Spring Shadows stamp set using Distress Embossing Ink.

Step 6: Place stamped image on a scrap piece of paper. Generously sprinkle Distress Antique Linen Embossing Glaze over the stamped image. Shake off excess Embossing Powder and return to jar. Heat stamped image with heat tool to melt embossing glaze.

Step 7: Repeat steps 5 & 6 with different small patterned cardstocks, stamps from same set and Distress Embossing Glazes. The colors I used were Walnut Stain, Peeled Paint, Tattered Rose, Antique Linen and Weathered Wood.

Step 8: Stamp Easter greeting from the Tim Holtz Stampers Anonymous Spring Shadows stamp set using Distress Embossing Ink and colorized watercolor cardstock strip from step 4.

Step 9: Place stamped greeting on a scrap piece of paper. Generously sprinkle Distress Hickory Smoke Embossing Glaze over the stamped image. Shake off excess Embossing Powder and return to jar. Heat stamped image with Heat Tool to melt embossing glaze.

Step 10: Cut out all stamped images. Also cut >< in greeting strip to create a banner. Then lightly shade cut outs with Distress Walnut Stain Ink and Blending Tool with Foam.

Step 11: Trim down panels for card base. Attached colorized panel to black card panel, then to kraft A2 card base using Distress Collage Medium.
 Step12: Pick apart colorized Mummy Cloth and adhere to card front for florals to rest on using Distress Collage Medium. Then adhere the stamped images/greeting using a combination of Ranger Letter It Black Foam Roll Tape and Distress Collage Medium. Finish it off by attaching a metal idea- ology bow using Distress Collage Medium.


 My name is Bobbi Smith. I’ve been a crafter all my life, however I really found my niche in paper-crafting about 20 years ago, when my children were young and have never looked back. I love all forms of Art, but really gravitate towards vintage, distress and grunge styles. I live in Illinois and love to hunt for vintage finds, when I’m not paper crafting! Check out my blog at