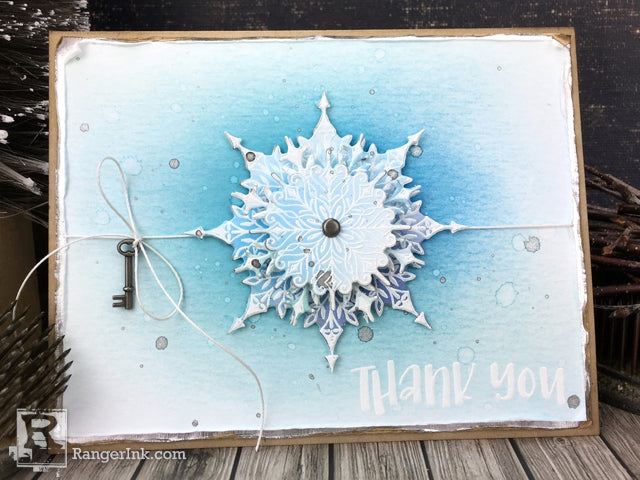
Hi everyone, Bobbi here. I’m so happy to be with you on the Ranger blog today! I’m sharing a really fun Swirly Snowflake Thank You card, with some layering and a little shimmer and shine! Hope you’ll join me.

Snowflake Thank You Card by Bobbi Smith
- Tim Holtz Distress® Oxide Ink Pads: Peacock Feathers, Faded Jeans, Broken China, Salty Ocean
- Tim Holtz Distress® Crayons: Brushed Pewter
- Tim Holtz Distress® Watercolor Cardstock
- Tim Holtz Distress® Clear Embossing Ink
- Ranger Embossing Powders: White
- Tim Holtz Distress® Collage Mediums: Matte
- Ranger Ink Blending Tool & Foam
- Ranger Non-Stick Craft Sheet™
- Ranger Heat it™ Craft Tool
- Tim Holtz Distress® Sprayer
- Dina Wakley Media Brushes
- Ranger Paper Creasers
- Ranger Adhesive Foam Rolls
- Letter It™ Acrylic Stamp Block
- Letter It™ Stamp Sets: Thank You
- Ranger Kraft Cardstock
- Tim Holtz Metallic Kraft Paper Stash: Silver
- Tim Holtz Idea-ology: Sanding Grip, Adornments Key, Long Brad
- Tim Holtz by Tonic Studions: Kush Grip Snips
- Tim Holtz Eclectic Elements Craft Thread
- Tim Holtz Sizzix Swirly Snowflakes Die Set 662436
- Tim Holtz Stampers Anonymous Swirly Snowflakes CMS319 and Mini Swirly Snowflakes CMS320 Stamp Sets
Instructions

Step 1: Place the “Thank You” stamp from the Ranger Letter It Clear Stamps-Thank You set onto the Ranger Letter It Acrylic Stamp Block. Ink the Thank You stamp with Distress Embossing Ink and stamp onto the lower right side of a 5 1/4” x 4” piece of Distress Watercolor Cardstock.

Step 2: On a scrap piece of paper, generously sprinkle Ranger White Embossing Powder over the stamped image. Shake off excess Embossing Powder and return to jar. Heat stamped image with Heat Tool to melt Embossing Powder.

Step 3: Now we’re going to start adding color to the center of the watercolor cardstock. Ink up a blending tool with foam using, Broken China Distress Oxide ink. Swirl blending tool in circular motion onto Non-Stick Craft Sheet to work color in foam (this will help to ensure no hard lines of color). Now very lightly swirl color onto center of watercolor cardstock in circular motion. You’re wanting to achieve gradient color with most concentration in center and fading to lightest outward. If there are any hard lines, just keep swirling color and it should blend and soften.

Step 4: Select 3 snowflake stamps (1 small, 1 medium and 1 large) from the Tim Holtz Stampers Anonymous Swirly Snowflakes and Mini Swirly Snowflakes Stamp Sets. Mount each stamp onto the Ranger Letter It Acrylic Stamp Block. Ink up snowflake stamps with Distress Embossing Ink and stamp onto new sheet of 5 1/2 x 4 1/4 Distress Watercolor Cardstock. On a scrap piece of paper, generously sprinkle Ranger White Embossing Powder over stamped images. Shake off excess Embossing Powder and return to jar. Heat stamped image with Heat Tool to melt Embossing Powder.

Step 5: Select a few different blue Distress Oxide Inks, I chose Broken China, Peacock Feathers, Salty Ocean and Faded Jeans. Ink up a Blending Tool with foam using, Broken China Distress Oxide ink. Swirl Blending Tool in circular motion on Non-Stick Craft Sheet to work color in foam (this will help to ensure no hard lines of color). Now very lightly swirl color onto a portion of the embossed snowflake watercolor cardstock in circular motion. Continue adding color with different shades of blue to add interest to final project. Buff color off white embossing of snowflakes with a clean dry towel.

Step 6: Spritz both sheets of cardstock with droplets of water using the Distress Sprayer, then dry with Heat It Tool. Being careful not to overheat embossed images. This will really bring out the oxidation look in the Distress Oxide inks.

Step 7: Tie off a little Tim Holtz Eclectic Elements Craft Thread to card front and attach a small Idea-ology Adornments Key. Mount snowflakes in center of card front using Ranger Adhesive Foam, one on top of the other, largest to smallest.

Step 8: Snip the prongs off the Idea-ology Long Brad and attach to center of snowflake with a little Tim Holtz Distress Collage Medium Matte. Cut a 4 1/8” x 5 3/8” piece of silver Metallic Kraft Paper Stash. Sand the silver cardstock on a scratch piece of paper using a sanding grip, to expose some of the underlying kraft.

Step 9: Cut a piece of Ranger Kraft Cardstock 8 1/2” x 5 1/2”, then score 4 1/4” x 5 1/2” and fold to create an A2 card base. Attach silver kraft and card front to card base using your favorite adhesive.

If you’re like me, I could use some wintery thank you cards for after the holidays. I hope you’ll give this fun snowflake card a try!


