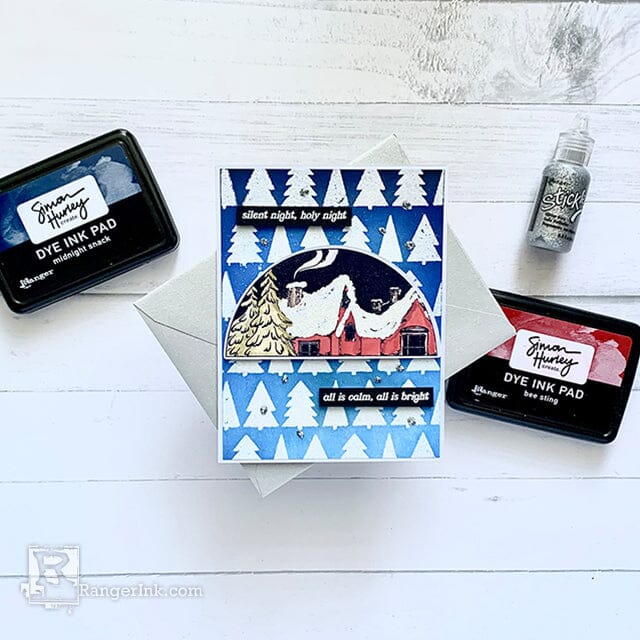
Still immersed in the holiday card-making spirit? Get inspired with this idea! Lieschen Harshbarger works her magic using Simon Hurley create. stamps and dye inks to craft a charming snowy, wintery card in this tutorial.

Simon Hurley create. Woodsy Christmas Card by Lieschen Harshbarger
- Materials
- Instructions
Simon Hurley create. Photopolymer Stamp Winter Wonderland
Simon Hurley create. Spellbinders Winter Wonderland Die
Simon Hurley create. Dye Ink Pad Shady
Simon Hurley create. Dye Ink Pad Midnight Snack
Simon Hurley create. Dye Ink Pad Crown Me
Simon Hurley create. Dye Ink Pad Woof!
Simon Hurley create. Dye Ink Pad No Diving
Simon Hurley create. Re-Inker Game Over
Simon Hurley create. Re-Inker Bee Sting
Simon Hurley create. Re-Inker Weeping Willow
Simon Hurley create. Re-Inker Cookie Dough
Simon Hurley create. Re-Inker Viper
Simon Hurley create. Stark White Cardstock
Simon Hurley create. Acrylic Stamping Blocks
Archival Ink™ Pad Jet Black
Wendy Vecchi MAKE ART Perfect Card Adhesive
Ranger Heat It™ Craft Tool
Ranger Anti-Static Pouch
Ranger Silicone Mat
Ranger Mini Ink Blending Tool
Ranger Mini Ink Blending Tool Domed Replacement Foams
Emboss It™ Ink Pad Clear
Embossing Powder Platinum
Embossing Powder Super Fine White
Embossing Powder Bridal Tinsel
Embossing Powder Clear
Embossing Powder Cotton Tail
Tim Holtz Distress® Embossing Pen
Ranger Artist Brushes
Stickles™ Glitter Glue Silver
Tim Holtz Distress® Black Heavystock
Tim Holtz® Tools by Tonic Studios – Trimmer
Other:
Foam Adhesive
Die Cutting Machine
Scor board
Envelope
Hello crafty friends! Today I’m sharing a card tutorial featuring the Winter Wonderland stamps and dies from Simon Hurley. This is another Christmas card I will be sending to a loved one this Christmas season! I enjoyed making this card, and I hope it gives you inspiration to do something fun and creative today!

Step 1: Begin by creating an A2 card base out of Stark White card stock by trimming an 8½” x 11” piece of cardstock at 5 ½” and then scoring it at 4 ¼”. Next, trim the front panel piece out of Stark White cardstock measuring 5¼” x 4”.

Step 2: On the front panel piece, use the Evergreens background stamp to stamp the images with the Emboss It ink pad. Then heat emboss with Bridal Tinsel embossing powder.

Step 3: Next, ink blend the front panel background with a mini blending tool and use Midnight Snack, No Diving, Crown Me, and Shady inks.

Step 4: On a separate piece of Stark White card stock, use an acrylic block to stamp one of the images from the Winter Wonderland stamp set with Jet Black archival ink. Then, heat emboss with Clear embossing powder. Next, use the coordinating dies to die cut the image.

Step 5: Using Ranger Ink brushes, color the image with Game Over, Bee Sting, Cookie Dough, Weeping Willow, and Viper Simon Hurley re-inkers.

Step 6: Then, use the Tim Holtz embossing pen to ink the snow on the cabin. Once inking is done, heat emboss with Cotton Tail embossing powder.

Step 7: Next, glue the inked background from Step 3 on the card base using Wendy Vecchi MAKE ART Perfect Card Adhesive.

Step 8: Use foam adhesive on the die cut from Step 4 and tape it onto the front panel piece.

Step 9: On a piece of Tim Holtz Distress Black Heavystock card stock, stamp two sentiments from the Winter Wonderland stamp set. Then, heat emboss with white embossing powder.

Step 10: Next, trim the sentiments and use foam adhesive to tape them to the front panel piece. Then, add some silver Stickles to add extra sparkle to the background.

Step 11: Once the Stickles dots have dried, pair the card to a complimentary envelope. Now it’s ready to be sent to a loved one this Christmas!
Your Cart
- Choosing a selection results in a full page refresh.


 Hi! My name is Lieschen Harshbarger. I’m married to my best friend and even though we don’t have children yet, our dog Sophie fills our hearts with lots of love and joy. By day, I work for the State of Texas, but during my evenings and weekends you’ll find me in my craft room – making cards and trying out new techniques with my crafty supplies. I enjoy being creative, but mostly I have enjoyed getting to know others and learning fun new things in this wonderful crafty industry! You can see more of my crafty projects on my blog
