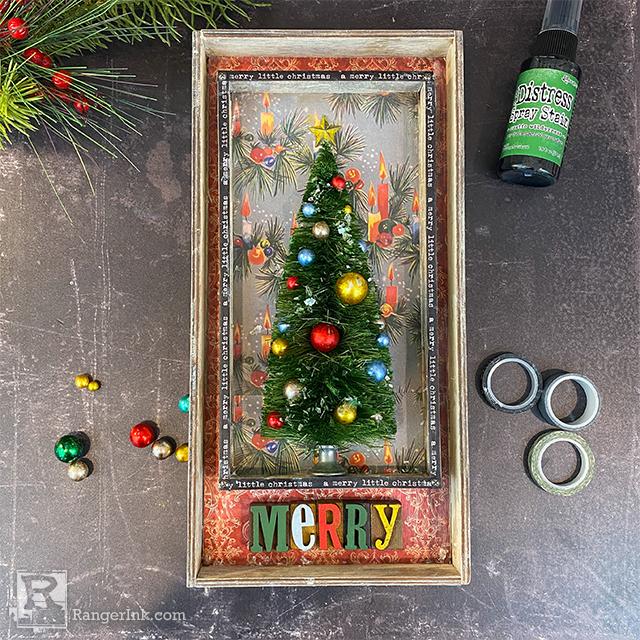
Tim Holtz Distress® Rustic Wilderness is the perfect shade of green to create holiday trees and decorations. Follow along with Cheiron Brandon as she uses this dark, vintage Distress® Spray Stain to create this holiday tree, ornaments and all, to create a great home decor piece for the season.

Rustic Wilderness Vignette Tray by Cheiron Brandon
- Materials
- Instructions
Tim Holtz Distress® Paint: Rustic Wilderness, Antique Linen, Candied Apple, Fossilized Amber, Weathered Wood
Tim Holtz Distress® Ink: Frayed Burlap
Tim Holtz Distress® Collage Medium: Matte
Tim Holtz Distress® Alcohol Ink: Mushroom, Stonewashed, Dijon, Crimson
Tim Holtz Distress® Mica Flakes
Tim Holtz® Idea-ology Vignette Tray
Tim Holtz® Idea-ology Paper Stash, Worn Wallpaper: Christmas/Noel, Letterpress, Baubles, Christmas Trim Tape
Tim Holtz® Idea-ology Hardware Heads, Adornments Stars, Woodland Half Tree, Mini Hardware Findings
Tim Holtz® by Stampers Anonymous Splat Box
Instructions
Hi there crafty friends, it’s Cheiron Brandon here and I have a fun holiday décor project to share with you today using the newest color of Distress, Rustic Wilderness. I couldn’t have imagined a more perfect color for Christmas trees and that is exactly what we are going to make today.

To make this project, you will need a set of Vignette Trays, a Woodland half tree (the back is flat which is perfect for this project) and Rustic Wilderness Distress Spray Stain.

Step 1: Put a Woodland Half Tree inside a Splat Box, and spray with Rustic Wilderness Distress Spray Stain. Let dry.

Step 2: Paint the Vignette Trays with Antique Linen Distress Paint. Paint the sides and the front and the inside walls of the tray. The main part of the trays will be covered with paper, and I plan to hang this on a wall.
 Step 3: Cut pieces of paper to fit inside both of the trays. I used paper from the Paper Stash for the larger tray, and some Worn Wallpaper for the smaller tray. Ink the edges of the paper with Frayed Burlap Distress Ink. Then adhere them to the inside of the tray with Distress Collage Matte Medium.

Step 4: Add trim tape around the edge of the smaller box.

Step 5: Now it’s time to create the colored baubles. Put baubles into small disposable cups (thanks to Tim Holtz for this easy clean up tip). Add Alcohol Inks in Mushroom, Stonewashed, Dijon and Crimson. Gently swirl the baubles around in each cup, pour out onto a paper towel to dry.

Step 6: Time to decorate the tree. Use Distress Collage Medium (Matte) to adhere to colored baubles to the tree. Adhere the small tray into the large tray using Distress Collage Medium.

Step 7: Use Distress Paints to color the letterpress letters. I used paints in Rustic Wilderness, Weathered Wood, Fossilized Amber, and Candied Apple and used a foam blending tool to apply the paint by dabbing the tool into the paint, then dabbing off before applying to the letterpress. Adhere the letterpress letters.
 Step 8: Add Distress Mica flakes to the tree by dabbing Distress Matte Medium on your finger, then onto the tree, then adhering the Mica Flakes.

Step 9: To finish the piece, add hardware heads to the four corners of the inside tray. Paint an Idea-ology Adornment star with Fossilized Amber Distress Paint and adhere above the tree.


