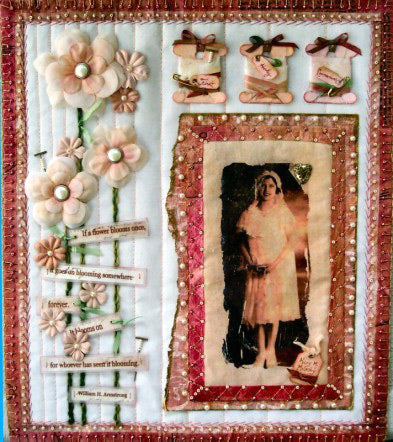
Did you know that Perfect Pearls and fabric are a great combination? This stunning quilt is the perfect example!

Perfectly Quilted Wall Hanging By Lisa Dixon
- Materials
- Instructions
- Tim Holtz Distress® Ink Pads
- Ranger Mini Misters
- Ranger Heat it™ Craft Tool
- Ranger Glossy Accents™
- Ranger Non-Stick Craft Sheet™
- Ranger Cut n’ Dry™ Foam and Felt Pads
- Ranger Brayers
- Ranger Ink Refresher
- Perfect Medium™
- Perfect Pearls™ Pigment Powder Kits
- Rubber Stamps, Botanicals (2500), Autumn Leaves, autumnleaves.com
- Eyelet, Safety Pins and Dressmaker Pins, Making Memories, makingmemories.com
- Vellum, Grafix, grafixarts.com
- Patterned Paper, Signature Suite Collection, My Mind’s Eye, mymindseye.com
- Dressmaker’s Pattern Tissue
- Jewelry Tags, Avery, avery.com
- Pearl Beads and Floss Bobbins, Nicole, sbars.com
- Glass Seed Beads, Mill Hill, millhill.com
- Silk Ribbons, Bucilla Corp., bucilla.com or plaidonline.com
- Paper Flowers, Prima Marketing, primamarketinginc.com
- Pearl Brads, K&Company, kandcompany.com
- 12” x 14” rectangles white muslin, scrap fabric and Pellon quilt batting
- Sewing Threads, Coats and Clark, coatsandclark.com
- Yarn, Atacama by Araucania, araucaniayarns.com
- Needles and Embroidery Floss, (E316, 5282, 3347, 223), DMC, dmcusa.com
- Other – scrap fabric, white felt, white muslin, natural muslin, color photocopy of vintage photograph, waterbrush, iron, white silk flowers, foam paint brushes, metal heart charm
Instructions
Create the Photo Transfer
(1) Pre-wash natural muslin fabric to remove sizing. Spritz wet muslin with Terra Cotta Color Wash and rinse to remove most of the color. Let dry and iron flat.
(2) Determine placement of photo transfer on fabric and use a foam brush to paint a coat of Perfect Fabric Medium directly onto the front of your color photocopy. Determine placement of photo transfer on fabric and burnish the image onto the muslin using brayer. Dry with Craft Tool or iron on the back of the fabric.
(3) Spray the back of the transfer with Mini Mister containing water and begin to remove the paper revealing the image transfer. Continue to wet and rub off remaining photocopy paper.
(4) On Non-Stick Craft Sheet use a water brush to mix Blush Perfect Pearls with Perfect Fabric Medium and water to create a diluted, translucent glaze for fabric. Brush the glaze over the photo to seal and protect the transfer. Allow to dry.
Glassine Tissue Paper for Quilt Border and Photo Mat
(5) Spray a piece of dressmaker’s pattern tissue with Mini Mister and water, followed by Cranberry, Wild Plum and Butterscotch Color Washes. Rinse carefully as the wet tissue is very fragile. Set tissue aside to dry.
(6) On Non-Stick Craft Sheet create paint with Perfect Fabric Medium and Blush and Perfect Pearl color Perfect Pearl Pigments Powders. Paint one side of the dyed tissue. Don’t worry about wrinkles in the tissue as this creates a nice effect.
(7) When the first side is completely dry, turn tissue over and apply a coat of the Fabric Medium/Pigment Powders paint to the other side. When completely dry you will have a strong, luminous tissue paper resembling raw silk.
Faux Leather Paper for Quilt Border and Photo Mat
(8) Working on the Non-Stick Craft Sheet spray patterned paper with Perfect Ink Refresher and work into the paper. Carefully crumple wet paper then smooth out.
(9) Use a soft brush or your fingers to apply Perfect Gold and Blush Perfect to the patterned side of the paper.
(10) Dry and smooth paper with a craft iron.
Silk and Paper Flowers
(11) Use Non-Stick Craft Sheet™ as a palette to create luminous paints. Use a water brush to pick up some Perfect Pearls™ Pigment Powder. Mix into paint on the craft sheet. For a thicker paint use less water; for a thinner, translucent paint use more water.
(12) Mix three different paints using Blush, Perfect Gold and Berry Twist Pigment Powders.
(13) Apply the various paints using brush tip brush to a variety of white silk flowers and to several small mulberry paper flowers.
(14) When the paints dry the powders are fixed. Layer two to three silk flowers and add pearl brads to the centers to create three different sizes of larger flowers. Set all flowers aside.
Quotation Strips
(15) Type quotation into computer and change font color to a dark brown color.
(16) In a small cup, mix together Clear Super Fine Detail™ Embossing Powder and Blush Perfect Pearls™ Pigment Powder.
(17) Print out quotation onto vellum and while ink is still wet sprinkle on embossing powder mixture; shake off excess and place into a new container to keep for another project.
(18) Emboss with Craft Tool.
(19) Cut quotation into phrases and back with small scraps of text patterned paper.
(20) Use a small square of Cut n’ Dry™ Foam to ink the edges of the phrases with Aged Mahogany Distress Ink™. Set aside.
Floss Bobbin Embellishments
(21) Use Non-Stick Craft Sheet™ as a palette to create dyes for the floss bobbins.
(22) Spray tiny amounts of Cranberry, Wild Plum and Butterscotch Color Washes onto the Craft Sheet.
(23) Spritz with water to dilute the dyes. Create several puddles of the three colors on the craft sheet.
(24) Wet three embroidery cardstock floss bobbins then place them in the different dyes.
(25) Blot bobbins with paper towel and dry with Craft Tool.
(26) Use a small square of Cut n’ Dry™ Foam to ink the edges of the bobbins with Aged Mahogany Distress Ink™. Tear thin strips of white muslin and wrap around the cards.
(27) Ink floral rubber stamp with Perfect Medium™ stamp pad and stamp the image onto each muslin-wrapped floss card.
(28) Use cosmetic brush to brush on Blush, Perfect Gold and Green Patina Perfect Pearls over the images.
(29) Wrap silk ribbons around cards and tie silk ribbon bows to the top of each card.
(30) Embellish with tiny inked jewelry tags, small safety pins and beaded dressmaker pin. Set aside.
Putting It All Together!
(31) Sandwich 12” x 14” quilt batting between the white muslin and scrap fabric pieces; baste the layers together to prevent shifting.
(32) Use sewing machine threaded with salmon-colored thread to sew vertical lines through all of the layers. Be sure to work from the center out when you sew to reduce puckering and bunching.
(33) Vary the distance between the vertical sewn lines so they gradually increase in width from ¼” to 1¾” moving from the left to right.
(34) Sew border lines all around to create a 10½” x 12” piece, cutting off excess fabric leaving about 1/8” from each sewn border.
(35) Cut a 5½” x 8” rectangle from faux leather paper. Tear one side and emboss the edges using Clear Embossing Ink, Ancient Gold™ Princess Gold Embossing Powder and Craft Tool.
(36) Cut muslin with photo transfer to 4¼” x 7¾”.
(37) Cut two 1” x 8” strips and two 1” x 5” strips from glassine tissue. Wrap the ends of the photo transfer fabric with the tissue strips. Tack down with a very small amount of Glossy Accents and miter the corners. Hand-sew a zigzag pattern around the tissue border using gold metallic embroidery floss and glass beads.
(38) Sandwich a 4” x 7½” piece of quilt batting between the photo transfer and the embossed faux leather paper. Hand-sew the beaded photo transfer using decorative herringbone stitch with gold metallic embroidery floss. Attach a gold heart charm with Glossy Accents. Add an inked jewelry tag embellished with name, silk ribbon and torn muslin strip.
(39) Hand-sew the matted photo transfer to the bottom right of the quilt background using gold floss and pearl beads approximately 1” from the right side and bottom of quilt.
(40) Using the vertical quilted lines as a guide, use green embroidery floss to backstitch three flower stems on the left side of the photo transfer. Then use a decorative double-threaded backstitch with soft yarn fiber to complete the stems.
(41) Tack down three large painted silk flowers with needle and embroidery thread at the tops of the stems.
(42) Arrange small, painted paper flowers among the stems and sew to the quilt adding pearl beads to each center.
(43) Add the quotation strips among the flowers and stems tacking down with needle and embroidery thread. Tie bits of green silk ribbon to some of the phrases and stems for leaves. Add two beaded dressmaker pins among the flowers and phrases.
(44) Add the floss bobbin embellishments in a row above the photo transfer. Attach with a strong double-sided tape and secure with a sewn stitch from the back.
(45) Cut two strips (5/8” x 11”) and two strips (5/8” x 12”) from faux leather paper and use a light adhesive to tack onto the top, bottom and sides of the quilt. Trim off excess.
(46) Cut two 1” x 11” strips and two 1” x 12½” strips from the glassine tissue. Wrap the ends of the top, sides and bottom with the tissue strips with 3/8” showing on the front. Tack down with a tiny amount of Glossy Accents™. Hand-sew the borders using a decorative blanket stitch with gold metallic embroidery floss and pink seed beads.
(47) On the inside faux leather paper border, hand sew using a decorative fly stitch with pink embroidery floss and tiny white seed beads.
(48) Cut a 10¼” x 12” rectangle of white felt and stitch or glue to the back of the finished quilt.


