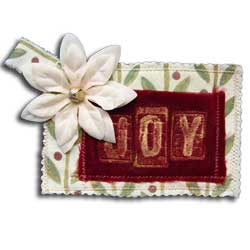
Make this joyous gift card holder with Perfect Pearls Powders, Mists and Perfect Fabric Medium.

Perfect Pearls™ Joy Gift Card Holder Ornament By Lisa Dixon
- Materials
- Instructions
- Archival Ink™ #0 Pads
- Ranger Mini Misters
- Ranger Heat it™ Craft Tool
- Ranger Non-Stick Craft Sheet™
- Perfect Pearls™ Pigment Powder Kits
- Perfect Medium™
- Perfect Pearls™ Pigment Powders
- Jingle Bell - AC Moore
- Alphabet Stamps - Phlax Alphabet (SH700), Stampers Anonymous
- Floral Border Stamp - Michaels
- Silk Flower Poinsettia - AC Moore
- Other: unbleached muslin, water, red rayon or silk velvet, cream felt, needle, pinking shears, iron, sewing machine, white cotton thread, white embroidery floss
Instructions
(1) Cut one four inch by seven inch rectangle of unbleached muslin.
(2) Ink the floral border stamp with Olive Archival Ink and stamp in a vertical pattern over the entire surface of the muslin.
(3) Working on the Non-Stick Craft Sheet, mix together Perfect Fabric Medium and Perfect Pearls Pigment Powders with a detail brush to create creamy paints. Make three different paints with Forever Green, Forever Red and Sunflower Sparkle Powders. Use the detail brush to paint in the stamped images. Forever Green for the leaves, Forever Red for the berries and Sunflower Sparkle for the stems and highlights on the leaves.
(4) Once the stamped and painted fabric is completely dry, iron on the back side to remove wrinkles.
(5) Cut one rectangle from the velvet about three inches by four inches.
(6) Turn on your iron to the cotton/linen setting. Place the “J” stamp on your work surface with the rubber side facing up. Position the velvet on top of the rubber stamp with the fuzzy side (the right side) of the fabric facing down. Mist the wrong side of the velvet with water. The fabric should be slightly wet but do not soak the velvet completely. Place the iron directly onto the wrong side of the velvet atop the rubber stamp. (If your iron has steam holes, avoid pressing them onto the velvet as they may make a pattern on the velvet.) Press down gently and hold the iron in place for fifteen to twenty seconds. Lift the iron to check the impression. You will see the outline of the stamp from the back of the fabric when it is done. You may need to replace the iron for an additional fifteen seconds or so. Repeat this embossing step for the letters “O” and “Y”.
(7) Working on the Non-Stick Craft Sheet, mix together Perfect Fabric Medium and Perfect Pearls Perfect Gold Pigment Powder with a detail brush to create a creamy paint. Use the detail brush to paint in the embossed letters on the right side of the velvet. Set aside to dry and then trim the velvet to two and one-quarter inch by three and three-quarter inches.
(8) Cut one three and three-quarter inch by five and one-half inch rectangle from cream felt and cut one three and three-quarter inch by five and one-half inch rectangle from the painted muslin. Sandwich the two fabrics together and sew around the perimeter using a one-half inch seam allowance. Sew the embossed velvet rectangle atop the muslin, offset to the bottom right. Sew only the bottom and short sides of the velvet to create the pocket.
(9) Use pinking shears to trim each side of the sewn ornament so it measures three and one-quarter inch by five inches.
(10) Use a three-quarter inch by three inch scrap of the leftover painted muslin to create a hanger for the ornament. Fold the scrap in half and sew to the top left corner of the ornament.
(11) Working on the Non-Stick Craft Sheet, spritz the white silk poinsettia with Perfect Pearls Mist in Interference Red. Use the Perfect Pearls Dusting Brush to brush on a small amount of Blush Perfect Pearls Pigment Powder to the flower. Let dry or speed drying with the Heat-it Tool. Use cotton floss and a needle to hand sew the flower to the top left corner of the ornament.
(12) Cover a small jingle bell with Perfect Medium and brush with Perfect Gold Pigment Powder. Mist with water to set the powders and dry with Heat-it Tool. Allow the bell to cool and then use cotton floss and a needle to hand sew the bell to the center of the flower to complete your project.


