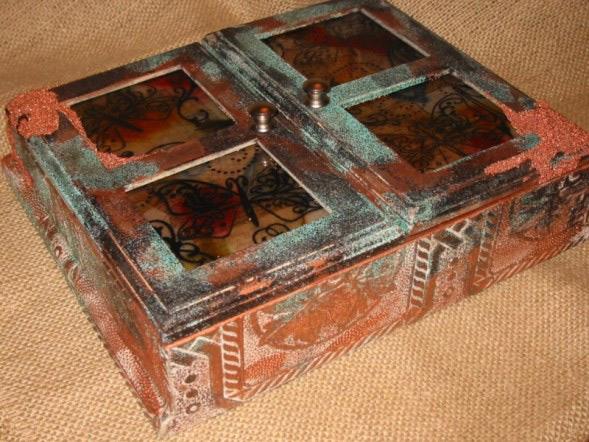
With a flea market find or a craft store wooden box, create this gorgeous Patina’ed Box with embossing powders!

Patina’ed Display Box By Lauren Ferguson-Nwachukwu
- Materials
- Instructions
- Tim Holtz® Alcohol Ink Applicator
- Tim Holtz® Alcohol Inks
- Perfect Pearls™ Pigment Powder Kits
- Ranger Non-Stick Craft Sheet™
- Ranger Heat it™ Craft Tool
- Tim Holtz Distress® Clear Embossing Ink
- Ranger Emboss It™ Ink Pad
- Ranger Embossing Powders
- Ranger Matte Accents™
- Matte Gel Medium, Liquitex, liquitex.com
- Microbeadz, Brown, Art Accentz, provocraft.com
- Textured Wallpaper
- Patterned Vellum Paper, Tapestry by C.R. Gibson, crgibson.com
- Stipple Brush
- Rubber Stamps, Technique Tuesday, BoHo Buzz, techniquetuesday.com; Autumn Leaves, Rhonna Farrer Swirls and Flourishes, autumnleaves.com
- Small Foam Brush
- Matte Perfect Paper Adhesive, US Artquest, usartquest.com
- Craft Knife
- Scissors
- Display Box
Instructions
Preparing the Box:
(1) Disassemble the box by unscrewing the doors from the hinges, taking out the class and any backing for the glass.
Patina’ed Textured Wallpaper:
(2) Cut a piece of textured wallpaper at least two times the size of the box. This will allow enough excess paper for both the interior and exterior sides of the box.
(3) Mix Matte Gel Medium and with Perfect Pearls Copper Pigment Powder; mix a small amount at a time and mix it thoroughly. Continue to add the Copper Pigment Powder until you have achieved the desired tone of rich copper. Note: For a darker copper tone, add other Perfect Pearl Pigments, mixing them thoroughly. (I added a bit of the bronze to get my color.)
(4) Using a small foam brush, paint an even coat over the textured wallpaper. Option: when the first coat is dry you may paint a second coat. Note: dabbing the brush into the crevices and then painting it out evenly will allow for complete coverage in the nooks and crannies of the textured wallpaper surface.
(5) Once the wallpaper is completely dry, load a stiff stipple brush with Distress Clear Embossing Ink and work into random areas of the wallpaper surface. Remember that you are going to be layering the various embossing powders, so you want a haphazard look.
(6) Shake Black Soot Distress Powder thoroughly. Sprinkle over inked areas and emboss with heat tool. When cool, rub the embossed areas like the dickens until release crystals have been removed.
(7) Repeat steps 4 and 5 with the Verdigris Embossing Antiquities until you get the desired look.
Wrapping Box with Textured Wallpaper:
(9) Place paper upside down on table and center box on the paper; trace an outline around the box. Cut outline of box; this will fit on the inside, back surface of the box. Note: the excess paper will be used for the interior and exterior sides of the box.
(10) Use Matte Perfect Paper Adhesive or liquid adhesive of choice and glue down inside piece of textured wallpaper.
(11) Once you have the glue down, place the paper inside and then take a craft knife and carefully cut away the excess. Option: measure the inside of the box and trim before placing into box, but be sure it is accurately cut!
(12) Utilize the excess paper to match up the pattern of the textured wallpaper to the glued in piece and glue that to the interior sides. Let dry.
(13) Repeat steps 11 and 12 for the exterior sides of the box.
(14) Take the extra Perfect Pearls mixture that you made for the paper and paint any unpainted or unembossed areas to create additional color and texture.
Finishing the Glass Doors:
(15) Ink stamps with Black pigment ink side of Big n’ Bossy Two Tone Embossing Stamp Pad. Sprinkle on Black Superfine Detail Embossing Powder. Shake off excess and emboss with Heat Tool. Allow to cool.
(16) On opposite side of glass apply Adirondack® Alcohol Inks of choice with Ink Applicator. All that is needed is a drop of each color on the felt; tap and twist the Alcohol Ink Applicator to get a mixture of color.
(17) Apply Patterned Vellum Paper to Alcohol Inked side of Glass with adhesive. Let dry.
(18) Replace glass into doors.
(19) Screw doors back on box.
Embellishing Outside of Box:
(20) Using Matte Accents, dribble down the sides of the box and apply Brown Microbeadz.
(21) To get a layered effect continue this in layers.
(22) Let some of the beads mixed with Matte Accents drip down the front of the glass and over the sides of the box. Allow to dry completely.


